Content Updating
Make SURE you set up File Server Host and URL Base Path in Site Settings, otherwise content updating will not work.
Make SURE you read the IIS Setup section for important information in setting up IIS properly.
Content updating is probably the most complex but most useful part of KioWare Server. There are several different, but related, types of content updates:
- Kiosk: Content that will only be pushed out to one kiosk.
- Project: Content that is specific to a Project of kiosks.
- Site: Content that is specific to a Site.
- Group: Content that is specific to a Group.
Explaining the differences between Projects, Sites and Groups: Grouping.
Revisions
The first step in content updating is setting up what is called a revision. A revision is a name that is similar to a version number, but it does not need to be numeric. The name is simply a reference point for you.
In this dropdown list:

Settings Tab
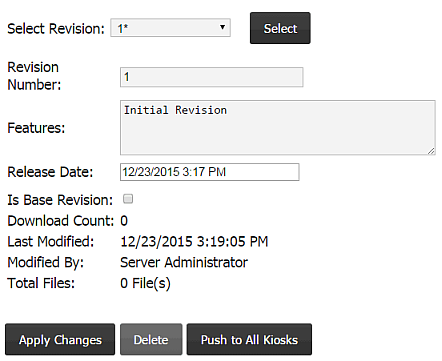
You can either select an existing revision to modify or create a new revision. By default, Add New Release is selected in the box. Click Select. You are given more options:

Tab Options
- Select Revision: Gives you the ability to move to a different revision.
- Revision Number: Name that is similar to a version number, but it does not need to be numeric. It is simply a reference point for you.
- Features: Optional description of revision.
- Release Date: Date and time the revision can be pushed out to the kiosks. This date can be changed to anything you want. You can schedule an update for 10/1/2899 1:05:31 AM if you wanted. Keep in mind that this date is compared with the kiosk's date. If the kiosk says it's the year 2900, it will receive the update.
- Is Base Revision: Indicates that this content update is meant to be a content starting point for your kiosks. If checked, no matter where this update is listed, every revision before it will be cleared out when the kiosk goes to pull the update. When revision names are listed in the console, those that are considered base revisions wil be listed in bold and red (if possible) and denoted with a star so that you know they are base revisions.
- Delete: Deletes the revision and removes it from all kiosks set to download it.
- Push to All Kiosks: (only available at the Site, Project, or Group level) Sets the revision to be downloaded by all kiosks within the Site, Project, or Group.
- Push to Kiosk: (only available at the kiosk level) Sets the revision to be downloaded by the currently displayed kiosk (can be within a Site, Project, or Group).
When you finish filling in the appropriate fields, click Apply Changes. You are given a Files tab and a Delete button. If you press the Delete button, the revision will be deleted and any Kiosks, Projects, Sites, or Groups set to download it will be reset.
Files Tab
This tab shows a list of files currently assigned to the revision (if there are any) and allows management of the list of files.

Tab Options
- Select: Gives you the ability to move to a different revision.
- Add File: Adds a file to this release (see Add File below).
- Delete Selected: Removes any files that have the Sel checkbox checked.
- Update Client Paths: Updates paths on the KioWare Client application (see Update Client Paths below).
- Apply Changes: Saves changes to this tab.
Add File
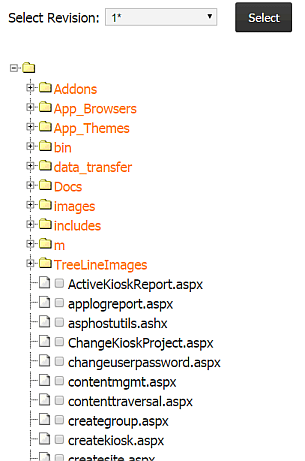
This button will usually show a tree view file browser that will allow you to select files to add to the revision. If the URL Base Path in settings cannot be found (could be on a different web server), you will need to enter files in one at a time, or change the URL Base Path.
Click the Add File button. If URL Base Path was found, you will see this file selector:

- Add Selected Files: Adds the selected files to a temporary file list. Apply Changes will need to be pressed to save the files to a revision permanently.
- Add File Manually: Adds a file by manually entering the file information (see Add File Manually below).
- Cancel: Exits the file picker without adding files.
To add all files in a directory recursively, simply click on a directory. If you click on it again, those files will be de-selected.
Add File Manually
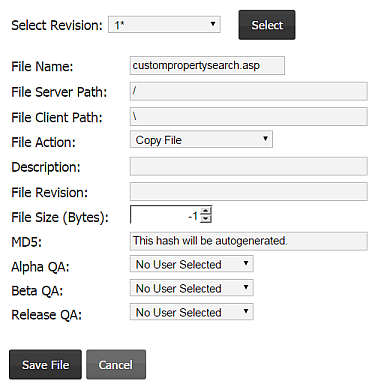
Click the Add File Manually button. You will see this page:

- File Name: A filename with no path.
- File Server Path: Path beginning with / and ending with /. This path is relative to the URL Base Path.
- File Client Path: Path beginning with \ and ending with \.
- File Action: See File Actions below.
- Description: Optional description of file.
- File Revision: Optional second description of file.
- MD5: A unique value that will identify the file for validation purposes (see MD5 Hash Generation below).
- Alpha QA: Optional person who did this testing.
- Beta QA: Optional person who did this testing.
- Release QA: Optional person who did this testing.
MD5 Hash Generation
It is important to understand that MD5 hash generation is a process that is done in the background by the KioWare Server service. A revision should not be set to be downloaded until all file hashes have been generated, otherwise the entire content update may fail.
Note: To check if a file hash is finished being generated you must exit out of the content updating section and go back in.
Update Client Paths
It is sometimes necessary to change the structure of directories; making paths on the client different than paths on the server. For instance, you may have revision directories that aren't supposed to be shown on the client. With this feature it is possible to strip those out.

- Path to Replace: File path to look for and replace with Path to Change to.
- Path to Change to: See former.
- Apply: Permanently changes the file paths.
- Cancel: Cancels the operation.
If Sel checkboxes are checked, only the checked files will be considered, otherwise all files in the revision will be considered.
File Actions
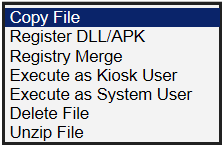
File Actions refer to actions that KioWare will perform with a file after it has been downloaded to the kiosk. There are several actions that KioWare can perform and they include:

- Copy File: Default action. The file is downloaded and that's it.
- Register DLL/APK: The file will be registered with the system. This is only valid for .dll, .ocx, .exe, and .apk files. Note: In order to register the KioWareSamsungSupport.apk file, the file must be installed on the Android device, and Device Administrator mode must be turned on in the KioWare for Android Configuration Tool (see Configuration Tool, Samsung KNOX Tab, Enable Device Administrator in the KioWare for Android user guide).
- Registry Merge: For .reg files only. The .reg file will be written to the registry.
- Execute as Kiosk User: The file will be executed on the system. This is normally for .bat or .exe files to perform various tasks on the kiosk.
- Execute as System User: The file will be executed by the KioWare service. This enables you to overwrite the KioWare.exe to perform a KioWare update. Another advantage of the System User is that it enables administrative tasks to be done on the kiosk, even if the kiosk runs as a non-admin user because the KioWare service (as all services do) runs with full access to the system.
- Delete File: Deletes a file (starting in the base directory).
- Unzip File: A zip file is downloaded and unzipped into the base directory.
Updating KioWare Client Settings
Note: This section only applies to KioWare Classic for Windows. In both KioWare for Windows and KioWare for Android, you do not need to load settings from KioWare Server. Instead, use the remote settings feature on the General tab of the Configuration Tool. In KioWare for Windows, this includes the settings in the Remote Settings Configuration section (see Configuration Tool, General Tab, Remote Settings Configuration in the KioWare for Windows user guide); in KioWare for Android, it includes the settings in the XML Settings section (see Configuration Tool, General Tab, XML Settings in the KioWare for Android user guide).
Updating KioWare client settings from KioWare Server involves the following process:
- Turn on Content updating at the client from the Server tab of the Config Tool.
- Save out a KioWare XML file by selecting File, Save Settings to File (in KioWare Classic for Windows), opening the top left Hamburger menu and selecting Export Settings (in KioWare for Windows), or selecting the top right Export XML Settings button (in KioWare for Android).
- Create the batch file shown here (beside the -xml flag). Since this example is sending the XML file to the kiosk, the xmlPath variable in the batch file should be changed to the name of your XML file prepended by %cd%\. The %cd% variable will be replaced with the current working directory path. This is necessary for KioWare to find the XML file.
- Create a content update with the batch file and XML file, making sure to keep them together in the same directory.
- Set the file action of the batch file to Execute as System User.
- Assign the revision to the kiosk and wait for the update to happen.
Automated KioWare Client Licensing
Note: You need at least r428 of the KioWare Config tool.
Service commands can be used to completely automate the KioWare client licensing process. Below, steps are provided that detail how to accomplish this. Note that this method assumes that KioWare is installed at C:\Program Files\KioWare, which is the default. If it is not, you will have to change the batch file below to match your setup.
- Create a new file called autoLic.bat. Note that you need to show file extentions in Windows to name it a .bat file.
- Copy and paste the code below into the file.
- Change the /tn="FillIn" and /ac="FillIn" to equal your transaction number and authorization code (quotes should be left there).
- Set up a Site or Project content update including the autoLic.bat file, setting the File Action to SystemCommand.
- Assign the content update to any kiosk you want to license.
  rem This assumes that KioWare is installed in the default location on your system
  rem Keep in mind that this will only work on clients that are still in demo mode

  rem Navigate to the KioWare install directory
C:\
cd "\Program Files\KioWare"
  rem Run the config tool passing in the transaction number and authorization code
  rem Replace FillIn with your transaction number and authorization code
KioWare_Config /tn="FillIn" /ac="FillIn" /kiosklevel=3 /silent /register
KioWare_Update_Tool.exe
At times it's convenient to update a KioWare installation remotely by pushing down a content update. Along with the process described above (see Updating KioWare Client Settings), you can also deploy the KioWare_Update_Tool.exe. This is the preferred method to update KioWare using a content update for several reasons. Not only does it do the copy, it also gets the correct install path of KioWare automatically. It logs to the event log. It also will reboot the machine if a reboot is necessary. For instance, if the KioWare service needs to be updated, a reboot will be necessary because the service is always running.
Using KioWare_Update_Tool.exe:
Warning: Do NOT use the KioWare update tool if the kiosk you are updating is not running the KioWare shell. The reason that we highly discourage this practice is that while the update tool is running, the computer is completely vulnerable because KioWare isn't active to protect it. Other applications on the system can also cause a reboot of the system to stop, in which case, someone would have full access to the computer for as long as they want.
Warning: The update tool does NOT delete installers after the install completes. The reason this matters is in the case where you send down another installer that will be run from the same directory that you ran the last one from. We suggest that you place the update tool and the update files in a uniquely named sub-directory each time.
- Add KioWare files (KioWare.exe, CS Utility Lib.dll, KioWare_Config.exe, KioWareDotNet.dll ...) to a content update.
- Add KioWare_Update_Tool.exe as well.
- Set the File Action of KioWare_Update_Tool.exe to Execute as System User.
- Release the update.
A full KioWare installer can be sent down instead of individual files. Keep in mind that the installer takes much longer to finish than replacing files, leaving the desktop exposed.
Assigning Revisions to Kiosks
Before a kiosk can receive a content update from the server, the kiosk has to be assigned a Download Revision. For all group types except Groups, revisions can be assigned to kiosks from the Kiosk Settings. For groups, they are assigned from the Group Settings and are assigned to all kiosks within the group.
Content Auditing
Content Auditing is alot like Content Updating in that a list of files is downloaded by the kiosk. This list of files is used to check that all content that should be on the kiosk, is not only there but is also uncorrupted. For each file in this list, a MD5 hash is checked against the files on the kiosk. If the MD5 hash is empty a filesize is used to determine if a file is the proper size. Results of the audit will be written to the kiosk event log.

- Add File: Shows a list of revisions that allow you to select files to add to the audit list.
- Delete Selected: Deletes selected items from the audit list.
- Apply Changes: Saves the audit list.
Content Updating Priorities
Warning - semi-technical
When content updates are handled on the server, content is gathered and merged together in this order:
- Site Content
- Group of Groups Content
- Group of Projects Content
- Group of Kiosks Content
- Project Content
- Kiosk Content
If files of the same name exist in different groupings, kiosk content will always have priority. For example, if a file called kio.html is part of a Project Content revision and the same file is part of a Kiosk Content revision and a Site Content revision, the Kiosk Content file will be sent and the others will not. The reason being is that even if they were sent, they'd just be overwritten on the client anyway (why waste bandwidth and processing if you don't have to).
Useful Knowledge
This section is layed out as a kind of FAQ for content updating. Below you will find things that will help when encountering certain road blocks in your content updating process.
Important IIS Setup
When setting up IIS, you will want to keep in mind that if you are using a server side scripting language such as ASP, ASP .Net or PHP, you will probably want to stop the update files from being rendered when they should be downloaded instead. You will also want every file no matter what extension it has to be granted access for downloading. To do this:
IIS 6 Setup
Note: This setup applies to Server 2003 and higher.
- Open IIS.
- Right click on the directory that you have set up to hold KioWare content update files.
- Select Properties.
- Set Execute Permissions to None.
- You may also want to turn on Directory browsing for the convenience of being able to click on files from the kiosk machine to test if they will be downloaded correctly.
- Create an application on the directory by pressing the Create button.
- Press the Configuration button.
- Remove all but one mapping from the list. The one you keep should be a file extension that you will never put in that directory because that file type may download differently than what is on the server, which will cause checksum validation to fail in KioWare. Do not remove all of them because IIS may automatically populate the list with defaults. Press Ok when done.
- Go to the Documents tab.
- Uncheck Enable Default Document.
- Go to the HTTP Headers tab.
- Click the File Types button.
- Add a new type of ".*" "application/octet-stream".
IIS 7 Setup
Note: This setup applies to Server 2008, Vista, Windows 7, and higher.
- Open IIS 7.
- Right click on the virtual directory you created for content update files. Note: It does not matter if you created the virtual directory under the KioWare Server application or not.
- Select Convert to Application and press Ok.
- Create a file called web.config inside your content directory then copy and paste this code into it:
<configuration>
<system.webServer>

<directoryBrowse enabled="true" />
<defaultDocument enabled="false" />

<staticContent>
	<clear/>
	<mimeMap fileExtension=".*" mimeType="application/octet-stream" />
</staticContent>

<handlers>
	<clear/>
	<add name="StaticFile" path="*" verb="*" modules="StaticFileModule"
resourceType="Either" requireAccess="Read" />
</handlers>

<security>
	<requestFiltering allowDoubleEscaping="true">
		<!-- Allow all files with 'web.config' name. -->
		<fileExtensions>
			<clear/>
		</fileExtensions>
		<!-- Allow all folders with 'bin', 'App_code', 'App_Data', etc names. -->
		<hiddenSegments>
			<clear/>
		</hiddenSegments>
	</requestFiltering>
</security>

</system.webServer>

</configuration>
- Create another directory inside your content directory that will hold all of your files. In KioWare Server, your update root will be this directory, NOT the first one. The reason that this step is important is two-fold:
1. When listing files from the KioWare Server console, you will not be able to accidentally send down files inside the first content directory.
2. It will give you the ability to send down your own web.config file if you need to.
Replacing Files Using a Batch File
Replacing or simply copying files using a batch file is a very simple task. Let's say there is a file called databaseFile.mdb in C:\Program Files\KioWare\ that you want to replace. First of all, it could be in use by KioWare, so you would want to use Execute as System User to run the batch file. Second, the database could be in use by IIS (web server in Windows). In this case you would need to call something like iisreset to unlock it. Below is an example batch file that performs this task.
  rem This is a batch file comment (it's not executed)
  rem Nice to know when this happened
echo %date% %time% >> results.txt
  rem stop IIS just in case the file is in use by it
iisreset /stop >> results.txt
copy "databaseFile.mdb" "C:\Program Files\KioWare" >> results.txt
  rem start IIS when task is done
iisreset /start >> results.txt
  rem 2 blank lines
echo. >> results.txt
echo. >> results.txt
Our suggestion when running a batch file is to write the output of the batch file to another file so that if something goes wrong, there is a log that may expain why it failed. The >> writes to the end of results.txt to perform this task.