Administration Tool
Kiosk Management
This page is used for configuration, management and reporting of individual kiosks. The header displays the kiosk name, unit name and description. To the right is a graphical status bar of the kiosk's current status: red (currently has error(s)), yellow (currently has warning(s)) or green if it has neither errors nor warnings.

Beside the kiosk name, you will see a Connect button. When this button is pressed it redirects the browser to the Remote Management Connection Hyperlink Format setting of the Site. This setting is normally the last IP address that the kiosk connected to the server with and :5800 appended at the end. This is used for remotely connecting to the kiosk through VNC.
To use VNC from the browser you will usually need to have the Java Runtime installed on your system. On the client (kiosk) you're connecting to you will need to install something like UltraVNC Server and make sure port 5800 is open and not blocked by a firewall. Also make sure that Enable JavaViewer (Http Connect) is checked in the Admin Properties of UltraVNC Server.
Status History
For a status history of the kiosk, click the  after the kiosk description (see above image). A listing of all past status changes for the kiosk will be displayed showing the status (red, yellow, or green icon) and the timestamp that the status occurred.

If the status was manually reset to green, it will be indicated. KioWare Server will reset a kiosk to green whenever a heartbeat shows that the problem has been fixed (ex, a printer with a low paper warning that has new paper added, etc); however, status changes due to event log errors/warnings must be manually reset. To manually reset the kiosk, click the Reset Kiosk to Normal button. Click Details to see what caused the status change.
Reports Tab
Reports here only apply to the individual kiosk. To view reports based upon many kiosks use the Site, Project or Group reports.
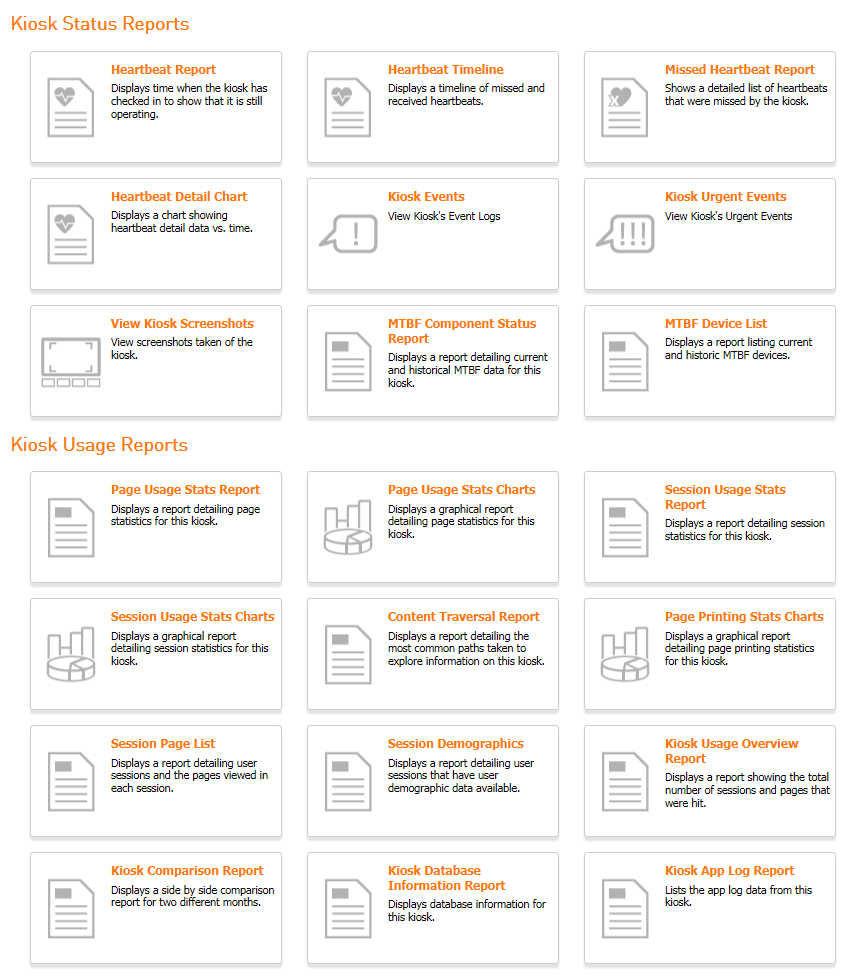
Tab Options
Kiosk Status Reports
- Heartbeat Report - Shows when a kiosk has checked in to see if it is still operating (see Heartbeat Report below).
- Heartbeat Timeline - Shows a timeline of missed and received heartbeats for a kiosk (see Charting, Heartbeat Timeline).
- Missed Heartbeat Report - Shows details on missed heartbeats for a kiosk (see Missed Heartbeat Report below).
- Heartbeat Detail Chart - Shows a graphical report for heartbeat detailed data vs. time (see Charting, Heartbeat Detail Chart).
- Kiosk Events - Shows Event Logs for a kiosk (see Kiosk Events below).
- Kiosk Urgent Events - Shows the urgent events for a kiosk. It is just like Kiosk Events below, but it shows only urgent events.
- View Kiosk Screenshots - Shows screenshots taken for a kiosk (see View Kiosk Screenshots below).
- MTBF Component Status Report - Shows details on the current and historical Mean Time Between Failure (MTBF) data for a kiosk (see MTBF Component Status Report below).
- MTBF Device List - Displays a report showing current and historical Mean Time Between Failure (MTBF) data for a kiosk (see MTBF Device List below).
Kiosk Usage Reports
- Page Usage Stats Report - Shows detailed web page statistics for this kiosk. It is just like Project Management, Reports Tab, Page Usage Stats Report, only it pertains to the kiosk.
- Page Usage Stats Charts - Shows a graphical report detailing web page statistics for this kiosk (see Charting, Page Usage Stats Charts).
- Session Usage Stats Report - Shows detailed web page statistics for this kiosk. It is just like Project Management, Reports Tab, Session Usage Stats Report, only it pertains to the kiosk.
- Session Usage Stats Charts - Shows a graphical report detailing session statistics for this kiosk (see Charting, Session Usage Stats Charts).
- Content Traversal Report - Shows details on the most used paths for exploring information on this kiosk. It is just like Project Management, Reports Tab, Content Traversal Report, only it pertains to the kiosk.
- Page Printing Stats Charts - Shows a graphical report detailing page printing statistics for this kiosk (see Charting, Page Printing Stats Charts).
- Session Page List - Shows details on user sessions for this kiosk and the web pages viewed in each session. It is just like Project Management, Reports Tab, Session Page List, only it pertains to the kiosk.
- Session Demographics - Shows details on user sessions that have user demographic data available for this kiosk. It is just like Project Management, Reports Tab, Session Demographics, only it pertains to the kiosk.
- Kiosk Usage Overview Report - Shows the total number of sessions for this kiosk and the web pages that were viewed. It is just like Project Management, Reports Tab, Kiosk Usage Overview Report, only it pertains to the kiosk.
- Kiosk Comparison Report - Shows a side-by-side comparison of this kiosk for two different months. It is just like Project Management, Reports Tab, Kiosk Monthly Comparison Report, only it pertains to the kiosk.
- Kiosk Database Information Report - Shows database information for this kiosk. It is just like Project Management, Reports Tab, Kiosk Database Information Report, only it pertains to the kiosk.
- Kiosk App Log Report - Shows the Application Event Log data for this kiosk. It is just like Project Management, Reports Tab, Kiosk App Log Report, only it pertains to the kiosk.
Heartbeat Report
The Heartbeat Report will show all the heartbeats generated by remote monitoring for a selected kiosk within a specified timeframe. Detail information can be viewed by clicking a heartbeat (see second image below).
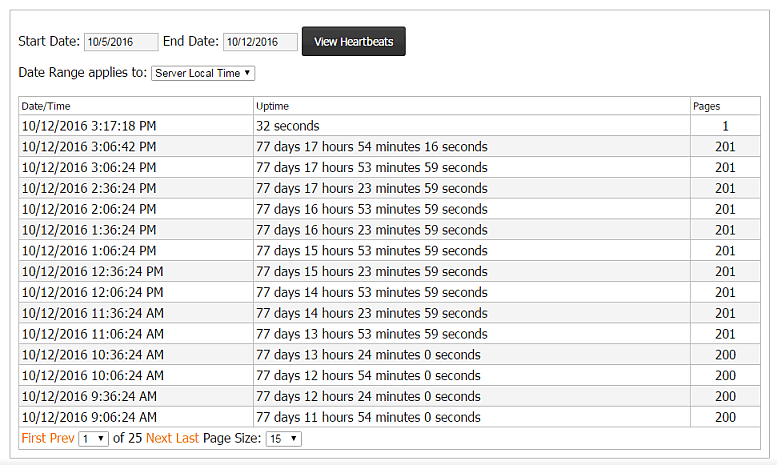
- Start Date: Show heartbeat reports starting with this date.
- End Date: Show heartbeat reports ending at this date.
- Date Range Applies to: View the report according to Server Local Time or Kiosk Local Time. Server time is the time on the server where KWS is installed and Kiosk time is the local time of the kiosk.
- View Heartbeats: When start or end dates are changed, this button will repopulate the list of hearbeats.
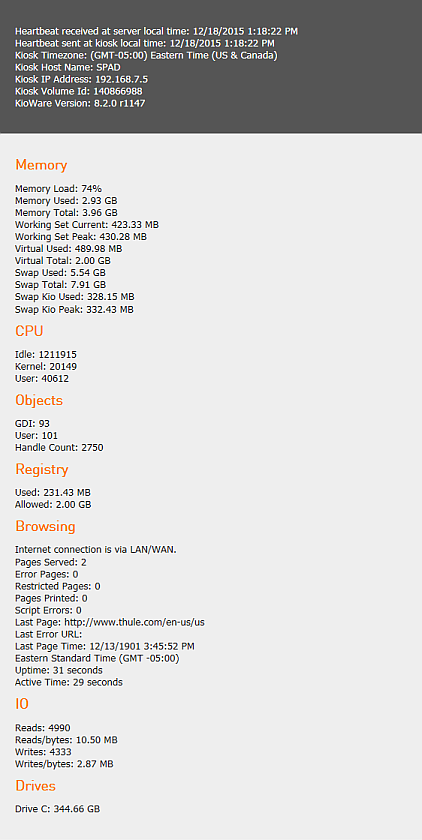
Missed Heartbeat Report
Shows all of the heartbeats missed between certain dates. The "Show One Missed HB Per Row" checkbox will show one missed heartbeat per row rather than grouping them together.

Kiosk Events
KioWare can upload Application, security and system event logs to KioWare Server. This page is used to view those log files.

- Select Event Log: Allows you to filter by certain event types.
- Start Date: Show event reports starting with this date.
- End Date: Show event reports ending at this date.
- Select Entry Types: Select which of the different types of event logs to show in the report (Information, Warning, Error, or Other).
- View Logs: When start or end dates are changed, this button will repopulate the list of events.
- First: Navigates to the very first page.
- Prev: Navigates to the previous page.
- Next: Navigates to the next page.
- Last: Navigates to the very last page.
- First textbox: Shows the current page and allows you to select a page to navigate to.
- Page Size: Sets the maximum number of events to show on one page.
When you click on an event, a box is shown with details about the event.
If you click on another event while the box is still showing, it will be updated with the new event data. Click the Close link, at the top right corner of the box, when you're finished viewing event details.
View Kiosk Screenshots
Shows screenshots sent up to the server for the kiosk.
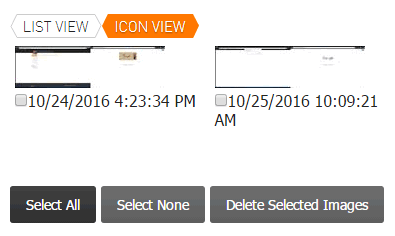
Clicking on a thumbnail will show the full image.
MTBF Component Status Report
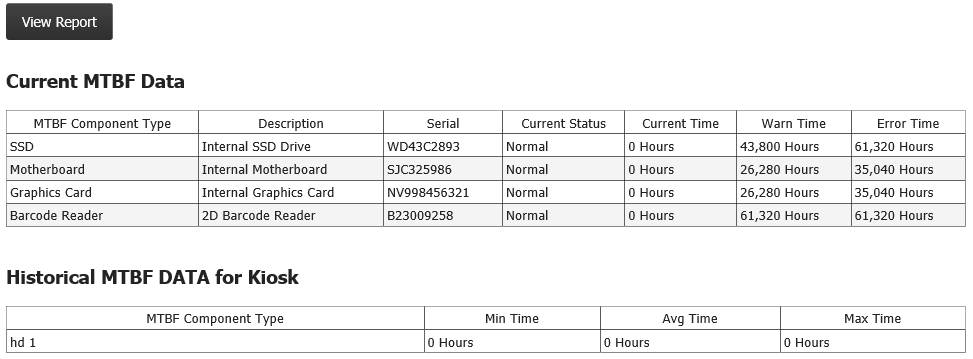
This report lists the MTBF components that are available on a Site, indicates if error or warning, and shows their usage times.
When components are removed (see Kiosk Utilities, Edit Kiosk MTBF Components), they appear in the Historical MTBF DATA for Kiosk table at the bottom of this report.
MTBF Device List Report
Displays a report that lists current and historic MTBF devices. If Only Show Current Devices is checked, historical devices will not be included.

Utilities Tab
Kiosk utilities are a lot like Project management. You can set up content updates specific to only the kiosk, change the kiosk name, unit name, move the kiosk to a different Project and more.
Note: Custom Properties of the kiosk are configured in Kiosk Settings.
Tab Options
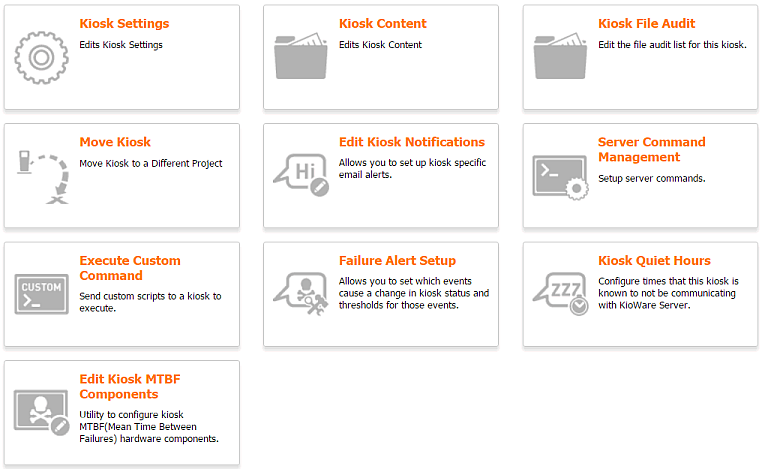
- Kiosk Settings - Edits the settings for this kiosk (see Kiosk Settings below).
- Kiosk Content - Sets up content for this kiosk (see Content Updating).
- Kiosk File Audit - Allows editing of the file audit list for this kiosk (See Content Updating, Content Auditing).
- Move Kiosk - Moves this kiosk to another Project (see Move Kiosk below).
- Edit Kiosk Notifications - Sets up email notifications for this kiosk (see Edit Kiosk Notifications below).
- Server Command Management - Sets up server commands for this kiosk (see Server Command Management below).
- Execute Custom Command - Sends custom commands (scripts) to this kiosk for executing. It is just like Project Management, Project Management Tab, Execute Custom Command, only it pertains to the kiosk.
- Failure Alert Setup - Makes changes to the failure settings for this kiosk. It is just like Project Management, Project Management Tab, Project-Wide Failure Alert Change Utility, only it pertains to the kiosk.
- Kiosk Quiet Hours - Schedules times that this kiosk will not be communicating with KioWare Server. It is just like Project Management, Project Management Tab, Kiosk Quiet Hours, only it pertains to the kiosk.
- Edit Kiosk MTBF Components - Sets up Mean Time Between Failure (MTBF) components for this kiosk (see Edit Kiosk MTBF Components below).
Kiosk Settings
Used to change various settings of a kiosk, such as name, current or update revision and IP Address.
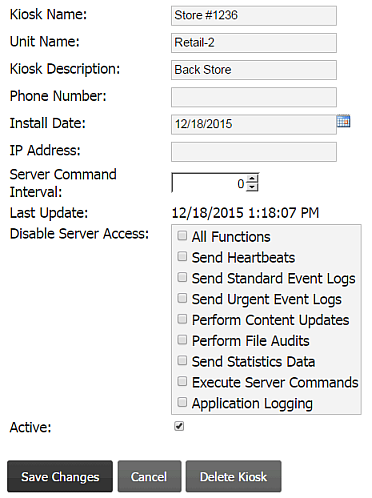
- Kiosk Name: Name that identifies the kiosk; however, does not need to be unique. Used in conjunction with Unit Name to identify kiosk when uploading statistics and downloading content.
- Unit Name: Unit identifier of the kiosk. The combination of Kiosk Name and Kiosk Unit must be unique. Used to identify the kiosk when uploading statistics and downloading content.
- Description: Optional description of the kiosk - purely for informational purposes.
- Phone Number: Optional listing of the local phone number of the modem installed in the kiosk - purely for informational purposes.
- Install Date: Optional listing of the install date of the kiosk - purely for informational purposes.
- IP Address: Optional listing of the network IP address of the kiosk. This IP is used to connect for remote management purposes. Note: last reported heartbeat IP can also be used. Refer to the System Configuration page of the Site for details.
- Server Command Interval: Allows overriding the Site level server command interval (seconds) for the kiosk. If set lower, your kiosk will show in a warning state by default if left low for too long. This warning default can be changed from Failure Alert Setup.
- Last Update: a read-only field listing the last date that content was updated.
- Disable Server Access: Has options for disabling certain parts of KioWare communication to KioWare Server. If All Functions is checked, communication with the kiosk will not be accepted at all.
- Active: If checked, the kiosk will be displayed in all kiosk selection controls in the console.
- Save Changes: Saves all changes and added properties to the kiosk.
- Cancel: Exits the page without saving changes.
Content Revisions Tab
Used to configure content update revisions for the kiosk.
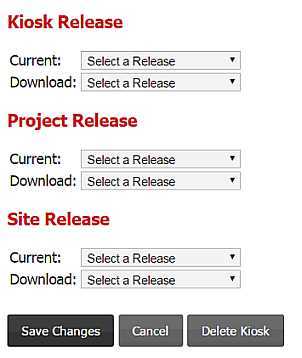
- Current Kiosk Release: Current content update release of the kiosk.
- Download Kiosk Release: Release set to be downloaded next content update.
- Current Project Release: Current content update release project wide.
- Download Project Release: Project release set to be downloaded next content update.
- Current Site Release: Current content update release site wide.
- Download Site Release: Site release set to be downloaded next content update.
Custom Properties Tab
Every kiosk may have custom, user defined properties associated with it. This page allows you to edit these properties.

- Properties Table: Shows a list of custom properties associated with the kiosk.
- Add Custom Property: Opens a page that allows you to define a new property to associate with the kiosk. Properties that you define support Substitution Variables.
Substitution Variables
A few places in KioWare Server support swapping certain strings with defined settings. One of these places is in Custom Properties and another in Site Settings as the Remote Hyperlink Format. The substitution variables are as follows:
- %a - Replaced with the kiosk IP address. The IP address is obtained from the last heartbeat that the kiosk performed if it is not filled in with the kiosk settings.
- %sn - Replaced with the Site Name.
- %pn - Replaced with the Project Name.
- %kn - Replaced with the Kiosk Name.
- %un - Replaced with the Unit Name.
- %cn - Replaced with the Computer Name.
- {kp:customPropertyName} - Can be replaced with any Custom Property that exists for the kiosk. If the Custom Property is not found, it will be replaced with nothing.
Move Kiosk
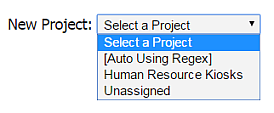
To move a kiosk from the current Project to another. Also see Bulk Move Kiosks.
Edit Kiosk Notifications
When urgent logs are received by KioWare Server, email notifications can be automatically sent. Notifications are not sent for normal events; they must be configured as urgent on the client.
Note: The Enable New Kiosk Notification setting cannot be updated at the kiosk level. To edit this setting, refer to Project Management Tab, Edit Project Notifications, Site Management Tab, Edit Site Notifications, or Group Management Tab, Edit Group Notifications.
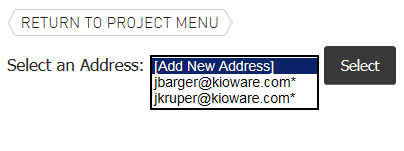
- Select an Address: Select Add New Address to add a new email address (see Add Notification Details below). Or, select a specific email address (see Edit Notifications below). KioWare Server user email addresses will also appear in this list. If they do not have any notifications set up, an asterisk (*) will display after them.
Add Notification Details
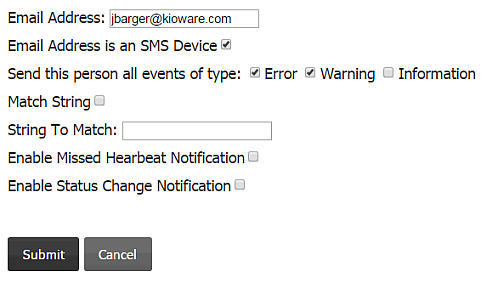
- Email Address: Enter the email address to receive the notification.
- Email Address is an SMS Device: If checked, the email messages sent will be stripped down to minimum content for easier viewing.
- Send this person all events of type: Check Error, Warning, and/or Information depending on what type of information is being sent to KioWare Server and what the email recipient wants to see.
- Match String: If checked, then any event log entry that matches the log type selected above (Error, Warning and/or Information) and also contains any of the text entered in String to Match will be sent to the email recipient. If unchecked, then no string filtering is performed.
- Enable Missed Heartbeat Notification: If checked, and the number of consecutive heartbeats missed exceeds the number entered in Server Management, System Configuration, then notification will be sent to the email recipient.
- Enable Status Change Notification: If checked, then notification will be sent to the email recipient when the status (No Issues, Error, or Warning) of a kiosk changes.
- Submit: Saves the new notification to the kiosk.
Edit Notifications

- New: Adds new notification (see Add Notification Details above).
- Delete: Deletes the notification from the kiosk notification list.
- Save: Saves all changes to the kiosk.
Match String (Example cases to match against)
This list consists of messages that KioWare Server logs in the event log.
| Case | Event Log Message | Suggested Filter String |
| Monitored printer paper low | Error on monitored device 'Custom KPM216H': (paper low) | (paper low) |
| Monitored printer paper jam | Error on monitored device 'Custom KPM216H': (paper low) (paper jam) | (paper jam) |
| Monitored printer error | Error on monitored device 'Custom KPM216H': (error condition) | (error condition) |
| A device removed from system | Device removed: port device COM2 | Device removed: |
| A device added to the system (thumb drive) | Device added: volume device, drive bitmask 0x20, drive change | Device added: |
| Expired KioWare licence | Licensing failed. | Licensing failed. |
| KioWare Service communication problem | Is the service running? Shared memory buffer is full. Can not append to shared memory buffer | append to shared memory buffer |
| See previous | No room in buffer for append to shared memory buffer | Above covers both |
Server Command Management
Enables adding and removing server commands such as taking screenshots and rebooting the kiosk.

When adding a new command you may specify the time it will run. This time can be in either server time or in kiosk time, if the kiosk time zone is known.
Options in the Command dropdown are filtered based on the platforms in use (e.g., the list will contain all commands if a Site has Windows kiosks, but will only show iOS commands if a Site has only iOS kiosks).
Platform indicators appear in parentheses after the Command Name:
- W = Windows
- A = Android
- AS = Android Super (KNOX-enabled and rooted Android devices)
- i = iOS (Kiosk Pro from Kiosk Group)
| Available Server Commands |
| Command Name | Valid Platforms | Description |
| KioWare Restart (Soft) | W, A | Performs a KioWare restart. KioWare does not exit, but everything is re-loaded except for the browser control. |
| KioWare Restart (Hard) | W, A | KioWare exits and the service restarts it. |
| Reboot Kiosk | W, AS | Reboots the computer or device. |
| Send Screenshot | W, A, i | The kiosk takes a screenshot and sends it to the server. Note: By default, this command will be ignored if the kiosk is not talking to the server via HTTPS. For more details, see Configuration Tool, Kiosk Management Tab, Server Commands in the KioWare Classic for Windows User Guide, Configuration Tool, Kiosk Management Tab, Connection Settings, Enable Server Commands in the KioWare for Windows User Guide, and Configuration Tool, Kiosk Management Tab, Enable Server Commands in the KioWare for Android User Guide. |
| Initiate Content Update | W, A, i | The kiosk will check for a content update. |
| Send Heartbeat | W, A, i | The kiosk will send a KioWare heartbeat. |
| Initiate File Audit | W, A, i | The kiosk will check for a file audit. |
| Forced KioWare Restart (Hard) | W | KILLS KioWare. Only use if nothing else works. |
| Forced Reboot Kiosk | W, AS | Tells Windows to restart the computer and kill any applications that do not respond quickly to the shutdown. Only use if a normal reboot command does not usually work. |
| Wipe Device Data | A | Tells KioWare to remotely wipe your device clean. To use this command, you must be running KioWare Server version 4.9.1 or higher, and the device must have Google Play installed and Device Administrator mode turned on in the KioWare for Android Configuration Tool (see Configuration Tool, Security Tab, General Options, Enable Device Administrator in the KioWare for Android user guide). Note: Use this command with caution; when a device is wiped clean, all of your files are permanently removed. |
| Server Commands by Device Type |
| Command Name | Windows | Android | KNOX | Rooted Android |
| KioWare Restart (Soft) | X | X | X | X |
| KioWare Restart (Hard) | X | X | X | X |
| Reboot Kiosk | X | | X | X |
| Send Screenshot | X | X | X | X |
| Initiate Content Update | X | X | X | X |
| Send Heartbeat | X | X | X | X |
| Initiate File Audit | X | X | X | X |
| Forced KioWare Restart (Hard) | X | | | |
| Forced Reboot Kiosk | X | | | |
| Wipe Device Data | | X | X | X |
Note: When KioWare gets a command, it does not wait until user session end to execute it, like content updating does. Be mindful of this when scheduling commands such as rebooting the kiosk and restarting KioWare.
Edit Kiosk MTBF Components
This list defines the MTBF components that are applied to a kiosk.

Add Component
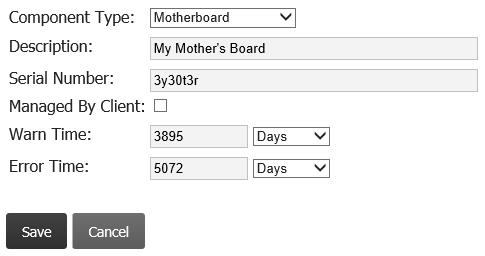
Click the Add Component button, enter information for the new component, and click the Save button.
The new component will be applied to the kiosk.
Edit Component
Click the icon to the right of a component, edit as needed, and click the Save button.
Remove Component
Check the box to the right of each component to be removed, or click the "Sel" column heading to select all.
Then click the Remove Selected button.
Replace Component
Check the box to the right of each component to be replaced (i.e., reset), or click the "Sel" column heading to select all.
Then click the Replace Selected button.
History Tab
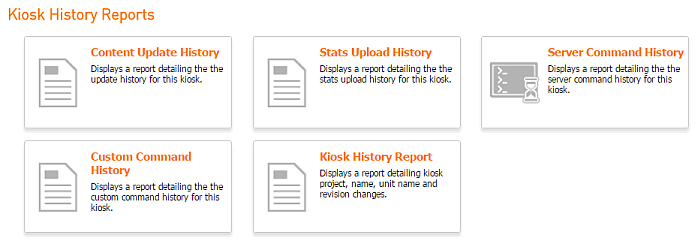
History reports consist primarily of log entries that are made when various data is transferred to and from KioWare Server and are most useful for auditing or troubleshooting purposes.
Tab Options
- Content Update History - Shows historical details on the content updates for this kiosk (see Content Update History below).
- Stats Upload History - Shows historical details on the stats uploads for this kiosk (see Stats Upload History below).
- Server Command History - Shows historical details on the server commands for this kiosk (see Server Command History below).
- Custom Command History - Shows historical details on the custom commands for this kiosk (see Custom Command History below).
- Kiosk History Report - Shows historical details on the Project, name, unit name, and revision changes for this kiosk. It is just like Project Management, Reports Tab, Kiosk History Report, only it pertains to the kiosk.
Content Update History
Whenever files are transferred from the server to a kiosk, a log entry is made. This report is used to view that log file and can show one of two different pages. When no content update session is occurring, the report shows this page.

If a content update session is occurring, then the report shows this page. The Status box shows the progress of the content update, both as a progress bar and percentage, and also the base path and start and end dates/times. Data for the most recent session will show at the bottom of the report.
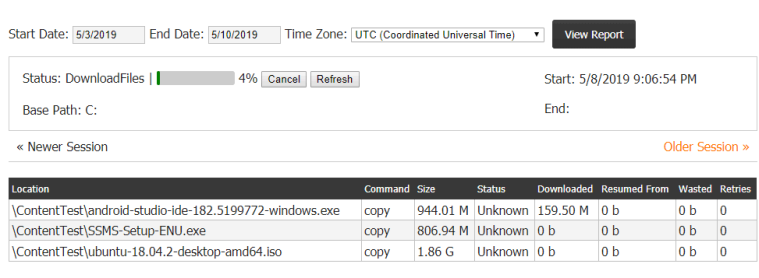
- Start Date: Enter the start date to filter selection of log entries.
- End Date: Enter the end date to filter selection of log entries.
- Time Zone: (Only available when a content update session is occurring) View the report according to Server Local Time or Kiosk Local Time. Server time is the time on the server where KioWare Server is installed and Kiosk time is the local time of the kiosk,
- View Report: Display the selected log statistics. A table will be generated that displays each file that is transferred, the revision, the path, and when it was transferred.
- Cancel: (Only available when a content update session is still in progress) Stop the content update from progressing further. Note: All updates downloaded to kiosks (or computers) prior to selecting this button will be stored temporarily. If the same content update session is re-started, it will then resume at the point where it was canceled.
- Refresh: (Only available when a content update session is complete) Refresh and show current data for the content update session.
- Newer Session/Older Session: (Only available when more than one session exists in the timeframe specified; see Start Date and End Date above) Select Older Sessions to show data for prior content update sessions, and select Newer Session to return to the most recent (or in-progress) session.
Stats Upload History
Whenever usage statistics are transferred from a kiosk to the server, a log entry is made. This page is used to view that log file.
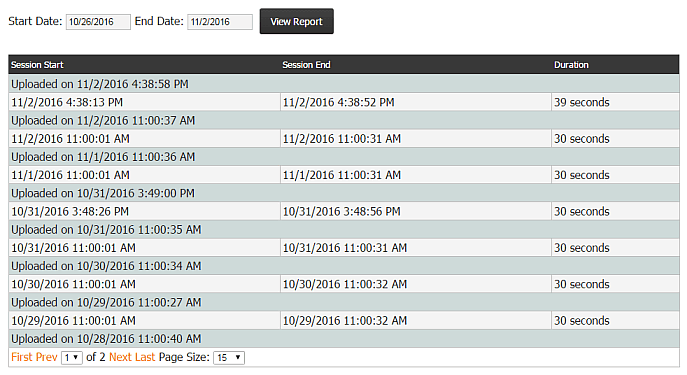
- Start Date: Enter the start date to filter selection of log entries.
- End Date: Enter the end date to filter selection of log entries.
- View Report: Display the selected log statistics. A table will be generated that displays each batch of usage statistics that were transferred, how many were sent, how many were received, and when they were received.
Server Command History

- Start Date: Enter the start date to filter selection of commands.
- End Date: Enter the end date to filter selection of commands.
- View Report: Display the selected history range. A table will be generated that displays what command was downloaded when, along with when the command completed.
Custom Command History
When custom commands are downloaded by a kiosk, this report will show selected instances.

- Start Date: Enter the start date to filter selection of commands.
- End Date: Enter the end date to filter selection of commands.
- View Report: Display the selected history range. A table will be generated that displays what command was downloaded when, along with when the command completed.