Administration Tool
Site Management
A Site is the top most grouping method. Most users will only have (and only need) one Site. To have multiple Sites you would need to purchase the ASP version, however in demo mode you can use up to 5 Sites.
KioWare client side note: Communication with the server depends on Site name being configured correctly in the config tool, on the Server tab.
Explaining the differences between Sites, Projects, and Groups: Grouping.
When KioWare Server is initially installed, there is only one Site. See KioWare Server Versions as to why.
Create New Site
A Site can be created by entering new data or copying data from another Site.

- Create New Site - Just like Editing the settings of a Site, only here you give the Site a name as well.
- Copy Settings from Another Site - Select the Copy Settings from Another Site option (see image above) and additional options display (see image below).
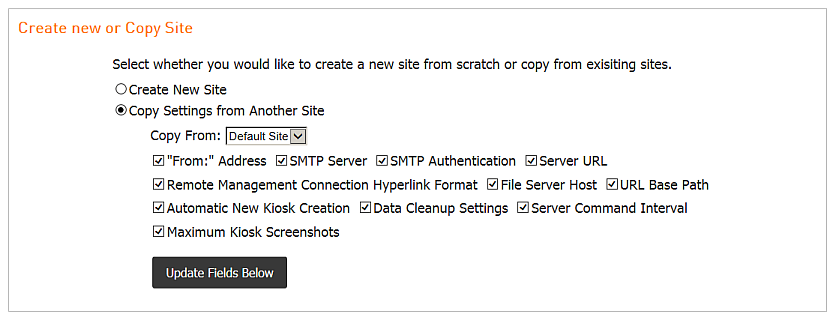
Select the Site and settings you wish to copy. Checkboxes indicate the types of settings, which are similar to those displayed when Editing the settings of a Site. Click the Update Fields Below button, and settings will be copied to the boxes below. Update as needed and click the Save button.
Site Projects Tab
A navigational listing of all Projects within the Site.

Site Management Tab
This is where configuration for Site settings, content updating and other important settings for the Site is done.
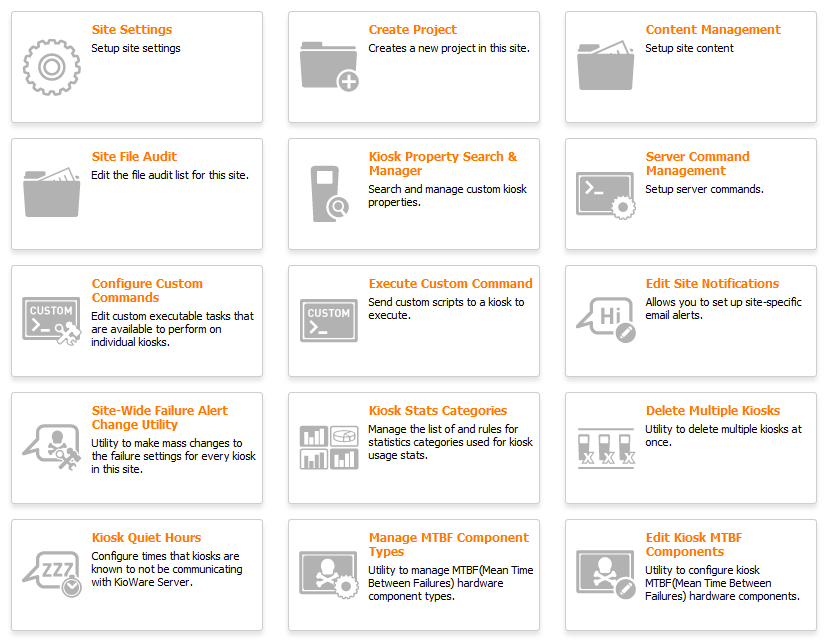
Tab Options
- Site Settings - Sets up a Site (see Site Settings below).
- Create Project - Sets up a new Project within this Site (see Create New Project below).
- Content Management - Sets up Site content that can be pushed to kiosks (see Content Updating).
- Site File Audit - Allows editing of the file audit list for this Site (see Content Updating, Content Auditing).
- Kiosk Property Search & Manager - Used to search and manage custom kiosk properties at the Site level (see Kiosk Property Search and Manager below).
- Server Command Management - Pushes server command settings to all kiosks in this Site (see Kiosk Management, Utilities Tab, Server Command Management).
- Configure Custom Commands - Allows editing of custom executable tasks that may be performed on individual kiosks in this Site.
- Execute Custom Command - Sends custom commands (scripts) from this Site to a kiosk for executing. It is just like Project Management, Project Management Tab, Execute Custom Command, only it pertains to the Site.
- Edit Site Notifications - Sets up email notifications for this Site. It is just like Project Management, Project Management Tab, Edit Project Notifications, only it pertains to the Site.
- Site-Wide Failure Alert Change Utility - Specifies the failure settings for kiosks in this Site. It is just like Project Management, Project Management Tab, Project-Wide Failure Alert Change Utility, only it pertains to the Site.
- Kiosk Stats Categories - Sets up and manage statistics categories for kiosks in this Site (see Kiosk Stats Categories below).
- Delete Multiple Kiosks - Removes one or more kiosks in this Site (see Delete Multiple Kiosks below).
- Kiosk Quiet Hours - Schedules times that kiosks in this Site will not be communicating with KioWare Server. It is just like Project Management, Project Management Tab, Kiosk Quiet Hours, only it pertains to the Site.
- Manage MTBF Component Types - Manages Mean Time Between Failure (MTBF) hardware component types for this Site (see Manage MTBF Component Types below).
- Edit Kiosk MTBF Components - Sets up MTBF components for kiosks in this Site. It is just like Project Management, Project Management Tab, Edit Kiosk MTBF Components, only it pertains to the Site.
Site Settings
Site settings configure top-level settings for a “company”.
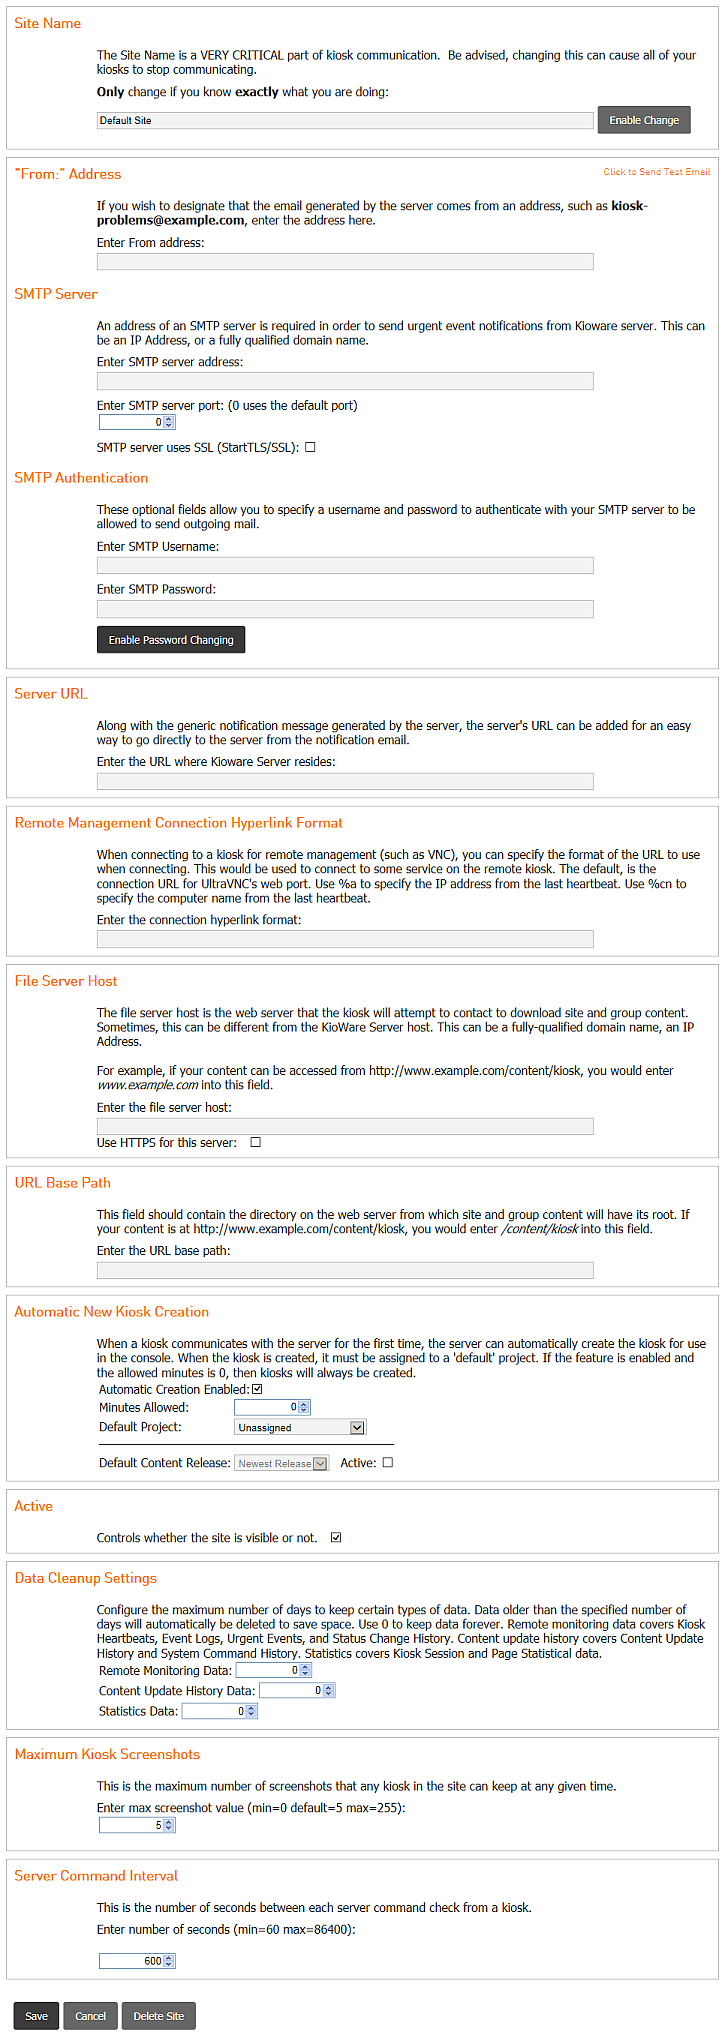
- Site Name: The Site Name is a VERY CRITICAL part of kiosk communication. Be advised, changing this can cause all of your kiosks to stop communicating. Only change if you know exactly what you are doing.
- "From:" Address: If you wish to designate that the email generated by the server comes from an address, such as [email protected], enter the address here.
- SMTP Server: An address of an SMTP server is required in order to send urgent event notifications from KioWare Server. This can be an IP Address, or a fully qualified domain name. Specify the port and SSL if applicable.
- SMTP Server uses SSL (StartTLS/SSL): If your server supports SSL communication via StartTLS, you can use this option to encrypt traffic.
- SMTP Authentication: Fill in a username and password to authenticate with your SMTP server if applicable.
- Server URL: Along with the generic notification message generated by the server, the server's URL can be added for an easy way to go directly to the server from the notification email.
-
Remote Management Connection Hyperlink Format: When connecting to a kiosk for remote management (such as VNC), you can specify the format of the URL to use when connecting. This would be used to connect to some service on the remote kiosk. The default is the connection URL for UltraVNC's web port. This setting supports Substitution Variables. One of the most common Substitution Variables to use here is %a, which is replaced with the kiosk IP address.
- File Server Host: The file server host is the web server that the kiosk will attempt to contact to download Site and Group content. Sometimes, this can be different from the KioWare Server host. This can be a fully-qualified domain name or an IP Address.
- Use HTTPS for this server: If checked, all file transfers will be encrypted.
- URL Base Path: This field should contain the directory on the web server from which Site and Group content will have its root. If your content is at http://www.example.com/content/kiosk, you would enter /content/kiosk into this field.
- Automatic New Kiosk Creation: When a kiosk communicates with the server for the first time, the server can automatically create the kiosk for use in the console. When the kiosk is created, it must be assigned to a 'default' Project. If the feature is enabled and the allowed minutes is 0, then kiosks will always be created instantly.
- Automatic Creation Enabled: When checked, a kiosk is automatically created in the console when it initially communicates with the server.
- Minutes Allowed: When set to a value other than 0, this value is the number of minutes allowed for automatically creating a kiosk after these settings are saved.
The timer will count down after you save.
The amount of time left can be seen by viewing the page again.
- Default Project: Select the Project that kiosks will be assigned to by default.
- Default Content Release: The Active checkbox toggles if a default content release should be available (checked) or unavailable (unchecked).
When checked, all available releases appear in the dropdown.
Select a release to use as the default.
Base revisions are indicated by an asterisk (*) following the revision name.
- Active: Controls whether the Site is visible or not. If the Site is not active, it will not, by default, show in the Sites drop down list.
- Data Cleanup Settings: Same as Data Cleanup Settings in System Configuration only it applies to the Site. Note that these settings cannot be higher than what are set in System Configuration.
- Server Command Interval: Server commands are controlled by the server. This setting tells the kiosk how often (in seconds) to check for the next command. The min is 1 minute, but an individual kiosk can be set up to check every second from kiosk settings. Note: Server Commands MUST be turned on at the kiosk.
- Maximum Kiosk Screenshots: Maximum number of screenshots that any kiosk on the server can keep at any given time (default = 5; max = 255; 0 disables this feature and hides the Send Screenshot command on the Server Command Management screen for Projects). Older screenshots are pushed out and deleted.
- Save: Click this button to save the updated Site.
- Cancel: Click this button to exit this page without saving.
- Delete Site: Click this button to delete the Site (only available if multiple Sites exist).
Create New Project
Sites that communicate with kiosks will always have a Project called Unassigned, however, there are times when creating more Projects is necessary.
The Project name will be used throughout the Administrative Tool whenever a Project name needs to be selected.
Enter a Project name and click the Add Project button to save.

Kiosk Property Search and Manager
Property Search Tab
Sometimes it's faster to have KioWare Server search for and provide a list of all potential matches of a kiosk that you're looking for. This feature provides that convenience. The search is based on any custom properties that you've set up on the kiosks.

Kiosk searching is based upon custom properties. For more info on custom properties: Custom Properties.
Pressing the Create Group of Selected Kiosks button will create a Group within the Site of the selected items in the list.
Property Management Tab
In this section, custom properties for every kiosk in the Site can be managed and deleted. The Count column shows how many kiosks are currently using the property in each row.

Kiosk Stats Categories
Some reports have the ability to filter their output based on categories configured here.

You may add as many categories as you want and remove them at will. When you add one, you must to specify a description and name.

After saving, you will be pesented with the option to edit the access list.
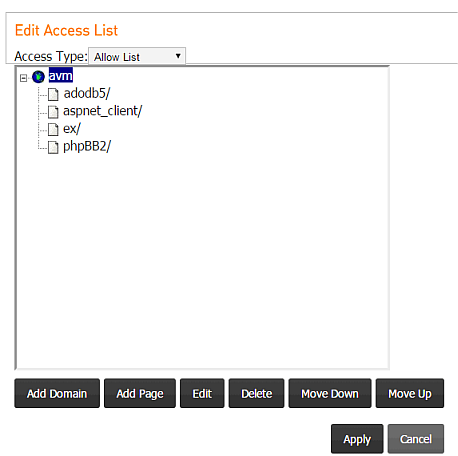
This is where the filter for your rule is set up. It works almost just like the browsing access list in KioWare client. After saving, there will be a star beside the rule indicating that it is in the process of being set up. If you come back in later, you should see that the star in no longer there, which means the rule is ready for full use. If the star never goes away, make sure that the KWS service is running and that there are no errors in the KioWare Server event log.
To match C: and file: paths, you need to use an empty domain. When you add an empty domain in the editor, you will see that it automatically makes the domain $$$empty$$$, which matches against file: paths. The page match will always be against the file: type of path, NOT the C: type (which uses backslashes).
Setting Up Stats Categories
There are two different ways to set up stats categories:
- Access List - Create them manually in KioWare Server using the access list of the Rule Category entry (see Edit Access List screen above).
- The Rule Category textbox CANNOT be left blank.
- The Rule Category entered should NOT match any other category.
- Page Title - The page title of the HTML document can be preceded with text ending in ^:
- My Category^My Page Title
-
| My Category | Unique text preceding the HTML page title |
| My Page Title | Page title of the HTML document |
Then create a rule in KioWare Server, entering the value of My Category in the Rule Category textbox (see Edit Rule screen above).
- The Rule Category entered MUST be an exact match only.
- Edit the access list (see Edit Access List screen above) so that it will NEVER match anything. This can be done by creating an allow list and adding a domain (such as <>) that will never match.
Delete Multiple Kiosks
Selecting the Delete Multiple Kiosks option displays kiosks, listed first by Site and then by Project, kiosk, and unit.
Kiosks are also sorted by last heartbeat. No heartbeat indicates kiosks that are not in use.
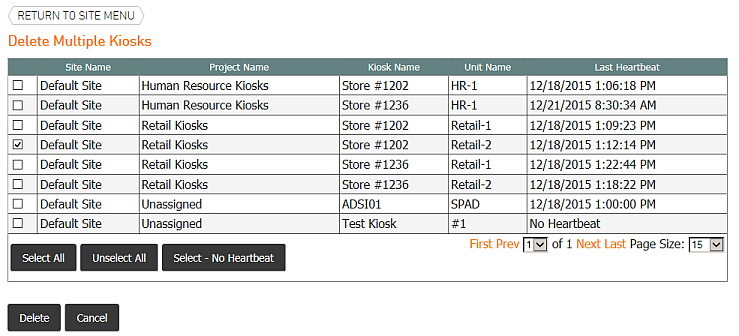
Check the box beside each kiosk to be removed (or use the Select All button to check all boxes).
To select all kiosks without a heartbeat, click the Select - No Heartbeat button.
Then click the Delete button.
A popup window appears, asking for confirmation of the delete. Click Ok to delete the kiosks and all data associated with them.
Note: Deleting permanently removes the kiosks from the KioWare Server database and cannot be undone.
Manage MTBF Component Types
This list shows the MTBF component types that are available for all kiosks in a Site.

Add Component Type
Click the Add Component button, enter a description, and click the Save button.

Edit Component Type
Click the icon to the right of a component type, edit its description, and click the Save button.
Remove Component Type
Click the red "X" to the right of a component type to remove it.
Reports Tab
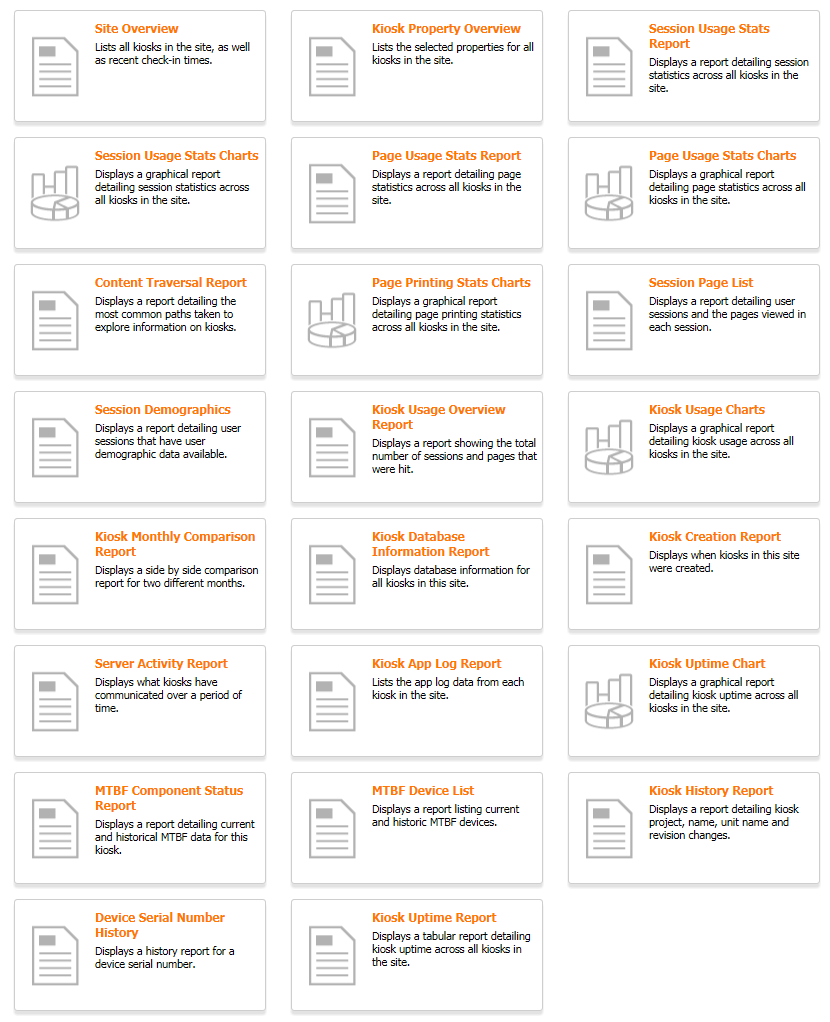
Site reports are just like Project reports. The only difference is that the reports here are relative to the Site.
Tab Options
- Site Overview - Shows a list of all kiosks in this Site. It is just like Project Management, Reports Tab, Project Overview, only it pertains to the Site.
- Kiosk Property Overview - Shows a list of selected properties for all kiosks in this Site. It is just like Project Management, Reports Tab, Kiosk Property Overview, only it pertains to the Site.
- Session Usage Stats Report - Shows detailed session statistics for all kiosks in this Site. It is just like Project Management, Reports Tab, Session Usage Stats Report, only it pertains to the Site.
- Session Usage Stats Charts - Shows a graphical report detailing session statistics for all kiosks in this Site (see Charting, Session Usage Stats Chart).
- Page Usage Stats Report - Shows detailed web page statistics for all kiosks in this Site. It is just like Project Management, Reports Tab, Page Usage Stats Report, only it pertains to the Site.
- Page Usage Stats Charts - Shows a graphical report detailing web page statistics for all kiosks in this Site (see Charting, Page Usage Stats Chart).
- Content Traversal Report - Shows details on the most used paths for exploring information on this Site. It is just like Project Management, Reports Tab, Content Traversal Report, only it pertains to the Site.
- Page Printing Stats Charts - Shows a graphical report detailing page printing statistics for all kiosks in this Site (see Charting, Page Printing Stats Chart).
- Session Page List - Shows details on user sessions for this Site and the web pages viewed in each session. It is just like Project Management, Reports Tab, Session Page List, only it pertains to the Site.
- Session Demographics - Shows details on user sessions that have user demographic data available in this Site. It is just like Project Management, Reports Tab, Session Demographics, only it pertains to the Site.
- Kiosk Usage Overview Report - Shows the total number of sessions for this Site and the web pages that were viewed. It is just like Project Management, Reports Tab, Kiosk Usage Overview Report, only it pertains to the Site.
- Kiosk Usage Charts - Shows a graphical report detailing the usage of all kiosks in this Site (see Charting, Kiosk Usage Charts).
- Kiosk Monthly Comparison Report - Shows a side-by-side comparison of kiosks in this Site for two different months. It is just like Project Management, Reports Tab, Kiosk Monthly Comparison Report, only it pertains to the Site.
- Kiosk Database Information Report - Shows database information for all kiosks in this Site. It is just like Project Management, Reports Tab, Kiosk Database Information Report, only it pertains to the Site.
- Kiosk Creation Report - Shows when kiosks in this Site were created. It is just like Project Management, Reports Tab, Kiosk Creation Report, only it pertains to the Site.
- Server Activity Report - Shows which kiosks in this Site have communicated with the server and how many times there was communication for a set date range (see Server Activity Report below).
- Kiosk App Log Report - Shows the Application Event Log data for each kiosk in this Site. It is just like Project Management, Reports Tab, Kiosk App Log Report, only it pertains to the Site.
- Kiosk Uptime Chart - Shows a graphical report detailing the uptime (time that it is active) for each kiosk in this Site (see Charting, Kiosk Uptime Chart).
- MTBF Component Status Report - Shows details on the current and historical Mean Time Between Failure (MTBF) data for a specific kiosk in this Site. It is just like Project Management, Reports Tab, MTBF Component Status Report, only it pertains to the Site.
- MTBF Device List Report - Shows details on the current and historical Mean Time Between Failure (MTBF) devices. It is just like Kiosk Reports Tab, MTBF Device List Report, only it pertains to the Site.
- Kiosk History Report - Shows historical details on the project, name, unit name, and revision changes for a kiosk in this Site. It is just like Project Management, Reports Tab, Kiosk History Report, only it pertains to the Site.
- Device Serial Number History Report - Shows historical details on in-service and out-of-service device types (see Device Serial Number History Report below).
- Kiosk Uptime Report - Shows a tabular report detailing the uptime (time that it is active) for each kiosk in this Site. It is just like Project Management, Reports Tab, Kiosk Uptime Report, only it pertains to the Site.
Server Activity Report
Shows the number of times each kiosk on the Site communicates with the server.
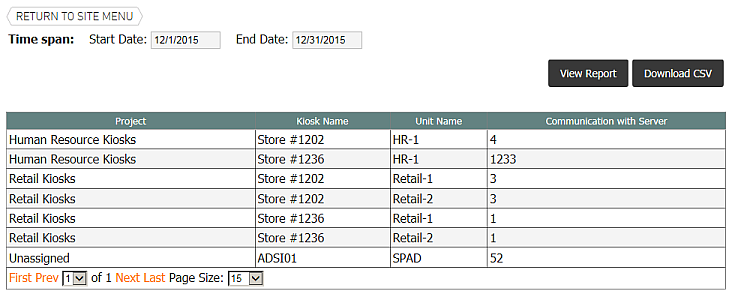
- Start Date: Date to begin.
- End Date: Date to end.
- View Report: Shows the report according to settings above.
- Download CSV: Creates a comma separated values file for saving the report data.
Device Serial Number History Report
Provides a way to show history for particular device types, and optionally by serial number.
