Configuration Tool
General Tab

- Start Page URL - Home page of KioWare Lite for Android. Enter a complete URL that begins with a protocol (e.g., “http://” or “file:///”). If left blank, the default Welcome to KioWare page will display. [See also the related JavaScript function: KioWareUtils, General Functions, getKioProperty in the Scripting section of this user guide.]
- Start On Boot - Run KioWare Lite for Android when the tablet boots up. If you are familiar with KioWare desktop, note that this option is still required when you set up the device admin from the Security tab, unlike shell mode (on desktop). See also Note 2 under Security Tab, General Options, Selected Home App. [This setting is included in the KioWare Lite for Android security/configuration audit; see Audit Tab, General, Start on Boot and Audit Tab, Security, Start on Boot/Shutdown Option.]
Screen Settings
- Screen Orientation - Force the tablet screen to display in portrait or landscape when KioWare Lite for Android is running. The default option allows the tablet to decide.
- Prevent Screen Sleep - Force the tablet screen to stay on when KioWare Lite for Android is running in certain cases. The default option allows the screen to sleep. There is also an option to end the user session when the screen sleeps.
- Screen Schedule - Used to set up a schedule for turning the tablet's screen on or off (see Screen Schedule below).
XML Settings
- Enable Automatic XML Import - Enables use of an XML settings file for importing XML settings and any embedded resources (images, addins, etc.). For more information on embedding and importing resources, see Import/Export of Settings, Images, and Other Resources.
- XML Location - When the “Enable Automatic XML Import” setting is enabled, you can specify the location of the XML settings file. A popup window displays the following options:
- Local File - Select a file from the local drive of your tablet.
- URL - Enter a specific web address. This URL will appear by default when using the Configuration Toolbar, Import XML Settings option, but can be changed.
- Google Drive - (Only available if Google Play Services is installed) Select a file from Google Drive.
- XML Update Interval - Sets the frequency (in minutes) that KioWare Lite for Android will check the XML settings file for changes while its browser is running (0 disables the check). When a change is found, KioWare Lite for Android will restart immediately if no user is present or the “Default Inactivity Timer” (see Attract/Inactivity Tab, Inactivity Timers) is set to 0. Otherwise, KioWare Lite for Android will wait until the session ends before restarting.
- Inactivity Timer Set - Updates will load when the “Default Inactivity Timer” times out.
- Inactivity Timer Not Set - Updates will load when “XML Update Interval” times out.
- Note: KioWare Lite for Android can automatically load settings and any embedded resources from an XML settings file on install or upgrade by including the file path in a special provisioning XML file (see Installation and Requirements, Installation Instructions, Provisioning).
Screen Schedule

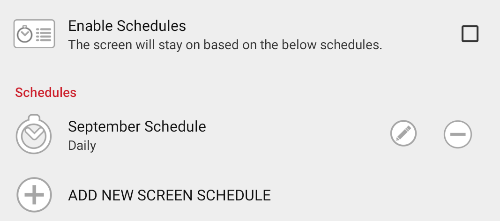
- Enable Schedules - If enabled, the tablet's screen will turn on and off based on the schedule you set (see below).
Schedules
- Add New Screen Schedule - Select the plus icon (see image above) and enter all information (see Edit Screen Schedule below for descriptions of settings).
- Edit Screen Schedule (pencil icon) - Select the pencil icon (see image above) and edit the information (see Edit Screen Schedule below for descriptions of settings).
- Delete Screen Schedule (minus icon) - Select the minus icon (see image above).
Edit Screen Schedule

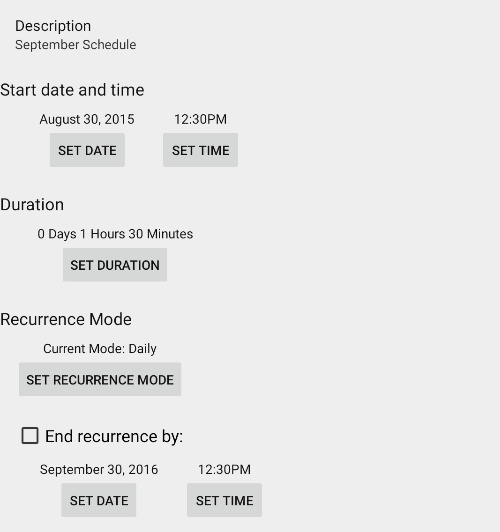
- Description - Enter a description for the screen schedule.
- Start Date and Time - Select the “Set Date” and “Set Time” buttons. Popup windows will display to set a start date (month/day/year) and start time (hour:minute am/pm) for the screen to automatically turn on.
- Duration - Select the “Set Duration” button. A popup window will display to set the duration (days/hours/minutes) for the screen to remain on.
- Recurrence Mode - Select the “Set Recurrence Mode” button. A popup window will display. Select the recurrence mode dropdown box (defaults to “Daily”) and select a recurrence pattern for automatically turning on the screen. This window will show different settings depending on the recurrence that is selected.
- Daily - Sets a daily interval (e.g., every day or every 10 days).
- Weekly - Sets a weekly interval (e.g., every week on Tuesday and Thursday or every 2 weeks on Saturday)
- Nth day of month - Sets the day of the month (1 to 31) and the monthly interval (e.g., the 15th day every 3 months).
- Nth day of week of month - Sets the week (first, second, third, fourth, or last) in the month, the day (Sunday through Saturday), and the monthly interval (e.g., the second Sunday every 2 months).
- Hourly - Sets the hourly interval (e.g., every 2 hours).
- Once - Sets up a one-time occurrence based on the “Start Date”, “Start Time”, and “Duration” settings above.
- End recurrence by - (not available with one-time occurrences) Check this box, and then select the “End Date” and “End Time” buttons. Popup windows will display to set an end date (month/day/year) and end time (hour:minute am/pm) for this recurrence only.