Configuration Tool
Attract/Inactivity Tab
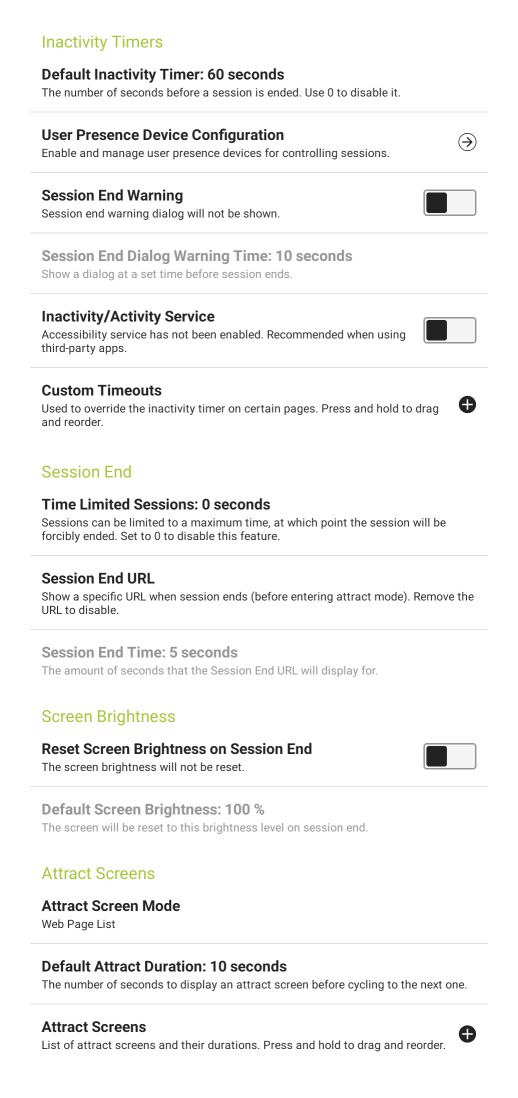
Inactivity Timers
- Default Inactivity Timer - Number of seconds before a KioWare user session is ended after the user is idle. Setting this to 0 disables the timer.
- User Presence Device Configuration - Select this option to enable and manage user presence devices for controlling user sessions (see User Presence Device Configuration below).
- Session End Warning - If enabled, a popup window will indicate when the user session will soon end (i.e., the “Default Inactivity Timer” above will soon time out).
- Session End Dialog Warning Time - When the time remaining in a user session (in seconds) equals this value, a session end warning will display.
- Note: If set to a value that is greater than or equal to the current “Default Inactivity Timer” (see above), no session end warning will display.
- Inactivity/Activity Service - (Also appears on the Application Manager and Single Application Mode screens under the Security Tab) Selecting this option provides access to the “KioWare Kiosk” option in the tablet's accessibility settings. When this option is turned on, activity in third-party applications (accessed via custom toolbar links; see User Interface Tab, Custom Toolbar Links) registers as user activity in KioWare for Android.
- If enabled and the “Default Inactivity Timer” (see above) times out, KioWare for Android will be brought to the front, running over top of the third-party application.
- If disabled, the third-party application will continue running on top, but the KioWare for Android session will end.
[This setting is included in the KioWare for Android security/configuration audit; see Audit Tab, Attract/Inactivity, Accessibility Service.]
- Note: KioWare for Android can automatically enable or disable the Accessibility Service on install or upgrade by including this setting in a special provisioning XML file (see Installation and Requirements, Installation Instructions, Provisioning). This setting is also included on the Create Provisioning File screen (see General Tab, Create Provisioning File, Device Configuration, Enable Accessibility Service), which is used to auto-generate a new provisioning file for ease in setting up new devices to run with KioWare for Android.
- Custom Timeouts - Used to override the default timer on specified pages or domains. Many times this would be used on pages which display videos to make sure the session does not time out while the user is watching. To change the order of custom timeouts, press an entry until it is highlighted and drag it up or down.
Session End
- Time Limited Sessions - Set the maximum amount of time (in seconds) that each user session will last before it automatically ends and logs off the user. Set to zero to disable.
- Session End URL - Enter a URL (or file path) that will show when a user session ends, before Attract mode begins (for more details on Attract mode, see Attract Screens below). Leave blank to disable.
- Session End Time - Set the amount of time (in seconds) that the “Session End URL” above will show before Attract mode begins (for more details on Attract mode, see Attract Screens below). The default is 5 seconds.
Screen Brightness
Note: These settings are only available with Android 4.3 and higher and only apply to session end. See User Interface Tab, Standard Buttons, Brightness Control for setting up a toolbar button to control screen brightness during the user session.
- Reset Screen Brightness on Session End - If enabled, the screen brightness will automatically be reset to the value of “Default Screen Brightness” (see below) when each user session ends.
Notes:
- To select this option, your device permissions must be set to allow use of the write settings with KioWare for Android (see table below).
- Permission popups will never show in the Main App. Missing permissions are logged after the settings are loaded (when required by the remote settings file).
-
| If write settings permission is... | ...Then KioWare will do this when you attempt to enable screen brightness reset on session end |
| Enabled in device settings before attempting to enable screen brightness reset on session end | Not show a permission popup, make screen brightness settings available, and enable screen brightness reset on session end. |
| Disabled in device settings before attempting to enable screen brightness reset on session end (or before loading a remote settings file that enables screen brightness reset) | Show a popup window asking for this permission to be allowed.
- Allowing permission will make screen brightness settings available and enable screen brightness reset on session end.
- Declining permission (or canceling the popup/not granting permission and returning to Config Tool) will disable screen brightness settings and show a popup listing all missing permissions that must be allowed for KioWare to function. Go to your device settings and enable them.
|
| Disabled in device settings before loading a provisioning file that enables screen brightness reset on session end | Show a popup window asking for this permission to be allowed.
- Allowing permission will enable screen brightness reset on session end.
- Declining permission (or canceling the popup/not granting permission and returning to Config Tool) will disable screen brightness reset on session end.
Note: If a brightness level or screen timeout value is set in the provisioning file, a popup will ask for permission before changing them in the Config Tool. Granting permission will allow a value to change; denying permission will fail to change the value.
|
| Declined (or popup is canceled/no permission granted before returning to Config Tool) during prior attempt to enable screen brightness reset on session end (see above) | Disable screen brightness settings and show a popup listing all missing permissions that must be allowed for KioWare to function. Go to your device settings and enable them. |
- Default Screen Brightness - (Only available when “Reset Screen Brightness on Session End” above is enabled) - The screen brightness level (percentage from 0 to 100) that automatically will be set when a session ends and also at the beginning of the first session.
Attract Screens
Use the settings in this section to switch between using a pre-defined list of web pages as attract screens and using a built-in attract screen looper (see Attract Screen Mode for more details on setting up attract screens).
User Presence Device Configuration
The “User Presence Device Configuration” setting contains four options: “Disabled”, “Proximity Sensor”, “Larco Keyboard Wedge”, and “ProxSonar”.
Disabling User Presence Devices
When “Disabled” is selected (under the “User Presence Device Type” setting), the screen looks like this.

Enabling Proximity Sensor
When “Proximity Sensor” is selected (under the “User Presence Device Type” setting), the screen looks like this.
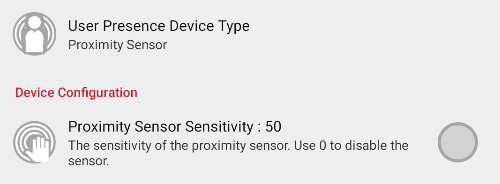
Select the “Proximity Sensor Sensitivity” setting and a popup window shows the sensitivity slider. This slider controls how close the user must be to the device to trigger a session start or end. It has a minimum value of 0 (device disabled), and its maximum value is based on the device's settings. The current sensitivity value displays below the slider for reference. An indicator (circle icon) appears to the right of the “Proximity Sensor Sensitivity” setting and can show one of three colors:
- Red - Indicates that the device is enabled and no user is present.
- Green - Indicates that the device is enabled and a user is present.
- Gray - Indicates that the proximity sensor is unavailable or disabled, or that the device does not have a proximity sensor. (If the device has no proximity sensor, then the current sensitivity value also will not show in the popup window).
Note: When enabled, the “Proximity Sensor” will not show that it is enabled until it first receives data (i.e., until a user is first present).
Enabling Larco Keyboard Wedge
When “Larco Keyboard Wedge” is selected (under the “User Presence Device Type” setting), the screen looks like this.
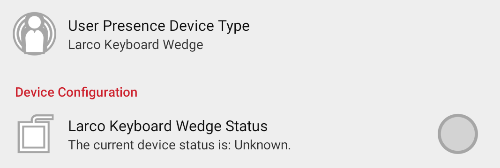
When selected, the “Larco Keyboard Wedge” option allows your kiosk or tablet to support use of a Larco keyboard wedge device as a user presence device. Key combinations for the device are listed below. Note: In Larco's SonicGuard application, which only runs on MS Windows, use these same keystrokes in your walk-away and walk-to setups.
| Walk-Away | Left-Shift + Right-Shift + Left-CTL + Right-CTL + F12 |
| Walk-To | Left-Shift + Right-Shift + Left-CTL + Right-CTL + F11 |
An indicator (circle icon) appears to the right of the “Larco Keyboard Wedge Status” setting and can show one of three colors:
- Red - Indicates that the device is enabled and no user is present.
- Green - Indicates that the device is enabled and a user is present.
- Gray - Indicates that the device is unavailable or disabled, or that it cannot detect if a user is present.
Note: When enabled, the “Larco Keyboard Wedge” will not show that it is enabled until it first receives data (i.e., until a user first steps on or off the device).
Enabling ProxSonar
When “ProxSonar” is selected (under the “User Presence Device Type” setting), the screen looks like this.
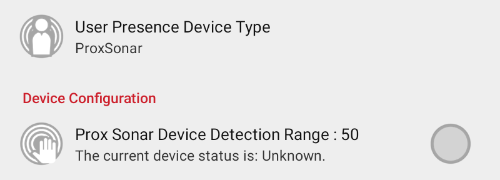
Select the “ProxSonar Device Detection Range” setting and a popup window shows the detection range slider. This slider controls how close the user must be to the device's proximity sensor to trigger a session start or end. It has a minimum value of 0 (device disabled), and its maximum value is based on the device's settings. The current detection range value displays above the slider for reference. An indicator (circle icon) appears to the right of the “ProxSonar Device Detection Range” setting and can show one of three colors:
- Red - Indicates that the device is enabled and no user is present.
- Green - Indicates that the device is enabled and a user is present.
- Gray - Indicates that the device's proximity sensor is unavailable or disabled, or that the device does not have a proximity sensor. (If the device has no proximity sensor, then the current detection range value also will not show in the popup window).
Note: When enabled, the “ProxSonar” will not show that it is enabled until it first receives data (i.e., until a user is first present).
Attract Screen Mode
On the Attract/Inactivity tab, the “Attract Screen Mode” setting provides three options for attract screen mode: “Disabled”, “Web Page List”, and “Local Folder Contents”.
Disabling Attract Screen Mode
Select the “Disabled” option to turn off Attract Screen mode. The Attract Screens section of the tab will look like this.

Using Web Page List
Select the “Web Page List” option and these settings become available (see image below). Use them to add specific web pages that will be used as attract screens.
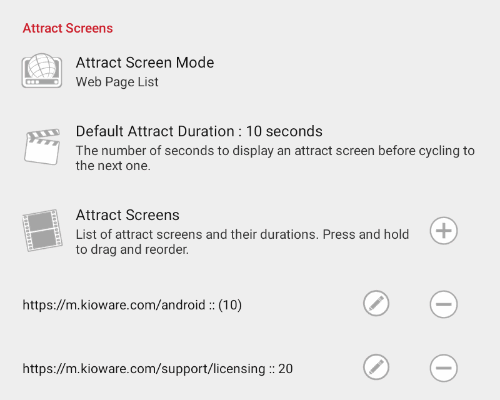
- Default Attract Duration - Set the number of seconds to show each attract screen if not specified on the attract screen itself (see “Duration” under “Attract Screens” below). Note: This setting is used as the default duration for the attract screen looper if it is greater than 0 and the custom JSON settings file does not exist or is empty (for more details on the JSON setting file, see the note under Using Local Folder Contents, Attract Looper Content below).
- Attract Screens - Used to configure individual attract screens and how long to show them.
- Add New Attract Screen (plus icon) - Select the plus icon (see image above). A popup window will display the related settings (see “Edit Attract Screen” below for descriptions of these settings).
- Remove Attract Screen (minus icon) - Select the minus icon (see image above).
- Reorder Attract Screen - Press an entry until it is highlighted (see image below) and drag it up or down.
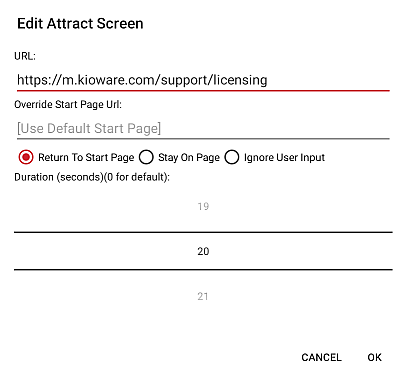
- Edit Attract Screen (pencil icon) - Select the pencil icon (see image above). A popup window will display these settings (see image below).
- URL - Enter the URL of a file or web page to be used as an attract screen.
- Override Start Page URL - (Only available when the “Return To Start Page” option is selected; see below) Enter the URL of a file or web page to be used as the “Start Page URL” when this attract screen is displayed (overrides the “Start Page URL” entered on the General Tab; see General Tab, Start Page Settings, Start Page URL).
- Behavior with User Activity (unlabeled) - Set how the attract screen will behave when there is user activity (pressing buttons on the system navigation bar, touching the screen, etc.).
- Return to Start Page - When enabled, user activity will automatically display the “Start Page URL” (or the “Override Start Page URL” above if one is set; see General Tab, Start Page Setting, Start Page URL).
- Stay on Page - When enabled, this attract screen will continue to display when there is user activity and will also register that activity.
- Ignore User Input - When enabled, this attract screen will continue to display when there is user activity but will ignore that activity.
- Duration - Set the amount of time this attract screen will display before the next attract screen appears (can be 0 to 3600 seconds). Note: When this setting does not equal 0, it will override the “Default Attract Duration” (see above) for this attract screen.
Using Local Folder Contents
Select the “Local Folder Contents” option and these settings become available (see image below). Use them to set up all files to be used in your attract screen looper.
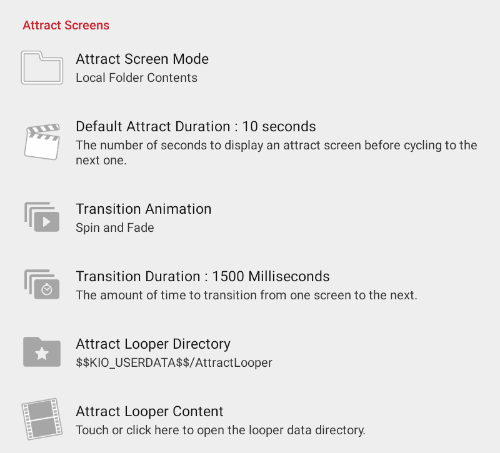
- Default Attract Duration - Set the default amount of time (in seconds) that each screen in the looper will show before showing the next screen. If this value is different from the “Default Attract Duration” for attract screens in the web page list (see Using Web Page List, Default Attract Duration above), then it will override the web page list value.
- Transition Animation - Set how each screen will transition into the next one (fade, zoom, switch from left, etc.).
- Transition Duration - Set the amount of time (in milliseconds) that it will take each screen to transition to the next.
- Attract Looper Directory - Select this option to set the attract looper directory. You can use either the default attract looper directory or a folder of your choice. When Attract Screen mode starts, KioWare for Android will automatically loop through the files placed in this folder. The file types that can be used in the looper are .jpg, .jpeg, .png, .bmp, .gif, .mp4, .ogg, .txt, .htm, .html, .website, and .url.
- Enter a Directory - Enter the path to the desired folder that will be used to store the attract looper files. Once a folder is entered, its path will automatically show on the Attract/Inactivity tab. (Note: Substitution variables can be used with this setting; see Configuration Tool, Substitution Variables for more details.)
- Use Default Directory - Leave the attract looper directory blank. KioWare for Android will then use the default directory (located under Android/data/com.adsi.kioware.client.mobile.app/UserData/AttractLooper).
When using either a selected attract looper directory or the default, the folder MUST contain valid file types (see above). The table below shows the conditions when a selected directory will and will not override the default.
-
| Selected Directory | Directory Used for Attract Looper |
| None | Default directory |
| Folder Containing Valid File Types | Selected directory (overrides default directory) |
| Folder Containing Invalid File Types | Default directory (ignores selected directory) |
| Empty Folder | Default directory (ignores selected directory) |
- Attract Looper Content - Select this option to directly access the AttractLooper directory (default or other directory; see “Attract Looper Directory” above). The directory automatically opens (if it already exists and a file browser application is loaded on the kiosk or tablet) and stores all files used in the attract screen looper. Valid file types are .jpg, .jpeg, .png, .bmp, .gif, .mp4, .txt, .htm, .html, .website, and .url. Attract screens in the looper will each display for the default seconds (see “Default Attract Duration” above) and will transition into the next screen as set under “Transition Animation” and “Transition Duration” above.
Note: Advanced users can create a settings.json file in the AttractLooper directory to override any default settings. For more information on overriding attract looper settings, please contact KioWare support via phone (Toll Free USA: 877-843-4790; International: 1-717-843-4790) or our website (https://m.kioware.com).