Configuration Tool
Browser Tab

- Enable Browser Zoom - Enables the Android browser's built-in zooming capability.
- Default Zoom - (Unavailable on Android 4.4 and higher) Sets the initial browser zoom (up to a maximum of 1000 percent). This zoom percentage will be applied to all navigations except refresh. If set to 0, this feature will be disabled. Using the “Load Defaults” button will auto-set the value to 0.
- Note: Tablets can vary, and some may restrict the maximum zoom to a percentage that is less than 1000. When the “Default Zoom” setting is greater than the tablet's maximum zoom, the tablet's maximum will always override this setting.
- Enable Browser Geolocation - Enables the Android browser's HTML 5.0 geolocation features.
- Note: KioWare does not use this geolocation feature other than to turn it on and always allow the feature for any page that asks for it. KioWare will never utilize the data or the GPS hardware; that is all managed by the WebView control.
- Enable WebRTC - (Only available with Android 5.0 and higher) Enables real-time communication (RTC) between the KioWare for Android browser and all websites. (For more information on WebRTC, visit www.webrtc.org.)
- Note: Cookies must be enabled for this RTC option to work properly (see Browser Cache/Data, Cookies below).
- Enable Desktop Browser Mode - Sends a non-Android user agent string in order to make websites provide a non-mobile version of their site (if they differ). [See also the related JavaScript function: KioWareUtils, General Functions, setDesktopModeEnabled in the Scripting section of this user guide.]
- Append User Agent - Sets additional text to be added to the user agent [string (sequence of characters) that helps a web server identify which browser is being used; may contain the version and details about your system such as operating system and version].
- Popup Window Handling - Enables popup windows to be flattened (opened in the currently displayed tab), blocked completely, or opened in a new tab. Note: The PDF popup mode that is set will always override this setting (see Security Tab, Download Manager, PDF Popup Mode). [This setting is included in the KioWare for Android security/configuration audit; see Audit Tab, Toolbar, Tab Bar.]
- Ignore SSL Errors in Browser - Enables KioWare to ignore Secure Socket Layer (SSL) errors in the browser.
- Enable Media Auto Play - If enabled, KioWare for Android will start all HTML5 videos that have the autoplay attribute set when a page loads.
- Note: Only devices running Android 4.1 and above can use JavaScript to start videos.
- Enable Wide Viewport Meta Tag - Enables KioWare for Android to use a website's Viewport meta tag, which displays websites according to the mobile device used to view them.
- Browser Cache/Data - Enables configuration of browser cache and data storage settings (see Browser Cache/Data below).
- Proxy Settings - Enables configuration of proxy settings (see Proxy Settings below).
- Automatic Action List - For a specific URL, perform an automatic action based on either a CONTAINS or a regular expression (regex) match (see Automatic Action List below).
Development Options
- Enable Remote WebView Debugging - (Available only with Android KitKat 4.4 and higher) If enabled, Chrome's Inspect feature can be used remotely to edit and debug web pages viewed within KioWare. For this to work properly, you must use a USB connection between the tablet and remote computer and enable USB debugging in the tablet settings.
Note: If you want to resize the browser screen because the virtual keyboard is displaying overtop of input boxes, create a notfullscreen.txt file (can be blank) and place it in the tablet's root external storage directory under Android/data/com.adsi.kioware.client.mobile.app.
Browser Cache/Data
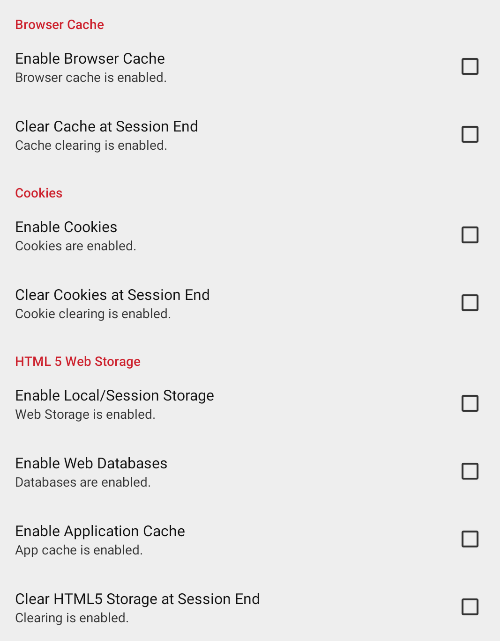
Browser Cache
- Enable Browser Cache - Allows KioWare for Android to store browser cache. Enabling this option allows the “Clear Cache at Session End” option to be set. [This setting is included in the KioWare for Android security/configuration audit; see Audit Tab, Browser, Clear Cache at Session End.]
- Clear Cache at Session End - When enabled, clears browser cache when the KioWare session ends. “Enable Browser Cache” must be turned on before this option can be set. [This setting is included in the KioWare for Android security/configuration audit; see Audit Tab, Browser, Clear Cache at Session End.]
Cookies
- Enable Cookies - Allows KioWare for Android to store cookies. Enabling this option allows the “Clear Cookies at Session End” option to be set. [This setting is included in the KioWare for Android security/configuration audit; see Audit Tab, Browser, Clear Cookies at Session End.]
- Clear Cookies at Session End - When enabled, all cookies will be cleared when the KioWare session ends. “Enable Cookies” must be turned on before this option can be set. [This setting is included in the KioWare for Android security/configuration audit; see Audit Tab, Browser, Clear Cookies at Session End.]
HTML 5 Web Storage
- Enable Local/Session Storage - Allows web pages to store HTML5 local data and session data.
- Enable Web Databases - Allows web pages to store HTML5 web databases.
- Enable Application Cache - Allows web pages to utilize HTML5's application cache.
- Clear HTML5 Storage at Session End - When enabled, all web storage and all application cache will be cleared when the KioWare session ends. Local storage, web databases, or application cache must be enabled to use this feature. [This setting is included in the KioWare for Android security/configuration audit; see Audit Tab, Browser, Clear HTML5 Storage at Session End.]
Proxy Settings
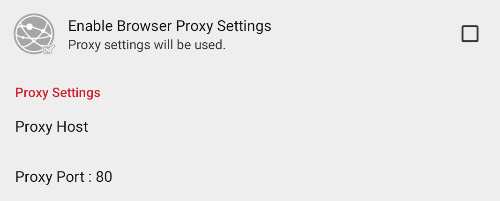
- Enable Browser Proxy Settings - When enabled, KioWare for Android will use a proxy server with web browsing.
- Proxy Host - Identifies the host computer running the proxy server (can be either a domain name or IP address).
- Proxy Port - Identifies the port (specific virtual location on the host computer) that the proxy server uses to receive information.
Automatic Action List

- Add New Automatic Action - Select the “Plus” (+) icon (see image above) to add a new entry. A popup window displays the automatic action settings (see “Edit Automatic Action” below for descriptions of these settings.
- Remove Automatic Action - Select the “Minus” (-) icon (see image above) to remove an automatic action.
- Edit Automatic Action - Select the pencil icon (see image above) to edit an automatic action. A popup window displays the current settings (see image below).
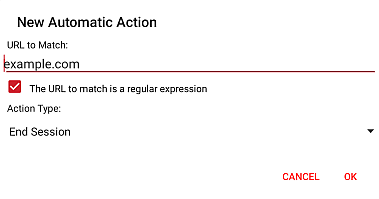
- URL to Match - Enter the URL that, when matched, will prompt the automatic action set in the “Action Type” setting below.
- The URL to match is a regular expression - If checked, the URL will be matched as a regular expression.
- Action Type - Select the action that will be prompted when the above URL is matched.
- Login Form - Automatically logs into a web form using the login information that you set.
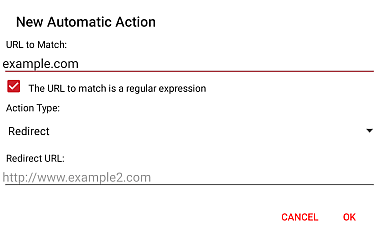
- Redirect - Redirects the matched URL (see “URL to Match”) to the URL that you set.
- End Session - Automatically ends the KioWare for Android session.
- Run Script - Automatically runs the JavaScript commands that you set.
- All Other Settings - See sections below for specific settings based on “Action Type”.
Login Form
The window looks like this when the “Action Type” is set to “Login Form”.
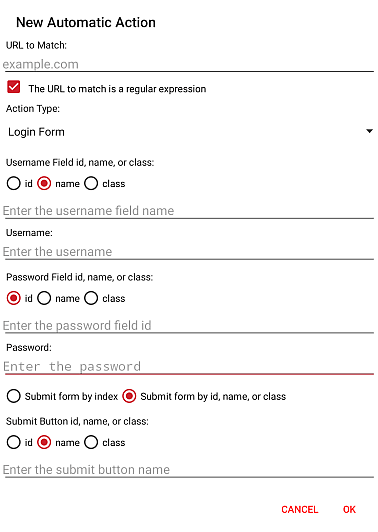
- Username Field id, name, or class - Select the username item to be used when logging into the form.
- id - If selected, the username field id will be used. Enter the field id on the line below.
- name - If selected, the username field name will be used. Enter the field name on the line below.
- class - If selected, the username field class will be used. Enter the field class on the line below.
- Username - Enter the username to be used when logging into the form.
- Password Field id, name, or class - Select the password item to be used when logging into the form.
- id - If selected, the password field id will be used. Enter the field id on the line below.
- name - If selected, the password field name will be used. Enter the field name on the line below.
- class - If selected, the password field class will be used. Enter the field class on the line below.
- Password - Enter the password to be used when logging into the form.
- Submit form by Index - (Only available when the “Submit Button id, name, or class” option below is not selected) Select this option to submit the form by its index. The “Form Index” setting will show.
- Form Index - Set the value of the form index.
- Submit form by id, name, or class - (Only available when the “Submit form by Index” option above is not selected) Select this option to submit the form using the submit button. The “Submit Button id, name, or class” setting will show.
- Submit Button id, name, or class - Select the submit button item to be used when submitting the form.
- id - If selected, the submit button field id will be used. Enter the button id on the line below.
- name - If selected, the submit button field name will be used. Enter the button name on the line below.
- class - If selected, the submit button field class will be used. Enter the button class on the line below.
Redirect
The window looks like this when the “Action Type” is set to “Redirect”.
End Session

Run Script
The window looks like this when the “Action Type” is set to “Run Script”.
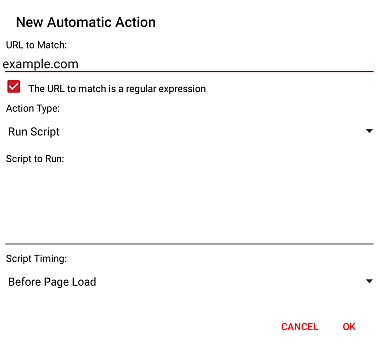
- Script to Run - Enter the JavaScript commands to be run when the URL (see Automatic Action List, URL to Match above) is matched.
- Script Timing - Set when the script is to be run (“Before Page Load”, “On Page Load Start”, or “After Page Load”).