Configuration Tool
Devices Tab
See also Root Tab for settings related to rooted devices.

- KioWare Device Support Not Installed - If this warning shows, then the KioWare Device Support application is not loaded on the kiosk or tablet and will need to be installed before using many of the devices that you set up from this tab. When Google Play Store is installed on the kiosk or tablet, the warning can be clicked (or tapped, if using a touchscreen) to install the KioWare Device Support application directly from the Play Store.
- Camera - Select this option to configure settings for the tablet's camera (see Camera below).
- MagTek uDynamo/BulleT/Dynamag - Select this option to configure settings for the MagTek magnetic strip reader (see MagTek uDynamo/BulleT/Dynamag below).
- OPN Devices - Select this option to configure settings for using OPN barcode readers (see OPN Devices below).
- Keyboard Wedge - Select this option to configure settings for a keyboard wedge (see Keyboard Wedge below).
- Bluetooth Devices - Select this option to configure settings for communication between the tablet and a Bluetooth device (see Bluetooth Devices below).
- Chromecast - Select this option to configure settings for Google's Chromecast digital media player (see Chromecast below).
- Star Printers - Select this option to configure settings for Star printers (see Star Printers below).
- Enable ZXing - If enabled, the ZXing application can be used, which allows the tablet's camera to serve as a barcode reader.
- Note: The ZXing application must be installed separately. It can be downloaded from the Google Play Store.
- ChipDNA Devices - Select this option to configure settings for ChipDNA devices (see ChipDNA Devices below). Note: This option is only available for devices running Android 4.1 and higher.
- GoChip Devices - Select this option to configure settings for GoChip EMV devices (see GoChip Devices below).
- Storm Interface Devices - Select this option to configure Storm Interface devices that comply with the Americans with Disabilities Act (see Storm Interface ADA Devices below).
- Numato GPIO Board - Select this option to configure settings for the Numato GPIO Board (see Numato GPIO Board below).
- Wattbox Devices - Select this option to configure settings for SnapAV Wattbox devices (see Wattbox Devices below).
Bluetooth Permissions for Locating Nearby Devices
When attempting to search for the following nearby Bluetooth devices, your device permissions must allow KioWare for Android to find, connect to, and determine the relative location of nearby devices (see table below).
Permissions must also be allowed when the Config Tool is started and any of the above device settings are either enabled or contain a generic Bluetooth device after loading a remote settings file (see table below).
Notes:
- KioWare for Android always skips enabling/disabling the Bluetooth state during the provisioning process (and in Android 13 or higher, logs that the Bluetooth state is unable to be set).
- Permission popups will never show in the Main App. Missing permissions are logged after the settings are loaded (when required by the remote settings file).
-
| If Bluetooth (location) permission is... | ...Then KioWare will do this when you attempt to locate nearby devices |
| Enabled in device settings before attempting to locate a nearby Bluetooth device | Not show a permission popup and continue with locating nearby devices. |
| Disabled in device settings before attempting to locate a nearby Bluetooth device (or before loading a remote settings file that enables one or more Bluetooth or generic Bluetooth devices) | Show a popup window asking for this permission to be allowed.
- Allowing permission will continue with locating nearby devices.
- Declining permission (or canceling the popup) will disable the specific device settings and show a popup listing all missing permissions that must be allowed for KioWare to function. Go to your device settings and enable them.
|
| Declined (or popup is canceled) during prior attempt to locate a nearby Bluetooth device (see above) | Disable the specific device settings and show a popup listing all missing permissions that must be allowed for KioWare to function. Go to your device settings and enable them. |
Camera

- Enable Camera - Select this option to enable the tablet's camera when KioWare for Android is running. All other camera settings will become available.
Note: To enable the camera, your device permissions must be set to allow use of the camera and microphone with KioWare (see table below).
-
| If camera and microphone permissions are... | ...Then KioWare will do this when you attempt to enable the camera |
| Both enabled in device settings before using this screen | Not show any permission popups and allow use of the Camera settings screen. |
| Both disabled in device settings before using this screen | Show two popup windows asking for these permissions to be allowed.
- Allowing both permissions will allow use of the Camera settings screen.
- Allowing only one permission or declining both will show a popup listing all missing permissions that must be allowed for KioWare to function. Go to your device settings and enable them.
|
| Partially enabled (one is enabled and the other is disabled) in device settings before using this screen | Show a popup listing all missing permissions that must be allowed for KioWare to function. Go to your device settings and enable them. |
| Declined or partially declined during prior use of this screen (see above) | Show a popup listing all missing permissions that must be allowed for KioWare to function. Go to your device settings and enable them. |
Default Camera Settings
- Clear Saved Images on Session End - If checked, all pictures previously saved to the device will be auto-removed when the session ends.
- Default Camera - Select the default camera.
- Front - Takes pictures from the front (screen) of the tablet.
- Back - Takes pictures from the back of the tablet.
Default Display Settings
Used to configure which buttons show when using the camera and to set up custom button images. Custom images for camera buttons may be kept or deleted when reloading the Configuration Tool default settings (see Configuration Tool, Configuration Toolbar, Load Defaults). For more information on adding custom images, see Configuration Tool, Using Custom Images.
Note: When multiple custom images can be set for a button, all image URLs MUST be entered for any custom images to display in the browser.
- Show Exit Button - If checked, the “Exit” (“X”) button will display when running the camera.
- Pencil Icon - Select this icon to add custom unpressed (up) and depressed (down) images. See note above.
- Show Camera Switch Button - If checked, the “Camera Switch” button will display when running the camera. This button switches between the front and back cameras (see “Default Camera” above).
- Pencil Icon - Select this icon to add custom unpressed (up) and depressed (down) images. See note above.
- Show Capture Button - If checked, the “Capture” button (for taking pictures) will display when running the camera.
- Pencil Icon - Select this icon to add custom unpressed (up) and depressed (down) images. See note above.
- Show Timer Button - If checked, the “Timer” button (for countdown before automatically taking pictures) will display when running the camera.
- Pencil Icon - Select this icon to add custom unpressed (up) and depressed (down) images. See note above.
- Show Preview Screen - If checked, the Preview screen (for accepting or removing pictures after taking them) will display when running the camera.
- Pencil Icon - Select this icon to add custom unpressed (up) and depressed (down) images for the “Accept” and “Cancel” buttons. See note above.
- Default Timer - Sets the amount of time (in seconds) before a picture is automatically taken when running the camera. Note: If using the onVideoCapture JavaScript function, this timer will set the amount of time before a video is automatically taken (see Scripting, Camera Events, onVideoCapture).
- Video Duration - Sets the amount of time (in seconds) that the camera will record a video. Set to 0 to allow users to stop the video whenever they want.
- Base64 Image Width - Sets the width of images shown using JavaScript, for custom resolution (see KWCamera, Camera Events, onCameraCapture in the Scripting section of this user guide).
MagTek uDynamo/BulleT/Dynamag
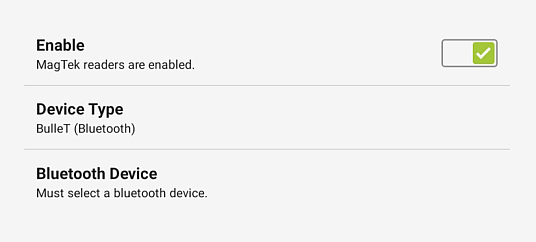
- Enable - If checked, MagTek readers can be used with the tablet.
- Device Type - Select the device type (“uDynamo”, “BulleT”, or “Dynamag”).
Note: When searching for nearby Bluetooth MagTek devices, your device permissions must allow KioWare for Android to find, connect to, and determine the relative location of nearby devices (see Bluetooth Permissions for Locating Nearby Devices above).
- Bluetooth Device - If “BulleT” is selected under “Device Type” (see above), this option becomes available for selecting the specific Bluetooth device. In order for a device to be listed, it must be paired using the Android Bluetooth settings.
OPN Devices
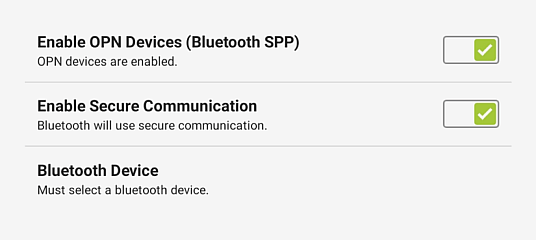
- Enable OPN Devices - If checked, OPN barcode readers can be used with the tablet.
Note: When searching for nearby Bluetooth OPN devices, your device permissions must allow KioWare for Android to find, connect to, and determine the relative location of nearby devices (see Bluetooth Permissions for Locating Nearby Devices above).
- Enable Secure Communication - If checked, OPN barcode readers will use a secure connection to communicate with the tablet. Note: Tablets can vary, and some may have issues when attempting communication with a secure connection.
- Bluetooth Device - If “Enable OPN Devices” is checked (see above), this option becomes available for selecting the specific Bluetooth device. In order for a device to be listed, it must be paired using the Android Bluetooth settings.
Keyboard Wedge
Devices can serve as keyboard wedges when they are set up to pass data to KioWare for Android as if entered on a keyboard.
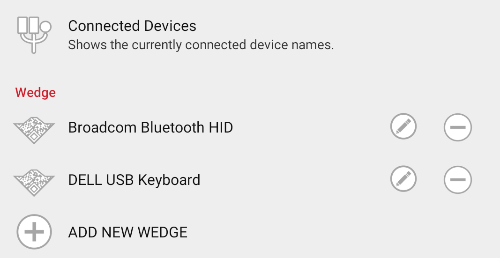
- Connected Devices - Select this option to view a list of all devices, internal to the tablet, that can serve as a keyboard wedge (see Connected Devices below).
Wedges
- Add New Wedge - Select this option to add a new keyboard wedge. A popup window displays the wedge settings (see Edit Wedge below for descriptions of these settings).
- Edit Wedge (pencil icon) - Select the pencil icon (see image above) to edit keyboard wedge settings for a device (see Edit Wedge below).
- Remove Wedge (minus icon) - Select the minus icon (see image above) to remove a keyboard wedge.
Connected Devices
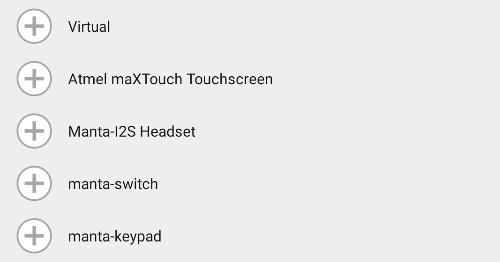
- Edit Connected Device - Select an internal device to view or edit its keyboard wedge settings. A popup window displays the following settings:
- New Wedge Entry - The name of the internal device to be used as a keyboard wedge.
- Alias - The alternative name of the device.
- Start Sentinel - (Optional) Characters used to indicate the start of data that is input.
- Note:
- The “Start Sentinel” and “End Sentinel” cannot be the same.
- The “Start Sentinel” and “End Sentinel” can only be a single character.
- The “Start Sentinel” and “End Sentinel” can use escaped characters (\n, \r, etc.) and Unicode (\u0018, \u0001\, etc.).
- End Sentinel - Characters used to indicate the end of data that is input (/n is commonly used; see note above).
- Note: “End Sentinel” must be entered for the keyboard wedge to work correctly.
- Clear Buffer Time - Sets the amount of time (in milliseconds) before the buffer is cleared when the device times out before the next key event occurs (set to 0 to disable; max = 500).
Edit Wedge
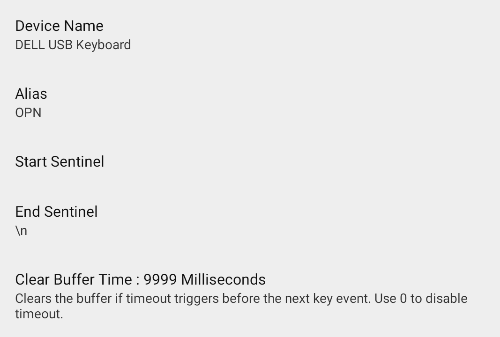
- Device Name - The name of the external device to be used as a keyboard wedge. Note: This is the actual name of the device (see Connected Devices above).
- Alias - The alternative name of the device.
- Start Sentinel - (Optional) Characters used to indicate the start of data that is input.
- Note:
- The “Start Sentinel” and “End Sentinel” cannot be the same.
- The “Start Sentinel” and “End Sentinel” can only be a single character.
- The “Start Sentinel” and “End Sentinel” can use escaped characters (\n, \r, etc.) and Unicode (\u0018, \u0001\, etc.).
- End Sentinel - Characters used to indicate the end of data that is input (/n is commonly used; see note above).
- Note: “End Sentinel” must be entered for the keyboard wedge to work correctly.
- Clear Buffer Time - Sets the amount of time (in milliseconds) before the buffer is cleared when the device times out before the next key event occurs (set to 0 to disable; max = 500).
Bluetooth Devices
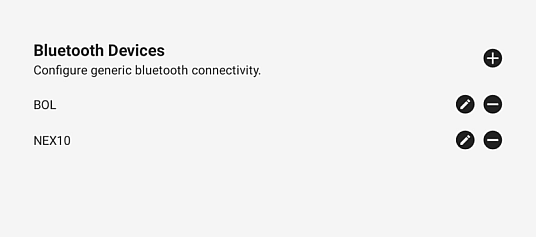
- Add New Bluetooth Device - Select this option to add a new Bluetooth device. A popup window displays the Bluetooth settings (see “Edit Bluetooth Device” below for descriptions of these settings).
Note: When searching for nearby generic Bluetooth devices, your device permissions must allow KioWare for Android to find, connect to, and determine the relative location of nearby devices (see Bluetooth Permissions for Locating Nearby Devices above).
- Remove Bluetooth Device (minus icon) - Select the minus icon (see image above) to remove a Bluetooth device.
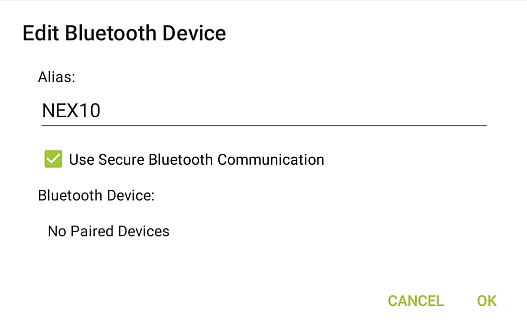
- Edit Bluetooth Device (pencil icon) - Select the pencil icon (see image above) to edit Bluetooth device settings (see image below):
- Alias - The alternative name of the device.
- Use Secure Bluetooth Communication - If checked, Bluetooth devices will use a secure connection to communicate with the tablet. Note: Tablets can vary, and some may have issues when attempting communication with a secure connection (e.g., Samsung tablets).
- Bluetooth Device - Select the specific Bluetooth device. In order for a device to be listed, it must be paired using the Android Bluetooth settings.
-
Chromecast
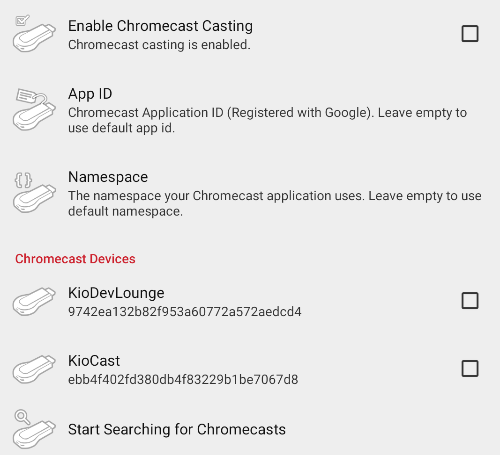
- Enable Chromecast Casting - If checked, Google's Chromecast digital media player can be used with the tablet.
- App ID - Application ID that you register with Google in the Chromecast Developer console. Leave blank to use KioWare for Android's App ID.
- Namespace - Unique string identifier for the application. Leave blank to use KioWare for Android's namespace.
Chromecast Devices
Options will appear for any Chromecast devices that are being used with the tablet. In the example image above, options for KioTron and KioCast devices display.
- Start Searching for Chromecasts - Enables KioWare for Android's Config Tool to begin searching for Chromecasts. KioWare supports the use of up to 10 Chromecasts at one time.
Star Printers
[See also the related JavaScript functions: StarPrinters, Printer Functions in the Scripting section of this user guide.]
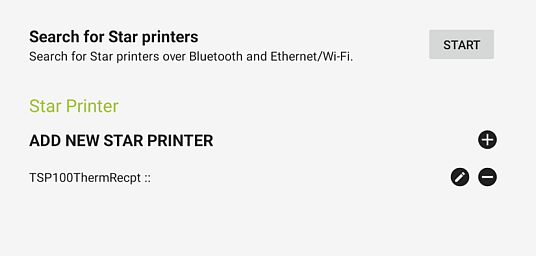
- Search for Star Printers - Select this to begin searching for available Star printers on Bluetooth and Ethernet/Wi-Fi.
Note: When searching for nearby Bluetooth Star Printers, your device permissions must allow KioWare for Android to find, connect to, and determine the relative location of nearby devices (see Bluetooth Permissions for Locating Nearby Devices above).
- Add New Star Printer - Select this option to add a new Star printer. A popup window displays the printer settings (see “Edit Star Printer” below for descriptions of these settings).
- Remove Star Printer (minus icon) - Select the minus icon (see image above) to remove a printer.
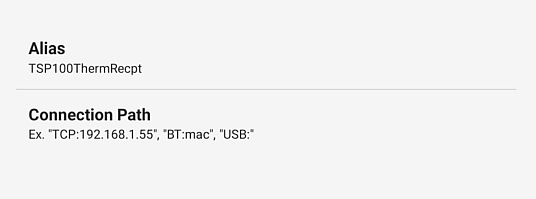
- Edit Star Printer (pencil icon) - Select the pencil icon (see image above) to edit Star printer settings (see image below):
- Alias - The alternative name of the printer.
- Connection Path - Enter the printer's connection path (e.g., “TCP:192.168.1.99”, “BT:mac”, or “USB:”).
-
ChipDNA Devices
[See also Scripting, KWCardEase for the related JavaScript commands and information on pairing your ChipDNA Bluetooth devices.]
The “ChipDNA Device Type” setting contains three options: “Disabled”, “Miura M007/M010 - Bluetooth”, and “Miura M007/M010 - USB”. Note: The settings below are only available for devices running Android 4.1 or higher.
Disabling ChipDNA Devices
When “Disabled” is selected under the “ChipDNA Device Type” setting, the screen looks like this.

Enabling Bluetooth Devices
When “Miura M007/M010 - Bluetooth” is selected under the “ChipDNA Device Type” setting, the screen looks like this. When this setting is enabled, ChipDNA devices can be used to initiate a credit card transaction via JavaScript under KioWare for Android. You must have a compatible EMV Bluetooth PIN pad and a valid ChipDNA account. Use the “Bluetooth Device” setting to select the specific Bluetooth device. In order for a device to be listed, it must be paired using the Android Bluetooth settings.

Enabling USB Devices
When “Miura M007/M010 - USB” is selected under the “ChipDNA Device Type” setting, the screen looks like this.

GoChip Devices

- GoChip Device Type - Select this option to enable a specific GoChip EMV device to run with KioWare for Android or to disable the feature completely.
- Transaction Timeout - (Only available if “GoChip Device Type” above is set to “Ingenico iUC285 (USB)”) Set the number of seconds before the transaction will time out and be cancelled.
Storm Interface ADA Devices
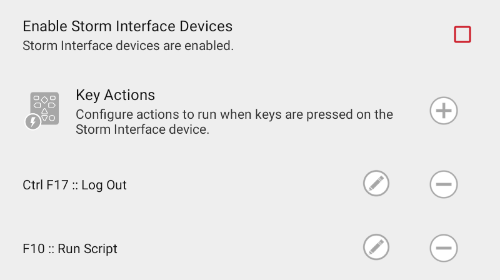
- Enable Storm Interface Devices - If checked, Storm Interface devices (that comply with the Americans with Disabilities Act) can be used with the tablet.
- Add New Key Action (plus icon) - Select the plus icon (see image above) to add a new key action (action to be performed when a specific key or key combination is pressed on the Storm Interface device while running the KioWare browser). A popup window displays the key action settings (see “Edit Key Action” below for descriptions of these settings). (See also Keyboard Filtering Tab, Hot Keys List.)
- Remove Key Action (minus icon) - Select the minus icon (see third image above) to remove a key action.
- Reorder Key Action - Press and drag a key action entry to reorder it.
- Edit Key Action (pencil icon) - Select the pencil icon (see third image above) to edit a key action. A popup window shows the related settings (see image below). (See also Keyboard Filtering Tab, Hot Keys List.)
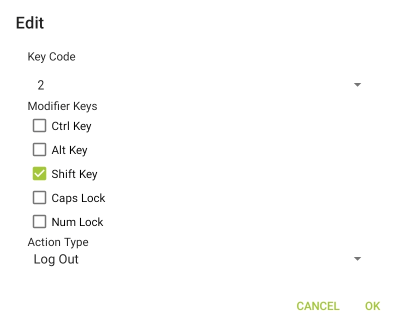
- Key Code - Select a key from the dropdown box (includes 0–9, A–Z, F1–F24, space, special characters, and all other action keys such as Enter, Esc, Tab, arrow keys, volume keys, etc.; does not include the Ctrl, Alt, and Shift keys).
- Modifier Keys - (Optional) Check the box for each modifier key (key that alters the function of another key, such as “Ctrl”, “Alt”, and “Shift”) that is to be used with the key selected above.
- Action Type - Select the action to be performed when the above key (or key and meta key combination) is pressed. The table below describes the available actions.
-
| Action | Description |
| Default | Performs the default action assigned to the key |
| Begin/Renew Session | Begins or refreshes the KioWare user session |
| Home | Returns to the Start Page (see General Tab, Start Page Settings, Start Page URL) |
| Back | Moves back one page or screen in the browser |
| Forward | Moves forward one page or screen in the browser |
| Refresh | Reloads the currently displayed page or screen |
| Log Out | Ends the current KioWare user session |
| Volume Down | Decreases the system volume |
| Volume Up | Increases the system volume |
| Scroll Up | Scrolls up one line |
| Scroll Down | Scrolls down one line |
| Scroll Right | Scrolls right for a set number of characters |
| Scroll Left | Scrolls left for a set number of characters |
| Zoom In | Increases the zoom percentage |
| Zoom Out | Decreases the zoom percentage |
| Show Exit Prompt | Shows the Exit popup window |
| Navigate | Navigates to the URL entered in the URL setting that shows below |
| Run Script | Runs the script entered in the Script to Run setting that shows below |
Numato GPIO Board
KioWare for Android supports the General Purpose Input/Output (GPIO) Board manufactured by Numato Systems. This board is an integrated circuit board containing metal pins that can be used to form electrical connections. By default, the pins are not set up to behave in any certain way; they are controlled by the user. If the board is connected to a kiosk or tablet that is running KioWare for Android, the Config Tool can be used to specify pin settings, including if pins will serve as input or output pins.
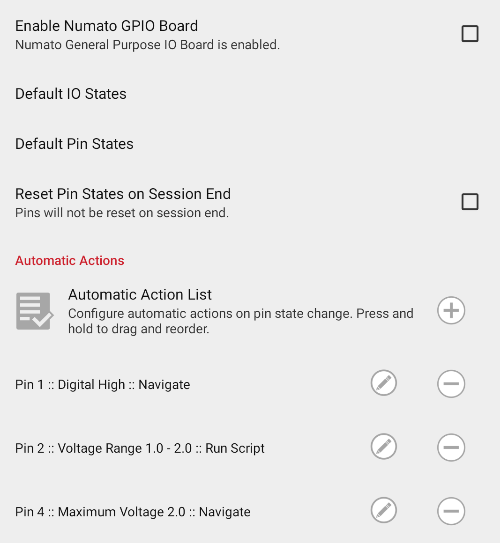
- Enable Numato GPIO Board - If checked, Numato System's GPIO Board can be used with the tablet, and the settings below become available.
- Default IO States - Sets the default input/output (I/O) state of all pins. A popup window lists the pins, and each one whose box is checked will serve as an output pin by default. All others will default to input pins.
- Default Pin States - Sets the default high-voltage pins. A popup window lists the pins, and each output pin (as specified in “Default IO States” above) that is checked will serve as a high-voltage pin by default. Note: Though all pins appear in the list, all input pins will be ignored.
- Reset Pin States on Session End - If checked, all pins will be reset to their default I/O and high-voltage states when a user session ends.
Automatic Actions
- Add New Automatic Action (plus icon) - Select the plus icon (see image above) to add a new automatic action. A popup window displays the automatic action settings (see “Edit Automatic Action” below for descriptions of these settings).
- Remove Automatic Action (minus icon) - Select the minus icon (see image above) to remove an automatic action.
- Reorder Automatic Action - Press and drag an automatic action entry to reorder it.
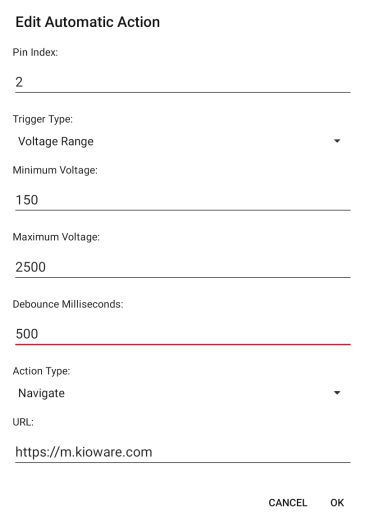
- Edit Automatic Action (pencil icon) - Select the pencil icon (see image above) to edit automatic action settings (see image below):
-
- Pin Index - The number that identifies a pin (corresponds to pin numbers shown in the popup windows for “Default IO States” and “Default Pin States” above).
- Trigger Type - Specify the condition of the pin that will trigger the automatic action to occur.
- Digital - The pin reaches a digital high or low (as set in “Trigger On” below)
- Above Voltage - The pin's voltage goes above the specified voltage (as entered in “Minimum Voltage” below).
- Below Voltage - The pin's voltage goes below the specified voltage (as entered in “Maximum Voltage” below).
- Voltage Range - The pin's voltage is within a specified range (as entered in “Minimum Voltage” and “Maximum Voltage” below).
- Trigger On - (Only available when “Trigger Type” above is set to “Digital”) Specify if a low or high voltage will trigger the automatic action to occur.
- Minimum Voltage - (Only available when “Trigger Type” above is set to “Above Voltage”) Set the lowest voltage that the pin can have before the automatic action is triggered.
- Maximum Voltage - Set the highest voltage that the pin can have before the automatic action is triggered.
- Debounce Milliseconds - Set the amount of time (in milliseconds) that the trigger condition must be continuously met before the action is triggered.
- Action Type - Select the action to be triggered when the specified conditions are met.
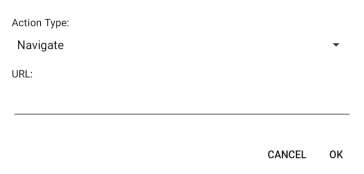
- Navigate - Redirect to a specific URL (as entered in “URL” below).
- URL - (Only available when “Action Type” above is set to “Navigate”; see image below) Enter the URL to be navigated to when the specified conditions are met.
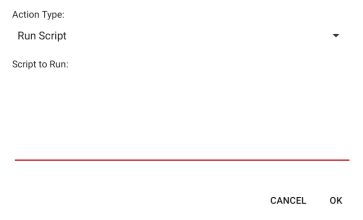
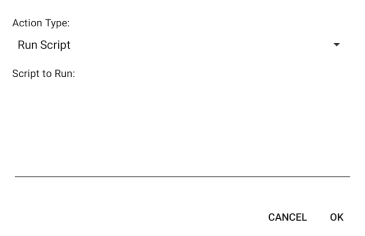
- Run Script - Run the specified JavaScript commands (as entered in “Script to Run” below).
- Script to Run - (Only available when “Action Type” above is set to “Run Script”; see image below) Enter the JavaScript commands to be run when the specified conditions are met.
Wattbox Devices
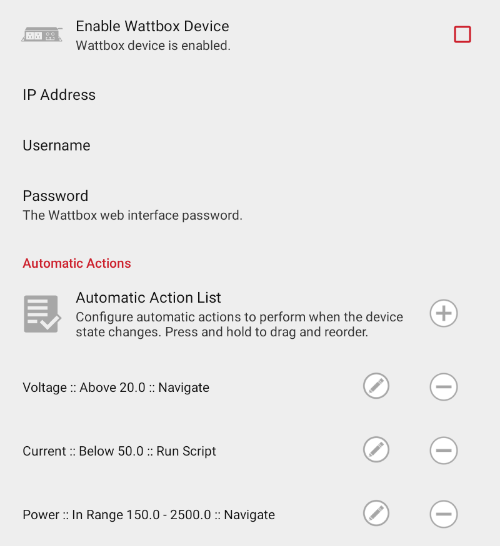
- Enable Wattbox Device - If checked, SnapAV Wattbox devices can be used with the tablet.
- IP Address - Enter the IP address of the Wattbox web interface.
- Username - Enter the username to log onto the Wattbox web interface.
- Password - Enter the password to log onto the Wattbox web interface.
Automatic Actions
- Add New Automatic Action (plus icon) - Select the plus (+) icon to add a new automatic action. A popup window displays the automatic action settings (see “Edit Automatic Action” below for descriptions of these settings).
- Remove Automatic Action (minus icon) - Select the minus icon (see image above) to remove an automatic action.
- Edit Automatic Action (pencil icon) - Select the pencil icon (see image above) to edit automatic action settings (see images below).
-
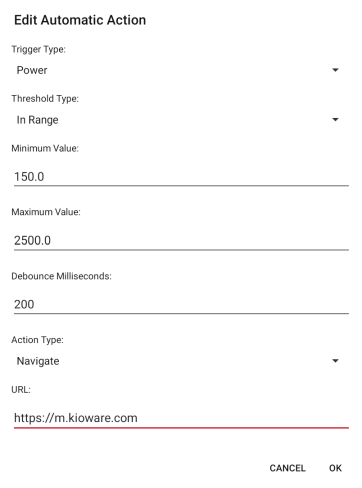
- Trigger Type - Specify the electrical measurement that will trigger the automatic action to occur (options are “Voltage”, “Current”, and “Power”).
- Threshold Type - Specify the condition of the “Trigger Type” (see above) that will trigger the automatic action to occur.
- Above - The “Trigger Type” (see above) goes above the specified value (as entered in “Minimum Value” below).
- Below - The “Trigger Type” (see above) goes below the specified value (as entered in “Maximum Value” below).
- In Range - The “Trigger Type” (see above) is within a specified range (as entered in “Minimum Value” and “Maximum Value” below).
- Minimum Value - (Unavailable when “Threshold Type” above is set to “Below”) Set the lowest value that the “Trigger Type” (see above) can have before the automatic action is triggered.
- Maximum Value - (Unavailable when “Threshold Type” above is set to “Above”) Set the highest value that the “Trigger Type” (see above) can have before the automatic action is triggered.
- Debounce Milliseconds - The amount of time (in milliseconds) during which the device has time to recover and re-enter the allowed range. If the device recovers, the auto-action will not occur.
- Action Type/Action - Select the action type and set the action to be triggered when the specified conditions are met.
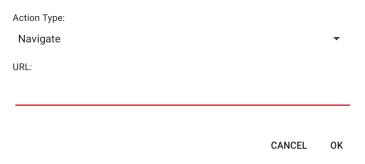
- Navigate - Redirect to a specific URL (as entered in “URL” below).
- URL - (Only available when “Action Type” above is set to “Navigate”; see image below) Enter the URL that KioWare for Android will redirect to.
- Run Script - Run the specified JavaScript commands (as entered in “Script to Run” below).
- Script to Run - (Only available when “Action Type” above is set to “Run Script”; see image below) Enter the JavaScript commands to be run.
