Configuration Tool
General Tab

Start Page Settings
- Start Page URL - Home page (main start page) of KioWare for Android. Enter a complete URL that begins with a protocol (e.g., “http://” or “file:///”; see table below). If left blank, the default Welcome to KioWare page will display. [See also the related JavaScript function: KioWareUtils, General Functions, getKioProperty in the Scripting section of this user guide.]
-
| Start Page Location | URL Format to Use |
| Tablet Internal Storage | file:///sdcard/your-content/startpage.html |
| Web Server | http://localhost/your-content/startpage.html |
- Additional Start Pages - Select the “Plus” (+) icon to set up additional start pages that will open in new tabs within the KioWare for Android browser. A popup window shows these settings:
- URL (unlabeled) - Enter the URL of the new start page (in the format of http://example.com).
- Allow the user to close this tab - If checked, the tab that shows the above URL can be closed.
Select “OK” and the new start page entry shows on the General tab (see below).
Note: If adding more start pages than allowed by the “Maximum Tabs” setting (see User Interface Tab, Tab Bar), a popup window will indicate this and give you the option of decreasing the start pages or increasing the “Maximum Tabs” setting before continuing.
- Start Page Entries (labeled with URLs) - All new start page entries show below the “Additional Start Pages” setting. Entries can be edited, removed, or reordered.
- Edit - Select the pencil icon (see image above) to edit an entry.
- Delete - Select the “Minus” (-) icon (see image above) to remove an entry.
- Reorder - Press and hold an entry to select it, and then drag it to reorder.
- Start Page URL First - (Only available when at least one additional start page has been added) - Sets if the main start page (see “Start Page URL” setting above) will show before or after all other start page tabs.
- Checked - The tab for the main start page shows first (far left), and all other start page tabs show to the right of this tab.
- Unchecked - All other start page tabs show first, and the tab for the main start page will show as the last tab on the right.
- Allow Start Page Closure - If checked, the tab for the main start page (see “Start Page URL” setting above) can be closed.
Boot Settings
- Start On Boot - Run KioWare for Android when the tablet boots up. If you are familiar with KioWare desktop, note that this option is still required when you set up the device admin from the Security tab, unlike shell mode (on desktop). See also Note 2 under Security Tab, General Options, Selected Home App. [This setting is included in the KioWare for Android security/configuration audit; see Audit Tab, General, Start on Boot and Audit Tab, Security, Start on Boot/Shutdown Option.
- Wait for Network Delay Timeout - (Only available when the “Start on Boot” checkbox above is checked) Set the amount of time (in seconds) that KioWare for Android waits for a network connection (after the device boots) before showing the start page (see Start Page Settings, Start Page URL above). When enabled, a Network Delay popup window shows and tells you that there will be a wait for this number of seconds. Set to 0 to disable the wait (defaults to 0).
- Allow Network Delay Cancel - (Only available when the “Start on Boot” checkbox above is checked and the “Wait for Network Delay Timeout” above is not set to 0) If checked, the Network Delay popup window can be closed during the wait.
- Wait for Network Type - (Only available when the “Start on Boot” checkbox above is checked and the “Wait for Network Delay Timeout” above is not set to 0) Select the type of network connection to wait for (“Wi-Fi”, “Cellular”, “Ethernet”, or “Any”).
Screen Settings
- Screen Orientation - When KioWare for Android is running, force the tablet screen to display in landscape, portrait, reverse landscape, or reverse portrait. The default option allows the tablet to decide.
- Prevent Screen Sleep - Force the tablet screen to stay on when KioWare for Android is running in certain cases. The default option allows the screen to sleep. There is also an option to end the user session when the screen sleeps. Note: This setting is directly related to the “Screen Schedule” setting (see below), as described in the following tables.
-
| Behavior of Screen Sleep and Screen Schedule When Running KioWare for Android |
| Screen Schedule | Prevent Screen Sleep |
Is Not Set
(Disabled or Empty) | Is used to control keeping the screen awake |
| Is Set | Is obeyed during scheduled times, and then is set to “Allow” outside of the scheduled times |
-
| Behavior of Screen Sleep and Screen Schedule When Upgrading Settings |
| Prevent Screen Sleep | Screen Schedule |
| Is Set to Anything But “Allow” | Will have all schedules disabled |
| Is Set to “Allow” | Will be set to “Disable Timer” if a schedule has been set up |
- End User Session on Sleep - If enabled, the user session will remain active when the kiosk or tablet goes to sleep.
- Screen Schedule - Used to set up a schedule for turning the tablet's screen on or off (see Screen Schedule below). Note: This setting is directly related to the “Prevent Screen Sleep” setting (see above), as described in the above tables.
Remote Settings
- Enable Automatic Settings Import - Enables use of a settings file for importing settings and any embedded resources (images, addins, etc.). For more information on embedding and importing resources, see Import/Export of Settings, Images, and Other Resources.
Notes:
- To enable this setting, your device permissions must be set to allow use of alarms and reminders with KioWare for Android (see table below).
- Permission popups will never show in the Main App. Missing permissions are logged after the settings are loaded (when required by the remote settings file).
-
| If alarms and reminders permission is... | ...Then KioWare will do this when you attempt to enable automatic settings import |
| Enabled in device settings before attempting to enable automatic settings import | Not show a permission popup, make all automatic settings import options available, and enable automatic settings import. |
| Disabled in device settings before attempting to enable automatic settings import (or before loading a remote settings file that enables automatic settings import) | Show a popup window asking for this permission to be allowed.
- Allowing permission will make all automatic settings import options available and enable automatic settings import.
- Declining permission (or canceling the popup/not granting permission and returning to Config Tool) will disable all automatic settings import options and show a popup listing all missing permissions that must be allowed for KioWare to function. Go to your device settings and enable them.
|
| Disabled in device settings before loading a provisioning file that enables automatic settings import | Show a popup window asking for this permission to be allowed.
- Allowing permission will enable automatic settings import.
- Declining permission (or canceling the popup/not granting permission and returning to Config Tool) will disable automatic settings import.
|
| Declined (or popup is canceled/no permission granted before returning to Config Tool) during prior attempt to enable automatic settings import (see above) | Disable automatic settings import and show a popup listing all missing permissions that must be allowed for KioWare to function. Go to your device settings and enable them. |
- Settings File Location - When the “Enable Automatic Settings Import” setting is enabled, you can specify the location of the settings file. A popup window displays the following options:
- Google Drive - (Only available if Google Play Services is installed) Select a file from Google Drive.
- Local File - Select a file from the local drive of your tablet. Note: When maneuvering through folders, select the top folder icon (labeled with two dots) to move back one level.
- URL - Enter a local file path (accesses your tablet's internal/external storage) or remote file path (accessed from a server via a network connection). This URL will appear by default when using the Configuration Toolbar, Import Settings option, but can be changed.
- Settings File Update Interval - Sets the frequency (in minutes) that KioWare for Android will check the settings file for changes while its browser is running (0 disables the check). When a change is found, KioWare for Android will restart immediately if no user is present or the “Default Inactivity Timer” (see Attract/Inactivity Tab, Inactivity Timers) is set to 0. Otherwise, KioWare for Android will wait until the session ends before restarting.
- Inactivity Timer Set - Updates will load when the “Default Inactivity Timer” times out.
- Inactivity Timer Not Set - Updates will load when “Settings File Update Interval” times out.
- Note: KioWare for Android can automatically load settings and any embedded resources from a settings file on install or upgrade by including the file path in a special provisioning XML file (see Installation and Requirements, Installation Instructions, Provisioning).
Provisioning
- Create Provisioning File - Select this option to generate a provisioning file for setting up new devices to run with KioWare for Android (see Create Provisioning File below).
Screen Schedule

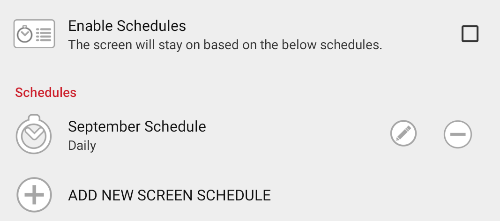
- Enable Schedules - If enabled, the tablet's screen will turn on and off based on the schedule you set (see below).
Notes:
- To enable this setting, your device permissions must be set to allow use of alarms and reminders with KioWare for Android (see table below).
- Permission popups will never show in the Main App. Missing permissions are logged after the settings are loaded (when required by the remote settings file).
-
| If alarms and reminders permission is... | ...Then KioWare will do this when you attempt to enable screen schedules |
| Enabled in device settings before attempting to enable screen schedules | Not show a permission popup, make screen schedule settings available, and enable screen schedules. |
| Disabled in device settings before attempting to enable screen schedules (or before loading a remote settings file that enables screen schedules) | Show a popup window asking for this permission to be allowed.
- Allowing permission will make screen schedule settings available and enable screen schedules.
- Declining permission (or canceling the popup/not granting permission and returning to Config Tool) will disable screen schedule settings and show a popup listing all missing permissions that must be allowed for KioWare to function. Go to your device settings and enable them.
|
| Disabled in device settings before loading a provisioning file that enables screen schedules | Show a popup window asking for this permission to be allowed.
- Allowing permission will enable screen schedules.
- Declining permission (or canceling the popup/not granting permission and returning to Config Tool) will disable screen schedules.
|
| Declined (or popup is canceled/no permission granted before returning to Config Tool) during prior attempt to enable screen schedules (see above) | Disable screen schedule settings and show a popup listing all missing permissions that must be allowed for KioWare to function. Go to your device settings and enable them. |
Schedules
- Add New Screen Schedule - Select the plus icon (see image above) and enter all information (see Edit Screen Schedule below for descriptions of settings).
- Edit Screen Schedule (pencil icon) - Select the pencil icon (see image above) and edit the information (see Edit Screen Schedule below for descriptions of settings).
- Delete Screen Schedule (minus icon) - Select the minus icon (see image above).
Edit Screen Schedule

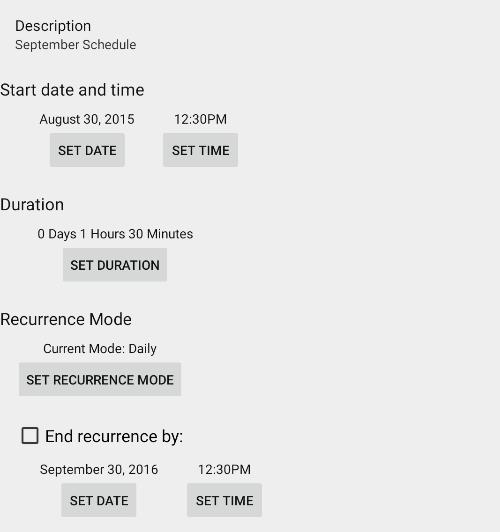
- Description - Enter a description for the screen schedule.
- Start Date and Time - Select the “Set Date” and “Set Time” buttons. Popup windows will display to set a start date (month/day/year) and start time (hour:minute am/pm) for the screen to automatically turn on.
- Duration - Select the “Set Duration” button. A popup window will display to set the duration (days/hours/minutes) for the screen to remain on.
- Recurrence Mode - Select the “Set Recurrence Mode” button. A popup window will display. Select the recurrence mode dropdown box (defaults to “Daily”) and select a recurrence pattern for automatically turning on the screen. This window will show different settings depending on the recurrence that is selected.
- Daily - Sets a daily interval (e.g., every day or every 10 days).
- Weekly - Sets a weekly interval (e.g., every week on Tuesday and Thursday or every 2 weeks on Saturday)
- Nth day of month - Sets the day of the month (1 to 31) and the monthly interval (e.g., the 15th day every 3 months).
- Nth day of week of month - Sets the week (first, second, third, fourth, or last) in the month, the day (Sunday through Saturday), and the monthly interval (e.g., the second Sunday every 2 months).
- Hourly - Sets the hourly interval (e.g., every 2 hours).
- Once - Sets up a one-time occurrence based on the “Start Date”, “Start Time”, and “Duration” settings above.
- End recurrence by - (not available with one-time occurrences) Check this box, and then select the “End Date” and “End Time” buttons. Popup windows will display to set an end date (month/day/year) and end time (hour:minute am/pm) for this recurrence only.
Create Provisioning File
KioWare for Android includes a provisioning feature to automatically load certain items during installation. A provisioning file, which tells KioWare for Android which items to auto-load, can be created manually using XML tags (see Installation and Requirements, Installation Instructions, Provisioning) or can be auto-generated using the settings below. Select the “RESET PROVISIONING FORM” option at the top to clear any information you have entered. This will NOT clear any changes made anywhere else in the Config Tool. To save all settings into a provisioning file, select the “SAVE PROVISIONING FILE” option at the bottom. A popup window will allow you to either save it on your Google Drive or in your device's local storage.

Settings File
This option can be used to supply the location of a pre-existing .xml file. If included, KioWare for Android will reference the local file, remote/local file path, or Google Drive ID and import the file during provisioning. (Similar settings, but used for automatic import of the settings file, are also available under General Tab, Remote Settings.)
- Settings URL - Specify the location of the settings file. A popup window displays the following options:
- Google Drive - (Only available if Google Play Services is installed) Select a file from Google Drive.
- Local File - Select a file from the local drive of your tablet. Note: When maneuvering through folders, select the top folder icon (labeled with two dots) to move back one level.
- URL - Enter a local file path (accesses your tablet's internal/external storage) or remote file path (accessed from a server via a network connection).
Licensing
Similar settings, but used for the device currently running KioWare for Android, are also available on the License Tab.
- Accept KioWare EULA - If checked, the End User License Agreement (EULA) is bypassed when running KioWare for Android for the first time after installation (and you automatically agree to the terms and conditions included in this EULA).
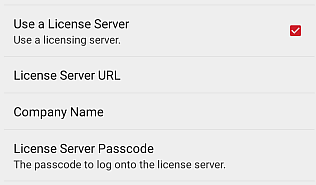
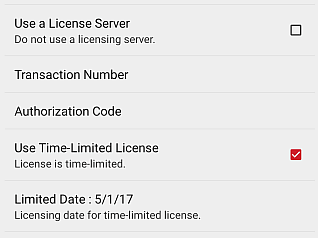
- Use a License Server - Tells KioWare for Android if the license server is enabled for automatic licensing of KioWare for Android.
If checked, these settings will show:

- License Server URL - Enter the URL address of the license server, beginning with “http://”. Note: Be sure to include the virtual directory location where KioWare License Server was installed.
- Company Name - Enter the name of the company that is licensing the KioWare product.
- License Server Passcode - Enter the passcode to log onto the license server.
If unchecked, these settings will show instead:

- Transaction Number - Enter the 8-digit license transaction number.
- Authorization Code - Enter the authorization code.
- Use Time-Limited License - (Optional) Check this box if using time-limited licensing.
- Limited Date - (Only available when the “Use Time-Limited License” checkbox is checked) Enter the licensing date (YYYY-MM-DD).
- KioWare Model - Select the KioWare for Android model (“KioWare Lite”, “KioWare Basic”, or “KioWare Full”).
Device Configuration
- Enable Device Administrator - If checked, Device Administrator mode is enabled. (A similar setting, but used for the device currently running KioWare for Android, is available under Security Tab, Enable Device Administrator.)
- Administrator Password - (Optional and only available when the “Enable Device Administrator checkbox is checked) Enter the password to exit KioWare for Android when Administrator mode is disabled. (A similar setting, but used for the device currently running KioWare for Android, is available under Security Tab, Exit Passcode.)
- Enable Accessibility Service - If checked, this setting provides access to the “KioWare Kiosk” option in the tablet's accessibility settings. When this option is turned on, activity in third-party applications (accessed via custom toolbar links; see User Interface Tab, Custom Toolbar Links) registers as user activity in KioWare for Android. (A similar setting, but used for the device currently running KioWare for Android, is available under Attract/Inactivity Tab, Inactivity Timers, Inactivity/Activity Service.)
- If enabled and the “Default Inactivity Timer” (see Attract/Inactivity Tab, Inactivity Timers) times out, KioWare for Android will be brought to the front, running over top of the third-party application.
- If disabled, the third-party application will continue running on top, but the KioWare for Android session will end.
- Enable Usage Data Access - If checked, access to the device's usage data will be allowed.
- Use Default Launcher - If checked, the default launcher will be enabled. Note: Setting the default launcher requires 5.0 (Lollipop - API Level 21) or higher. (A similar setting, but used for the device currently running KioWare for Android, is available under Security Tab, Selected Home App.)
- Root Test - (Requires the device to be rooted) If checked, a root test will be performed and superuser permissions will be requested. (See also Root Tab for settings related to rooted devices.)
- Screen Timeout - Enter the number of seconds before the screen times out (use 0 to disable). Note: You must enter a valid value for the device you are using. Use this setting with caution, as KioWare Support has no means of verifying which values will and will not work with your device.
- Screen Brightness - Enter a value for the screen brightness (can be from 0 to 255, per the Android documentation; enter 256 to automatically adjust the screen brightness).
- Alarm Volume - Enter the volume for the alarm (as a percentage from 0 to 100). [See also Scripting, KioWareUtils, Volume Functions for the related JavaScript command.]
- Music Volume - Enter the volume for playing music (as a percentage from 0 to 100). [See also Scripting, KioWareUtils, Volume Functions for the related JavaScript command.]
- Ring Volume - Enter the volume for the ringtone (as a percentage from 0 to 100). [See also Scripting, KioWareUtils, Volume Functions for the related JavaScript command.]
- System Volume - Enter the volume for system sounds (as a percentage from 0 to 100). [See also Scripting, KioWareUtils, Volume Functions for the related JavaScript command.]
- Voice Volume - Enter the volume for voice calls (as a percentage from 0 to 100). [See also Scripting, KioWareUtils, Volume Functions for the related JavaScript command.]
Kiosk Management Configuration
- Configure Kiosk Management Settings - If checked, the KioWare Server settings below will be included when provisioning is run. (For more details on Provisioning and manual setup of tags, see Installation, Installation Instructions, Provisioning).
- Site Name - (Only available when the “Configure Kiosk Management Settings” checkbox above is checked) Sets the KioWare Server Site name. (For the related substitution variable, see Configuration Tool, Substitution Variables.)
- Kiosk Name - (Only available when the “Configure Kiosk Management Settings” checkbox above is checked) Sets the KioWare Server kiosk name. (For the related substitution variable, see Configuration Tool, Substitution Variables.)
- Unit Name - (Only available when the “Configure Kiosk Management Settings” checkbox above is checked) Sets the KioWare Server unit name. (For the related substitution variable, see Configuration Tool, Substitution Variables.)
Wi-Fi/Bluetooth Configuration
- Clear Known Wi-Fi List - If checked, all currently saved access points are cleared from the known list (setting is unchecked by default). On Android 6.0 or higher, this setting clears access points that were added by KioWare; versions lower than 6.0 will clear all existing access points. Note: If checked and any networks are being added (see “Wi-Fi SSID” below), then KioWare for Android automatically ensures that the Wi-Fi radio is enabled.
- Wait for Network - Set the number of seconds that provisioning must wait for a network connection before moving on (this occurs after all other Wi-Fi activities are finished, but before all other activity). Enter 0 to disable the wait.
- Wi-Fi SSID - (Optional if the network is an open network) When adding a Wi-Fi network to the known list, enter the service set identifier (SSID) that identifies your router.
- Wi-Fi Password - When adding a Wi-Fi network to the known list, enter the password to log onto the Wi-Fi network.
- Wi-Fi State - Set the Wi-Fi state (check to enable or uncheck to disable).
- Bluetooth State - Set the Bluetooth radio state (check to enable or uncheck to disable).
Provisioning Results
- Show Results Dialog - If checked, a window will open to show the results of each item KioWare for Android attempted to load during the provisioning process (see Create Provisioning File above).
- Results Dialog Timeout - (Only available when “Show Results Dialog” above is checked) Set the number of seconds that the results dialog will remain open before timing out and closing (can be 1 to 3600, or use 0 to disable).