Configuration Tool
Security Tab

-
Enable Device Administrator - Enables KioWare for Android to run as an Android device administrator so that it will run on top of the Android lock screen. This is the most secure way to run KioWare for Android and is highly recommended. When checking this checkbox a popup window appears, telling you that this setting must be disabled before you can uninstall KioWare for Android. Select “OK”, and a second popup window describes the operations that Device Administrator mode allows (see Quick Start Guide, Warnings, Device Admin Prevents Uninstall (KioWare Kiosk) for more details about these two popups):
- Erase all data
- Change the screen-unlock password
- Set password rules
- Monitor screen-unlock attempts
- Lock the screen
Select “Activate” at the bottom right, and the main tab re-appears with the checkbox checked. [This setting is included in the KioWare for Android security/configuration audit; see Audit Tab, Security, Enable Device Administrator and Audit Tab, Security, Exit Passcode.]
Notes:
- If the device administrator passcode (see “Exit Passcode” below) is NOT set when enabling the above option, KioWare for Android will prompt you to set one. If you do not enter a passcode, then this option will automatically be disabled.
- If running external apps, see warning 2 on the User Interface tab.
- KioWare for Android can automatically enable or disable Administrative mode on install or upgrade by including this setting in a special provisioning XML file (see Installation and Requirements, Installation Instructions, Provisioning). This setting is also included on the Create Provisioning File screen (see General Tab, Create Provisioning File, Device Configuration, Enable Device Administrator), which is used to auto-generate a new provisioning file for ease in setting up new devices to run with KioWare for Android.
- Exit Screen Timeout - Set the amount of time (in seconds) that the KioWare for Android exit screen will remain open without user activity before automatically closing (default is 60; max. is 600).
- Exit Passcodes - Sets passwords for exiting KioWare for Android or performing exit actions (see Exit Passcodes below).
- Exit Pattern - Sets the corner pattern to use when exiting KioWare for Android (see Custom Exit Pattern below).
- Enable Fingerprint Exit - (Only available with Android 6.0 (M) and higher, and when fingerprint reader hardware is detected) If checked, any fingerprints set up through the Android Screen Lock settings will exit KioWare for Android.
- Enable Quick Exit - WARNING: Use this ONLY while you are testing because it enables exiting without a passcode.
- Passcode Protect the Configuration Tool - If checked, the passcode entered under “Configuration Tool Passcode” (see below) will be required to access the Config Tool.
- Note: When the above setting is turned on, the passcode is required any time the Config Tool is accessed, even when exiting the tablet's Sleep mode or closing KioWare's Logcat Viewer (see Configuration Tool, Configuration Toolbar, Dropdown Menu, Logcat Viewer).
- Configuration Tool Passcode - (Only available when “Passcode Protect the Configuration Tool” above is checked) - Sets (and confirms) the passcode for accessing the Config Tool (default is 3523).
- Hide System Dialogs - (Available only with Android 12 and higher) If checked, all dialogs (popup windows) generated from the tablet will be hidden.
- Note: With Samsung tablets, virtual keyboards are considered to be system dialogs and will be hidden if this option is checked.
- Disable Notification Shade - (Available only with Android 12 and higher and when “Inactivity/Activity Service” is enabled; see Security Tab, Application Manager, Inactivity/Activity Service) If checked, the notification shade (menu that shows when swiping down from the tablet's top status bar) will not show when running KioWare for Android. [This setting is included in the KioWare for Android security/configuration audit; see Audit Tab, Security, Disable Notification Shade.]
- Disable Status Bar - (Available only with Android 4.4 and higher) If checked, swiping down on the tablet's status bar when running KioWare for Android will not allow items on the bar to be opened. [This setting is included in the KioWare for Android security/configuration audit; see Audit Tab, Security, Disable Status Bar.]
- Show Blocked Messages - If checked, Android toast messages (notification messages) will show when users press navigation keys (physical buttons on a device or on-screen menu button) that are blocked features of the OS.
-
Selected Home App - The home app is a launcher that replaces the Home screen on your Android device and gives access to the contents and features of it. Setting the home app can be done at both the device level and in the Config Tool, where you can specify which home app to use when KioWare is running.
Based on your device's default home app, the Config Tool will allow or block a home app from being set (see table below).
| If Device's Default Home App Is… | …Then Config Tool Does This |
| Not set | Blocks a home app from being set. A popup window indicates that the device home app is not set to KioWare. You must select the “Update” button and set the device home app to KioWare before the Config Tool will allow a home app to be set. |
| Set to a home app other than KioWare | Blocks a home app from being set. A popup window indicates that the device home app is not set to KioWare. You must select the “Update” button and set the device home app to KioWare before the Config Tool will allow a home app to be set. |
| Set to KioWare | Allows a home app to be set (to KioWare or any other home app that is available). |
Setting KioWare as your home app in the Config Tool provides the greatest security when running KioWare for Android. If you are able to select the Android “Home” button to leave KioWare for Android, then something else is set as your home app and should be reset to KioWare instead. For security reasons, KioWare for Android is not able to do this for you automatically. [This setting is included in the KioWare for Android security/configuration audit; see Audit Tab, Security, Selected Home App.]
- Note:
- The most secure way to run KioWare for Android is to make it a device administrator that runs at boot. If KioWare for Android is a device administrator, the home app is not an issue.
- If “Enable Device Administrator” (see above) is disabled and “Start on Boot” (see General Tab, Start on Boot) is enabled, the launcher requires a passcode (if set) to exit the browser when tapping the four corners of the screen.
- Default Browser App - Use this option to set a default browser for your device when the KioWare browser is not running (see Default Browser below for details on setting the default browser for your device when KioWare is or is not running).
- Protocol Access List - Specifies the list of protocols (default is _mailto) for which KioWare for Android will attempt to launch a third-party application to handle (i.e., the default handler at the operating system level). General guidelines for entering protocols are as follows:
- Enter protocols as a comma-separated list with no spaces (they will not be trimmed).
- Colons (:) are optional, and case does not matter.
- An asterisk (*) entry will match everything (must be by itself with no colon).
- A minus sign (-) can precede any entry to indicate that it should be blocked instead of allowed. These entries will display the URL blocked page.
- An underscore (_) can precede any entry to indicate that it should be blocked silently (will do nothing and not display the URL blocked page).
- The minus sign (-) and underscore (_) can be used with the asterisk (*) to block everything.
- All entries are processed in the order listed with a first match policy (see example below).
- Example:
To block mailto silently, allow rdp, and block everything else with an error message, enter the following:
- Browsing Access List - Select this option to configure which pages and resources can be accessed by KioWare (see Browsing Access List below). [This setting is included in the KioWare for Android security/configuration audit; see Audit Tab, Security, Browsing Access List.]
- Scripting Access List - Select this option to configure which web page scripts can be accessed by KioWare (see Scripting Access List below).
- Error Page Access List - Select this option to configure which error pages are allowed to load when an HTTP error occurs (see Error Page Access List below).
- Web App Monitoring List - Select this option to configure which browsed URLs are to be monitored by KioWare (see Web App Monitoring List below).
- Application Manager - Select this option to configure which Android applications and groups of applications (activities) are allowed to run in KioWare for Android (see Application Manager below).
- Download Manager - Select this option to configure settings for downloading files (see Download Manager below).
- File Browser - Select this option to configure secure file browser settings (see File Browser below).
- Basic Authentication List - Select this option to configure KioWare for Android to fulfill basic authentication requests from websites (see Basic Authentication List below).
- Wi-Fi Access Point List - Select this option to set up access points that KioWare for Android will remember and automatically try to connect to (see Wi-Fi Access Point List below).
Exit Passcodes
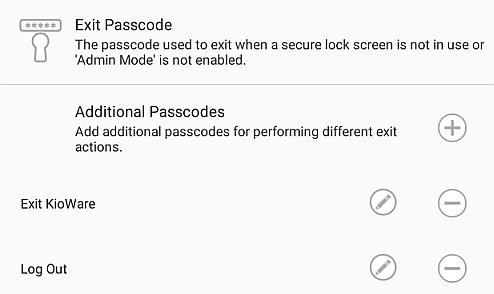
- Exit Passcode - Doubles as a way to set up the KioWare for Android exit passcode and the device administrator exit passcode. A popup window shows for entering and confirming your new exit passcode. [This setting is included in the KioWare for Android security/configuration audit; see Audit Tab, Security, Exit Passcode.]
Notes:
- Your exit passcode (lockscreen passcode) MUST be set if you expect to run KioWare for Android as a device administrator.
- The default passcode MUST be changed in order to exit KioWare for Android when it enters Safe mode (see Quick Start Guide, Warnings, Exit Is Impossible for more details and what to do if you cannot exit).
- Add Additional Passcode (plus icon) - Select the plus (+) icon (see image above) to add an additional passcode. A popup window displays the related settings (see “Edit Additional Passcode” below for descriptions of these settings).
- Remove Additional Passcode (minus icon) - Select the minus (-) icon (see image above) to delete an additional passcode.
- Edit Additional Passcode (pencil icon) - Select the pencil icon (see image above) to edit an additional passcode. A popup window displays for setting the passcode and related exit action (see image below).
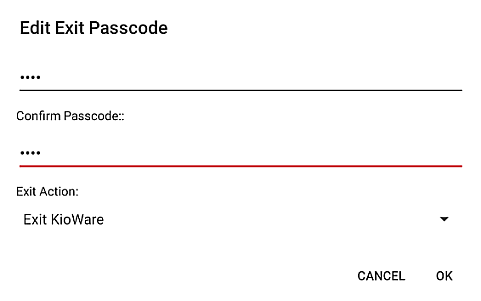
- Exit Passcode - Enter an additional exit passcode.
- Confirm Passcode - Enter the above passcode for confirmation.
- Exit Action - In the dropdown box, select an action to be performed when the above passcode is used to exit (shut down or log off from) KioWare for Android.
- Exit KioWare - KioWare for Android shuts down and the device stays on.
- Restart KioWare - KioWare for Android shuts down and restarts.
- Shut Down Device (Requires root) - KioWare for Android shuts down, and the device also shuts down if it is rooted. (See also Root Tab for settings related to rooted devices.)
- Restart Device (Requires Samsung KNOX or root) - KioWare for Android shuts down and the device (if it is running the Samsung KNOX platform or is rooted) also shuts down and restarts. (See also Samsung KNOX Tab for settings related to KNOX devices, and Root Tab for settings related to rooted devices.)
- Log Out - The current user is logged off and KioWare for Android keeps running.
- Navigate - The current user is logged off, and KioWare for Android navigates to the URL entered in the “URL” setting that shows below.
- Run Script - The current user is logged off, and KioWare for Android runs the script entered in the “Script to Run” setting that shows below.
- Open Logcat Viewer - The current user is logged off, and the Logcat Viewer is opened. (For details on showing/hiding the Logcat Viewer button on the toolbar of the KioWare browser, see User Interface Tab, Development Buttons, Hide/Show Logcat Viewer Button; for details on showing the Logcat Viewer from the Configuration Tool, see “Logcat Viewer” and “Device Support Logcat Viewer” under Configuration Tool, Configuration Toolbar, Dropdown Menu.)
Custom Exit Pattern
You can set a custom pattern (using the four corners of the browser) for exiting the KioWare for Android browser. When set, selecting the browser corners in this order will show the exit dialog screen. (See also Quick Start Guide, Running KioWare for Android, Exiting KioWare for Android.)
Note: When using the correct custom exit pattern to exit KioWare for Android, the exit dialog screen shows for you to enter your exit passcode (see General Options, Exit Passcode above). You will be given three tries to enter the passcode correctly. If all three tries are incorrect, you will be returned to the KioWare for Android session.
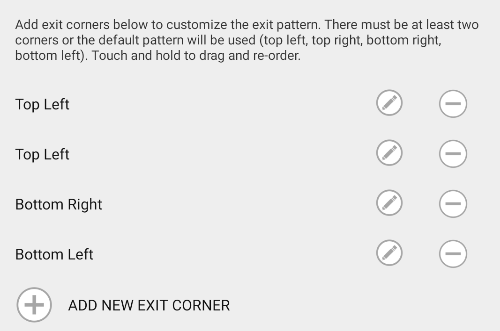
- Add New Exit Corner - Select this button to add a new corner to the exit pattern. A popup window displays a dropdown box containing options for the four browser corners (see image below). All corners you add will show on the Exit Pattern screen in the order that they are added (see image above). Note: A custom exit pattern MUST include at least two corners; otherwise, a reverse C pattern will be used by default (top left, top right, bottom right, bottom left).
- Reorder Exit Corner - Select and drag an exit corner entry to reorder it.
- Remove Exit Corner - Select the minus (-) icon (see image above) to delete an exit corner. Note: A custom exit pattern MUST include at least two corners; otherwise, a reverse C pattern will be used by default.
- Edit Exit Corner - Select the pencil icon to edit an exit corner. A popup window displays for changing the browser corner (see image below). Select the arrow at the right to show options for the four browser corners (“Top Left”, “Top Right”, “Bottom Right”, and “Bottom Left”).
Default Browser
You can set the default browser on your device's system. This default browser can be KioWare for Android or another browser (but you can only choose one), and tells your device how to handle links from a third-party application (app) that does NOT have its own built-in web viewer (see table below).
System Default Browser
(Can only be one) | When KioWare Is Running | When KioWare Is Not Running |
Set to KioWare
(recommended) | The device will always try to open links in KioWare. | The device will always try to open links in a different app that it lets you set (see Setting KioWare as the Default Browser below). |
| Set to Other Browser | The device will always try to open links in KioWare. | The device will always try to open links in this browser app. |
Note: The default browser should only be set when KioWare for Android is NOT running because the related system popup windows (see images below) will be blocked if it is running.
Setting KioWare as the Default Browser
Use the steps below to set your device's default browser to KioWare for Android, and also to set the application (app) to use when KioWare is not running.
- Change the default browser in the Settings app. There are two ways to do this:
- In the standard Android settings, select “Apps”, and then select the gear icon at the top, followed by “Browser App”.
- If the default browser was cleared or has not been set, this system popup window will show the first time you select a link (from a third-party app with no web viewer).
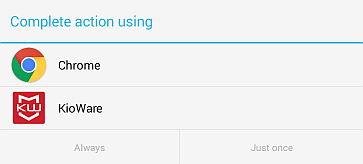
It is recommended that you select “KioWare”, and then select the “Always” button. Once this window shows, it will not show again. You will have to use the Android settings (see above) to change the default browser.
- Set the app to use when KW is not running. This can be done in one of two ways:
- Use the “Default Browser App” setting on the Security Tab in the Config Tool (see image below).
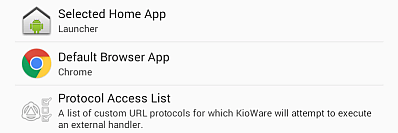
- Wait until the second system popup window appears (see image below). It only shows when KioWare is set as the default browser AND you select a link (from a third-party app with no web viewer) while KioWare is not running.

Once this window shows, it will not show again. You will then have to use the “Default Browser App” setting (see above) to change the app.
Browsing Access List
Used to restrict which domains and/or pages can be accessed when running KioWare for Android. Most times you will want to check the “Set Allow List” checkbox to make the access list an allow domain list instead of a revoke domain list. If the list is empty, nothing is blocked. [This setting is included in the KioWare for Android security/configuration audit; see Audit Tab, Security, Browsing Access List.]
Note: Pages and resources (css, js, ...) are considered, but resources are not queried all the time so they are easy to miss when testing. This is a limitation of the browser control, not KioWare for Android.
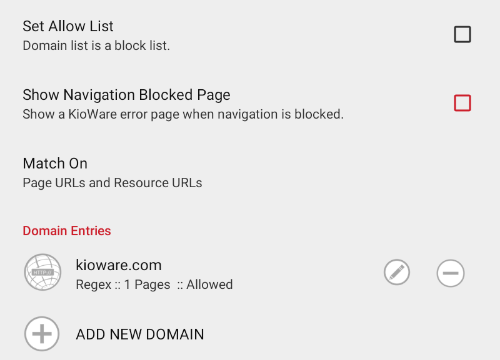
- Set Allow List - (For domains only) If checked, domains entered below will be included on an allow list.
- Show Navigation Blocked Page - If checked, KioWare for Android will show a “Navigation Blocked” page when you try to access a blocked domain or web page (to block a domain or page, the checkbox to add it to an allow list must be unchecked; see “Set Allow List” above, and see “Add New Domain”, “Entry is Allow List” and “Edit Domain”, “Set Allow List” under Domain Entries below).
- Match On - Specifies what KioWare for Android will check when deciding to allow or block a page. When selected, a popup window will display the following options:
- Page URLs and Resource URLs - Prompts KioWare for Android to check if both the page URL and all resources are allowed.
- Page URLs Only - KioWare for Android will only check page URLs and will ignore resource URLs.
See also the browser JavaScript functions in the Scripting section of this user guide:
Domain Entries
- Add New Domain - Select this option (see image above) to add a new domain. A popup window displays the following settings:
- New Domain Entry - Enter a domain to use for filtering web pages.
- Entry is Regular Expression - Check this box if the domain is a regular expression (CONTAINS match).
- Entry is Allow List - Check this box if the domain is to be included in an allow list.
- Note: If you check “Entry is Allow List” and then add another domain, pages for that domain are still blocked. To unblock a domain's pages, edit the domain and check “Set Allow List” (see below).
- Remove Domain - Select the minus (-) icon (see image above) to remove a domain.
- Edit Domain - Select the pencil icon (see image above) to edit a domain. The settings below will display.
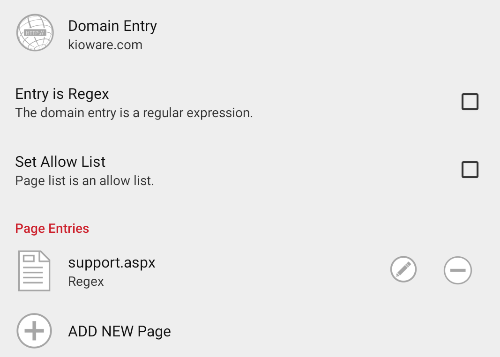
- Domain Entry - The domain to use for filtering web pages.
- Entry is Regex - Check this box if the domain is a regular expression (CONTAINS match).
- Set Allow List - (For pages only) Check this box if pages for the domain are to be included in an allow list.
- Page Entries
- Add New Page - Select this option (see image above) to add a new page for this domain. A popup window displays the following settings:
- New Page Entry - Enter a page to use for filtering.
- Entry is Regular Expression - Check this box if the page is a regular expression (CONTAINS match).
- Remove Page - Select the minus (-) icon (see image above) to remove a page.
- Edit Page - Select the pencil icon (see image above) to edit a page. “Page Entry” and “Entry is Regex” settings can be edited (see image below).

Guidelines for Editing Domains and Pages
-
General Rule of Thumb - There are two ways that KioWare for Android matches entries. The default is by simple CONTAINS matches. Another is by regex matching.
- Matches are CONTAINS matches (unless it's a regex).
- The longer the entry in a domain or page rule, the more strict a match.
- With two domains that are the same except that one is longer than the other, always place the longer one first because when KioWare for Android finds a matching domain in the list, it does not continue to look for more (e.g., do not put “foo.com” above “svr2.foo.com”; see table below).
-
| EXAMPLE DOMAIN ORDER |
foo.com
svr2.foo.com | Non-recommended order | Will always match on foo.com |
svr2.foo.com
foo.com | Recommended order | Will match on svr2.foo.com and foo.com |
-
Domain Rules - The domain you enter should not have the protocol (such as “http://”) preceding the name, and you can enter any portion of the domain name depending on how restrictive you wish to be.
-
| EXAMPLE DOMAIN MATCHES |
| Domain | Will Match | Will Not Match |
| foo | www.foo.com
www2.foo.com
www.foo.net
www.foodeat.com
(i.e., any domain with “foo” in it) | Any domain without “foo” in it |
| foo.com | www.foo.com
www2.foo.com
www.twofoo.com | www2.foo.net |
| .foo.com | www.foo.com
www2.foo.com | foo.com
www.twofoo.com
www2.foo.net |
| www.foo.com | www.foo.com | www2.foo.com
www.foo.net |
| .com | www2.foo.com
www.foo.com
www.twofoo.com
(i.e., any domain with “.com” in it) | Any domain without “.com” in it |
-
Page Rules - The path/filename you enter should not have any domain information (ex, “http://www.foo.com”), and you can enter any portion of the path/filename depending on how restrictive you wish to be.
-
| EXAMPLE PATH AND FILENAME MATCHES |
| Path/Filename | Will Match | Will Not Match |
| foo | main/foo.html
product/foo.html
main/foo.asp
foo/default.asp
(i.e., any page with “foo” in its path) | Any page without “foo” in its path |
| foo.html | main/foo.html
product/foo.html | foo.aspx |
| ads/foo.html | english/ads/foo.html
spanish/ads/foo.html
| ads/main/foo.html
|
| /ads/ | Any page with “/ads/” in its path (e.g., “english/ads/active/foo.html”) | Any page without “/ads/” in its path |
Note: Pages that are part of a Revoke List will have a red “X” through their page icons.
-
Regex Matching - Any domain or page can be matched using regular expressions rather than simple CONTAINS matching. The most common use of regex will most likely be "begins with" and "ends with".
-
| EXAMPLE REGEX MATCHES |
| Regex | Will Match | Will Not Match |
| ^www.kioware.com$ | Only www.kioware.com | Anything other than www.kioware.com |
| ^/foo.html | /foo.html | /bar/foo.html |
-
File System Matches - To match a file or directory on the file system, use an empty string regex domain match. The syntax is: $^ and means that the string begins and ends with nothing. The page under the domain can then be used for the path. Note that you must use a regex that means empty string becuase the Config Tool will not allow you to use empty literals.
Scripting Access List
This list is used to dictate which web pages can execute JavaScript in KioWare for Android's browser. Most times you will want to check the “Set Allow List” checkbox to make the access list an allow domain list instead of a revoke domain list. If the list is empty, KioWare for Android will still acknowledge the “Set Allow List” setting (i.e., if an allow list is empty, all scripts will be blocked; if a block list is empty, all scripts will be allowed). This setting defaults to an allow list, but whether it is set to allow or block scripts, the file: URLs are always allowed.
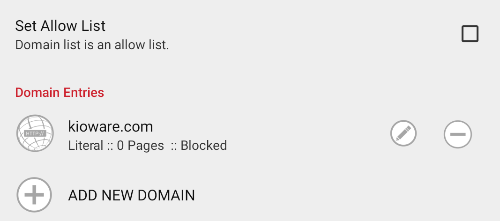
- Set Allow List - (For domains only) If checked, web page scripts for domains entered below will be included on an allow list.
Domain Entries
- Add New Domain - Select this option (see image above) to add a new domain. A popup window displays the following settings:
- New Domain Entry - Enter a domain to use for filtering web page scripts.
- Entry is Regular Expression - Check this box if the domain is a regular expression (CONTAINS match).
- Entry is Allow List - Check this box if the domain is to be included in an allow list.
- Note: If you check “Entry is Allow List” and then add another domain, web page scripts for that domain are still blocked. To unblock a domain's scripts, edit the domain and check “Set Allow List” (see below).
- Remove Domain - Select the minus (-) icon (see image above) to remove a domain.
- Edit Domain - Select the pencil icon (see image above) to edit a domain. The settings below will display.
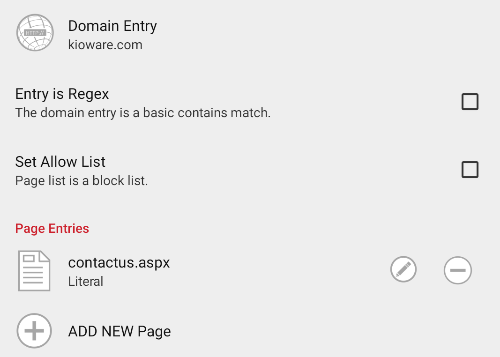
- Domain Entry - The domain to use for filtering web page scripts.
- Entry is Regex - Check this box if the domain is a regular expression (CONTAINS match).
- Set Allow List - (For pages only) Check this box if scripts for web pages in the domain are to be included in an allow list.
- Page Entries
- Add New Page - Select this option (see image above) to add a new page for this domain. A popup window displays the following settings:
- New Page Entry - Enter a page to use for filtering web page scripts.
- Entry is Regular Expression - Check this box if the page is a regular expression (CONTAINS match).
- Remove Page - Select the minus (-) icon (see image above) to remove a page.
- Edit Page - Select the pencil icon (see image above) to edit a page. “Page Entry” and “Entry is Regex” settings can be edited (see image below).

Error Page Access List
A page that is allowed will continue to load even if an HTTP error occurs. A page that is blocked will redirect to our standard navigation error page.
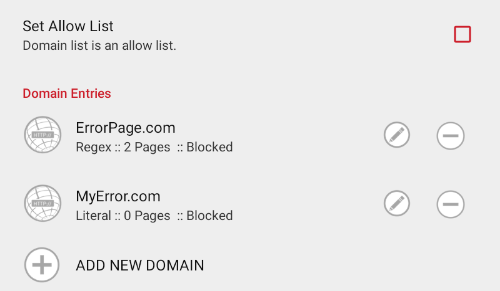
- Set Allow List - (For domains only) If checked, error pages for domains entered below will be included on an allow list.
Domain Entries
- Add New Domain - Select this option (see image above) to add a new domain. A popup window displays the following settings:
- Domain Entry Pattern - Enter a domain to use for filtering error pages.
- Comma-Separated HTTP Error Codes - Enter HTTP error codes as a comma-separated list (e.g., “404,500,505” with no spaces or quotes). These error codes will be filtered for the above domain.
- Entry is Regular Expression - Check this box if the domain is a regular expression (CONTAINS match).
- Entry is Allow List - Check this box if the domain is to be included in an allow list.
- Note: If you check “Entry is Allow List” and then add another domain, error pages for that domain are still blocked. To unblock error pages for a domain, edit the domain and check “Set Allow List” (see below).
- Remove Domain - Select the minus (-) icon (see image above) to remove a domain.
- Edit Domain - Select the pencil icon (see image above) to edit a domain. The settings below will display.
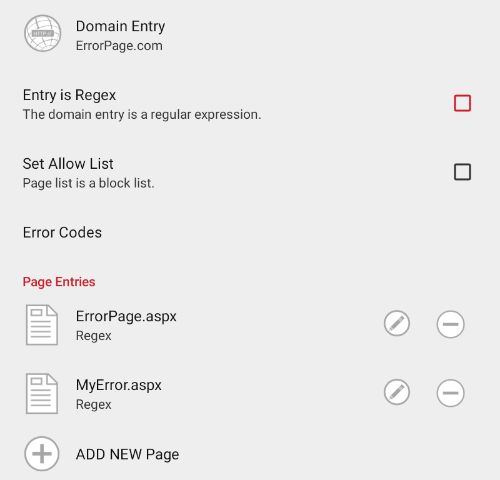
- Domain Entry - The domain to use for filtering error pages.
- Entry is Regex - Check this box if the domain is a regular expression (CONTAINS match).
- Set Allow List - (For pages only) Check this box if pages in the domain are to be included in an allow list.
- Error Codes - Enter HTTP error codes as a comma-separated list (e.g., “404,500,505” with no spaces or quotes). These error codes will be filtered for the above page.
- Page Entries
- Add New Page - Select this option (see image above) to add a new error page for this domain. A popup window displays the following settings:
- Page Entry Pattern - Enter an error page to use for filtering.
- Comma-Separated HTTP Error Codes - Enter HTTP error codes as a comma-separated list (e.g., “404,500,505” with no spaces or quotes). These error codes will be filtered for the above error page.
- Entry is Regular Expression - Check this box if the error page is a regular expression (CONTAINS match).
- Remove Page - Select the minus (-) icon (see image above) to remove an error page.
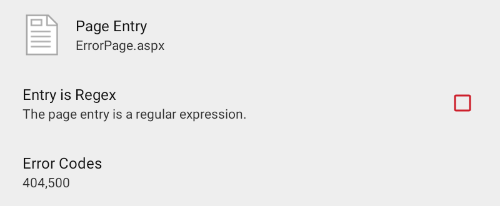
- Edit Page - Select the pencil icon (see image above) to edit an error page. “Page Entry”, “Entry is Regex”, and “Error Codes” settings can all be edited (see image below).
Web App Monitoring List
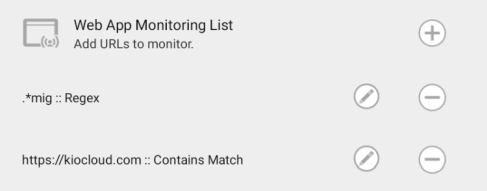
- Add New URL - Select the plus (+) icon (see image above) to add a new URL to be monitored. A popup window displays the following settings:
- URL to Match - Enter a URL (or file path). KioWare will compare this URL to URLs that are browsed during a user session, and if there is a match, the URL will be monitored.
- Reload Timeout - Set the maximum amount of time (in seconds) that a page hang-up can last before the URL is automatically reloaded.
- Restart KioWare Timeout - Set the maximum amount of time (in seconds) that a page hang-up can last before KioWare for Android is restarted.
- Entry is Regular Expression - Check this box if the URL is to be matched as a regular expression (sequence of characters that indicates a pattern to look for).
- Remove URL - Select the minus (-) icon (see image above) to remove a URL.
- Edit URL - Select the pencil icon (see image above) to edit a URL (see “Add New URL” above for descriptions of these settings).
Application Manager
This screen initially shows only the “Inactivity/Activity Service” and “Usage Data Access” settings (see image below). These settings are used by KioWare for Android to determine what applications are running on the kiosk (or tablet) and if they are permitted (i.e., if they are included on the allowed applications list; see Allowed Applications below).
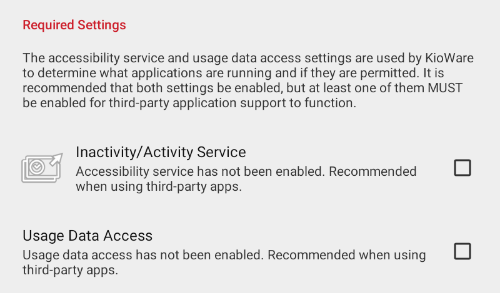
It is recommended that both of these settings be enabled, but at least one of them MUST be enabled in order to use any third-party application with KioWare for Android. To enable a setting, select its checkbox, select “Settings” on the popup window that shows, and in your tablet's settings, set “KioWare Kiosk” to the “On” position. A second popup window will show for allowing KioTouchTM to have full control of your Android device. Select “Allow” and use the back button on your device to return to the Config Tool. After one or both settings have been enabled, the screen shows more application-related settings (see image below).
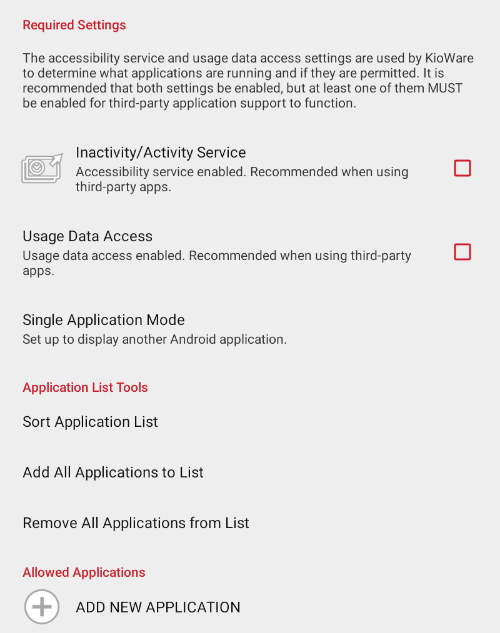
- Inactivity/Activity Service - [Also appears on the Single Application Mode screen (see below) and on the Attract/Inactivity Tab] Selecting this option provides access to the “KioWare Kiosk” option in the tablet's accessibility settings. When this option is turned on, activity in third-party applications (accessed via custom toolbar links; see User Interface Tab, Custom Toolbar Links) registers as user activity in KioWare for Android.
- If enabled and the “Default Inactivity Timer” (see above) times out, KioWare for Android will be brought to the front, running over top of the third-party application.
- If disabled, the third-party application will continue running on top, but the KioWare for Android session will end.
[This setting is included in the KioWare for Android security/configuration audit; see Audit Tab, Attract/Inactivity, Accessibility Service.]
- Note: KioWare for Android can automatically enable or disable the Accessibility Service on install or upgrade by including this setting in a special provisioning XML file (see Installation and Requirements, Installation Instructions, Provisioning). This setting is also included on the Create Provisioning File screen (see General Tab, Create Provisioning File, Device Configuration, Enable Accessibility Service), which is used to auto-generate a new provisioning file for ease in setting up new devices to run with KioWare for Android.
- Single Application Mode - Configures settings for running only one application (that is not KioWare for Android) on the tablet (see Single Application Mode below).
- Match On - (Unavailable with Android 5.0 and higher) Android uses what is called an activity stack (for more information, refer to Android Developer Guide, Tasks and Back Stack). KioWare for Android utilizes these stacks to decide whether or not to allow/block the current application. The “Match On” setting determines what part of the current stack to check.
- Bottom Only - (Default for backward compatibility) Matches only on the bottom activity. When the bottom activity of the stack is an allowed activity (see Allowed Applications below), then the currently visible application is allowed.
- Top Only - (Recommended) Matches only on the top activity. If the top activity (currently visible) of the stack is not allowed, then KioWare for Android will start the last allowed activity.
- Bottom and Top - Matches on both the top and bottom activities. Both the bottom and top activities of the stack must be allowed (see Allowed Applications below) for the currently visible activity to be allowed.
- Note:
- We recommend using “Top Only” because if your application attempts to open an application that is not allowed, then this new application will be blocked.
- Create a blockdebug.txt file (can be blank) and place it in KioWare for Android's data directory (usually /sdcard/Android/data/com.adsi.kioware.client.mobile.app) to display the activity class paths whenever an activity is blocked.
Application List Tools
The following settings apply to the allow list (see Allowed Applications below).
- Sort Application List - Sorts the allow list alphabetically (applications are not listed alphabetically for selection and may not be added in alphabetical order).
- Add All Applications to List - Adds all available Android applications to the allow list.
- Remove All Applications from List - Clears the allow list.
Allowed Applications
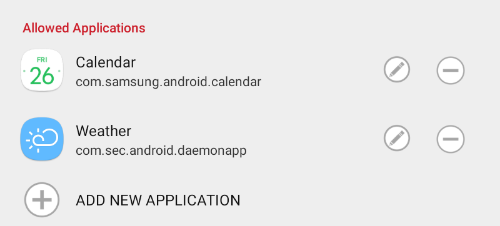
- Add New Application (plus icon) - Select the plus icon (see image above) to display a popup window listing all available applications. Then select an application to be added to the allow list, and it will show above. Note: When attempting to add an application to Single Application mode (see Single Application Mode, Application below) that is not already added in this allowed applications list, a popup window appears to alert you of this and allow you to add it (see Quick Start Guide, Warnings, Application Not in Allowed Applications List for more details about this popup).
- App Not in List - After selecting the “Add New Application” setting above, this button shows at the bottom left of the popup window. Select it to enter the package name for a custom application. Note: When attempting to enter an application package name in Single Application mode (see Single Application Mode, Application below) that is not already added in this allowed applications list, a popup window appears to alert you of this and allow you to add it (see Quick Start Guide, Warnings, Application Not in Allowed Applications List for more details about this popup).
- Remove Application (minus icon) - Select the minus icon (see image above) to remove the application.
- Edit Application (pencil icon) - Select the pencil icon (see image above) to show the package name for an application (see image below). Then select the package name to edit it.
-

Single Application Mode
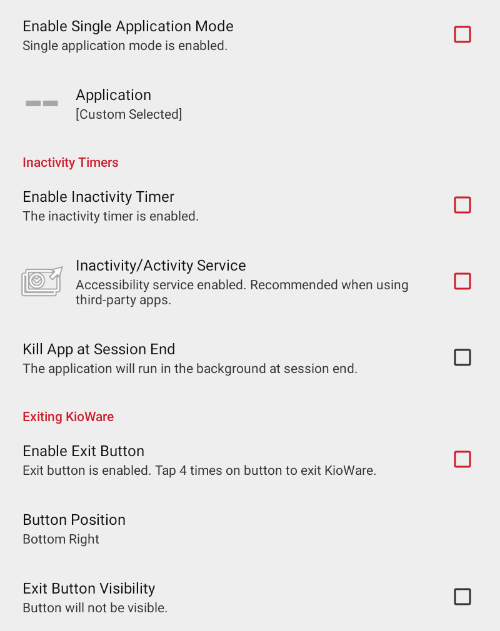
- Enable Single Application Mode - If enabled, only one application (and not KioWare for Android) will run on the tablet. Note: This setting, when combined with certain other settings, may prevent exit from KioWare for Android (see Quick Start Guide, Warnings, Exit Is Impossible for details on these other settings and what to do if you cannot exit).
- Notes:
- When enabling the above setting, if the “Exit Button Visibility” setting (see Exiting KioWare, Exit Button Visibility below) is already enabled, then a popup window indicates that for increased security, the “Exit Button Visibility” setting should only be used for testing in Single App mode.
- With Samsung devices using Android 14 or higher, KioWare for Android cannot keep screens awake when run behind a third-party app. The screens would go to sleep if any app is launched above KioWare for Android during Single App mode or when using a toolbar button (see User Interface Tab, Setting Up Multiple Toolbars, Setting Up Toolbar Controls, Setting Up App Button) or application programming interface (API; see Scripting, KioWare for Android JavaScript Functions).
- Application - Displays a listing of all available Android applications. Select the one to run on the tablet. Note: When selecting an application that was not already added to the allowed applications list (see Allowed Applications above), a popup window appears to alert you of this and allow you to add it (see Quick Start Guide, Warnings, Application Not in Allowed Applications List for more details about this popup).
- App Not in List - After selecting the “Application” setting above, this button shows at the bottom left of the popup window. Select it to enter or edit the package name for an application added to Single Application mode (see above). Note: When entering a package name for an application that was not already added to the allowed applications list (see Allowed Applications above), a popup window appears to alert you of this and allow you to add it (see Quick Start Guide, Warnings, Application Not in Allowed Applications List for more details about this popup).
Inactivity Timers
- Enable Inactivity Timer - If checked, KioWare for Android will display attract screens when the inactivity timer starts (see Attract/Inactivity Tab, Inactivity Timers). If no attract screens are set up, then your “Start Page URL” will display (see General Tab, Start Page URL).
- Inactivity/Activity Service - [Also appears on the Application Manager screen (see above) and on the Attract/Inactivity Tab] Selecting this option provides access to the “KioWare Kiosk” option in the tablet's accessibility settings. When this option is turned on, activity in third-party applications (accessed via custom toolbar links; see User Interface Tab, Custom Toolbar Links) registers as user activity in KioWare for Android.
- If enabled and the “Default Inactivity Timer” (see above) times out, KioWare for Android will be brought to the front, running over top of the third-party application.
- If disabled, the third-party application will continue running on top, but the KioWare for Android session will end.
[This setting is included in the KioWare for Android security/configuration audit; see Audit Tab, Attract/Inactivity, Accessibility Service.]
- Note: KioWare for Android can automatically enable or disable the Accessibility Service on install or upgrade by including this setting in a special provisioning XML file (see Installation and Requirements, Installation Instructions, Provisioning). This setting is also included on the Create Provisioning File screen (see General Tab, Create Provisioning File, Device Configuration, Enable Accessibility Service), which is used to auto-generate a new provisioning file for ease in setting up new devices to run with KioWare for Android.
- Kill App at Session End - (Not available with Android 14 or higher) If checked, the application that runs on top of KioWare for Android will be closed when the session ends (when Attract screen mode starts; see Attract/Inactivity Tab, Attract Screens). Note: Advanced users can create a file called SessionEndKillPkgs.json in the UserData directory under Android/data/com.adsi.kioware.client.mobile.app and set up packages to be closed at session end, even when not using Single Application mode. For more information on this, please contact KioWare support via phone (Toll Free USA: 877-843-4790; International: 1-717-843-4790) or our website (www.kioware.com).
Exiting KioWare
- Enable Exit Button - If enabled, an “Exit” button will display on the tablet when the selected application (see “Application” above) is running. Tap four times on the button to exit KioWare for Android. Note: This setting, when combined with certain other settings, may prevent exit from KioWare for Android (see Quick Start Guide, Warnings, Exit Is Impossible for details on these other settings and what to do if you cannot exit).
- Button Position - Sets the position on the screen where the “Exit” button will display (e.g., top left, middle right, middle of screen).
- Exit Button Visibility - If disabled, the “Exit” button will be invisible but still functional when the selected application (see “Application” above) is running.
- Notes:
- If enabled but not made visible, the “Exit” button will be visible for 20 seconds at boot/start of Single Application mode (including relaunch of KioWare for Android).
- Using the “Exit” button, similar to the KioWare for Android exit, requires a passcode.
- When enabling the “Exit Button Visibility” setting, if Single App mode (see Single Application Mode above) is already enabled, then a popup window indicates that for increased security, the “Exit Button Visibility” setting should only be used for testing in Single App mode.
Download Manager
Note: Downloads can also be managed by an addin. For more information on addins, please contact KioWare Support via phone (Toll Free USA: 877-843-4790; International: 1-717-843-4790) or our website (www.kioware.com).
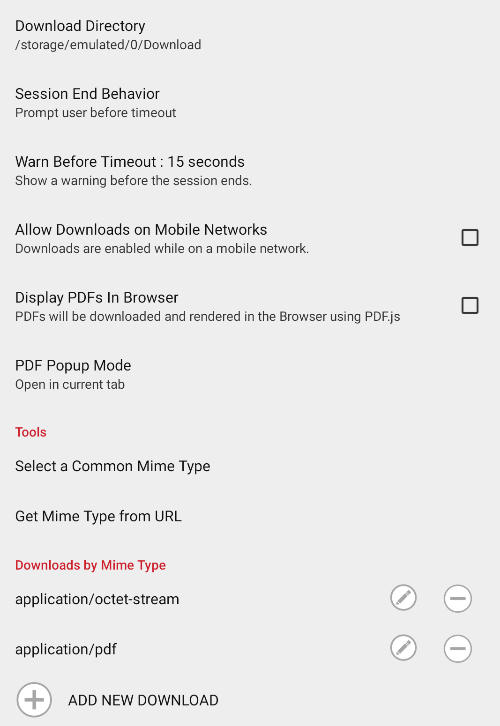
- Download Directory - Path to the directory where downloads will be stored. The default path of storage/emulated/0/Download should be used.
- Session End Behavior - Specify how KioWare for Android will behave if the session is about to end when a file is being downloaded.
- Prompt user before timeout - A warning will alert the user that the session is about to end.
- Pause timeout during download - The timeout will pause and resume when the download is complete.
- No behavior change - If timeout ends, the download stops and the session ends.
- Warn Before Timeout - When the time remaining in a user session (in seconds) equals this value and a file is being downloaded, a session end warning will display.
- Allow Downloads on Mobile Networks - If enabled, files can be downloaded on 4G networks. If disabled, files will be queued until the device reconnects to Wi-Fi. Note: In the latter case, we recommend using the progress dialog (see Downloads by Mime Type, Edit Download, Show Progress Dialog below). This will indicate to the user if something should be downloading but is not.
- Display PDFs in Browser - If enabled, the KioWare for Android browser can download and display PDFs. If disabled when trying to display a PDF, the browser will indicate that the download has been blocked.
- PDF Popup Mode - (Only available if “Display PDFs in Browser” above is enabled) Specify if PDFs should open in the currently displayed tab or in a new tab. Note: This setting will always override the browser popup mode that is set (see Browser Tab, Popup Window Handling).
Tools
- Select a Common Mime Type - Displays a list of common mime types. When a file starts downloading, KioWare for Android will check this list for a matching mime type.
- Get Mime Type from URL - For a mime type that is not in the list (see “Select a Common Mime Type” above), enter the URL needed to retrieve the mime type.
Note: Additionally, there is a PDF viewer application that can be run in conjunction with Device Administrator mode (see General Options, Enable Device Administrator above). Please contact KioWare Support for more information.
Downloads by Mime Type
- Add New Download - Select this option to add a new file download. A popup window displays the download settings (see “Edit Download” below for descriptions of these settings).
- Edit Download (pencil icon) - Select the pencil icon (see image above) to edit file download settings (see image below):
- General Options
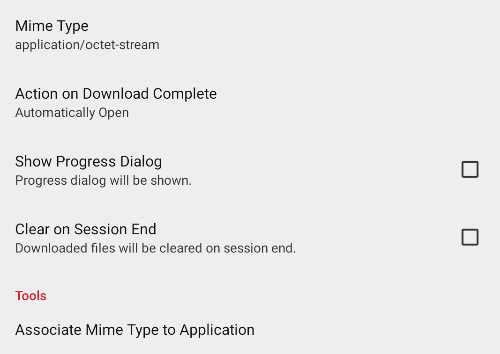
- Mime Type - Enter the mime type (string that tells KioWare for Android the file extension).
- Action on Download Complete - Specify how KioWare for Android will behave when the file download is complete.
- Automatically Open - The file automatically opens.
- Prompt User - A popup window indicates that the download is complete.
- Do Nothing - The download stops and the session continues normally.
- Show Progress Dialog - If enabled, a progress bar will display during the download.
- Clear on Session End - If enabled, all downloaded files will be removed when the session ends. KioWare for Android will keep a record of all the files.
- Tools
- Associate Mime Type to Application - Displays available applications that can be associated with the mime type. Downloaded files with the matching mime type will always open in the selected application.
-
File Browser
The source code of some web pages may contain a file input tag (<input type="file">), which generates a button for opening the file browser (popup window for browsing and selecting files). You can use the screen below to enable (or disable) users from opening the file browser when the KioWare browser is running, and to set which directories (folders) and file types can be accessed. When settings for camera and video capture are turned on (see General Options below), the device's camera (set to take photos and/or video) can be opened instead of the file browser.
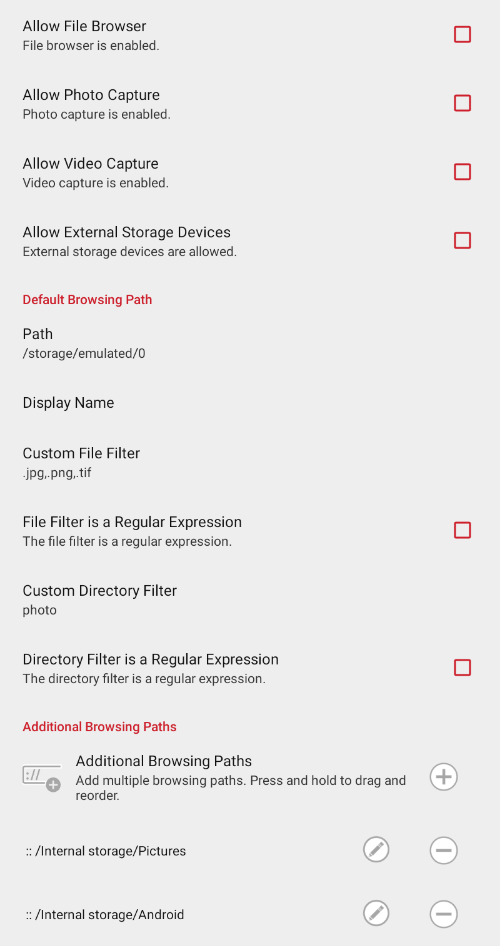
General Options
- Allow File Browser - If checked, the file browser can be opened using a web page button (see File Browser above). Additional file browser settings under Default Browsing Path and Additional Browsing Paths below will also become available. (Note: Based on the “Allow Photo Capture” and “Allow Video Capture” settings below, the file browser may or may not be opened when a button is pressed; see the table below for more details.)
- Allow Photo Capture - If checked, the tablet's built-in camera (set to take photos) can be opened using a web page button (see File Browser above). The camera MUST first be enabled; see Devices Tab, Camera, Enable Camera. (Note: Based on the “Allow File Browser” setting above and the “Allow Video Capture” setting below, the camera may or may not be opened for taking photos when a button is pressed; see the table below for more details.)
- Allow Video Capture - If checked, the tablet's built-in camera (set to take video) can be opened using a web page button (see File Browser above). The camera MUST first be enabled; see Devices Tab, Camera, Enable Camera. (Note: Based on the “Allow File Browser” and “Allow Photo Capture” settings above, the camera may or may not be opened for taking video when a button is pressed; see the table below for more details.)
- Allow External Storage Devices - (Only available if “Allow File Browser” above is checked) If checked, external storage devices (external hard drives, USB thumb drives, etc.) can be accessed through the file browser when the KioWare browser is running.
Behavior of File Selection Button
(Based on File Browser, Camera, and Video Camera Settings*) |
| Using Only One Setting |
| Allow File Browser | Allow Photo Capture | Allow Video Capture | Pressing Button |
| X | | | Opens only the file browser |
| | X | | Opens only the camera (set to take photos) |
| | | X | Opens only the camera (set to take video) |
| Using A Combination of Settings or No Settings |
| Allow File Browser | Allow Photo Capture | Allow Video Capture | Pressing Button |
| X | X | X | Asks if the file browser or camera (set to take photos or video) should be opened (can only select one) |
| X | X | | Asks if the file browser or camera (set to take photos) should be opened |
| X | | X | Asks if the file browser or camera (set to take video) should be opened |
| | X | X | Asks if the camera (set to take photos or video) should be opened |
| | | | Does nothing |
- * X = setting is checked; blank = setting is unchecked.
Default Browsing Path
Note: The settings below are only available if the “Allow File Browser” checkbox is checked (see General Options above).
- Path - Set the default browsing path (path to a specific folder) that will show each time the file browser is opened.
- Custom File Filter - Tells KioWare for Android which files or file types to show for this browsing path. On the popup window that shows, there are three ways you can filter files:
- By File Extension - Enter file extensions as a comma-separated list (e.g., “.png,.gif,.jpg” with no spaces or quotes). Only files with these extensions will show.
- By Regular Expression - Enter a regular expression (sequence of characters that indicates a pattern to look for) and also check the “File Filter is a Regular Expression” box below. Only files (filenames) that match this regular expression will show.
- Show All - Leave blank to show all files.
- File Filter is a Regular Expression - Check this box if a regular expression was entered in the “Custom File Filter” setting above.
- Custom Directory Filter - Tells KioWare for Android which directories to show for this browsing path. On the popup window that shows, there are three ways you can filter directories:
- By Any Text (CONTAINS Matching) - Enter any text to use for matching. Only directories (directory names) containing this text will show.
- By Regular Expression - Enter a regular expression and also check the “Directory Filter is a Regular Expression” box below. Only directories (directory names) matching this regular expression will show.
- Show All - Leave blank to show all directories.
- Directory Filter is a Regular Expression - Check this box if a regular expression was entered in the “Custom Directory Filter” setting above.
Additional Browsing Paths
Note: The settings below are only available if the “Allow File Browser” checkbox is checked (see General Options above).
- Add New Browsing Path (plus icon) - Select the plus icon (see image above) to add a new browsing path. A popup window displays the related settings (see “Edit Browsing Path” below for descriptions of these settings).
- Remove Browsing Path (minus icon) - Select the minus icon (see image above) to remove a browsing path.
- Reorder Browsing Path - Select and drag a browsing path entry to reorder it.
- Edit Browsing Path (pencil icon) - Select the pencil icon (see image above) to edit a browsing path. The settings below will display (see image below).
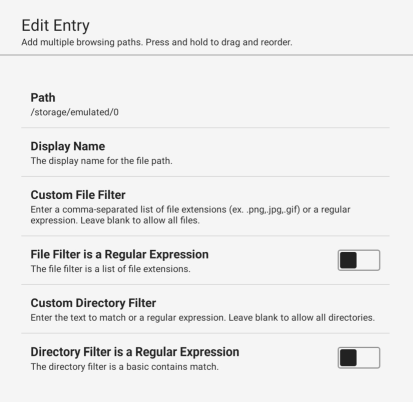
- Path - Set an additional browsing path that can be selected each time the file browser is opened.
- Display Name - Enter a name to show for the file path.
- Custom File Filter - Tells KioWare for Android which files or file types to show for this browsing path. There are three ways you can filter files:
- By File Extension - Enter file extensions as a comma-separated list (e.g., “.png,.gif,.jpg” with no spaces or quotes). Only files with these extensions will show.
- By Regular Expression - Enter a regular expression and also check the “Regex” box to the right. Only files (filenames) that match this regular expression will show.
- Show All - Leave blank to show all files.
- Custom Directory Filter - Tells KioWare for Android which directories to show for this browsing path. There are three ways you can filter directories:
- By Any Text (CONTAINS Matching) - Enter any text to use for matching. Only directories (directory names) containing this text will show.
- By Regular Expression - Enter a regular expression and also check the “Regex” box to the right. Only directories (directory names) matching this regular expression will show.
- Show All - Leave blank to show all directories.
Basic Authentication List
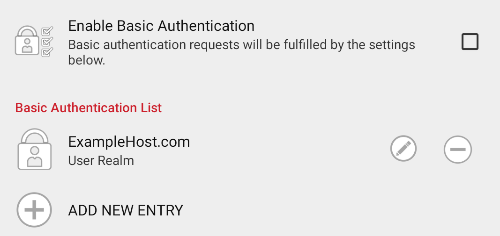
- Enable Basic Authentication - If enabled, KioWare for Android will automatically sign into basic authenticated websites based on the settings for “Host”, “Realm”, “Username”, and “Password”.
- Add New Entry - Select this option to add a new basic authentication entry. A popup window displays the related settings (see “Edit Entry” below for descriptions of these settings).
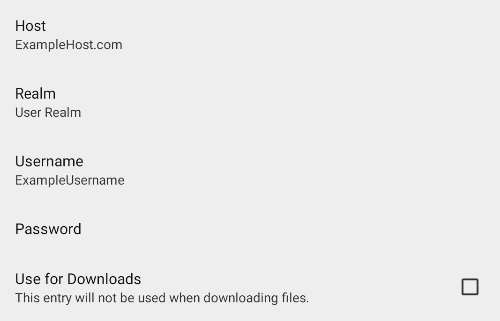
- Edit Entry (pencil icon) - Select the pencil icon (see image above) to edit basic authentication settings (see image below):
- Host - The name of the web host.
- Realm - The realm set up on the server (collection of web pages/resources and users, all controlled by the same authentication policy).
- Username - The username to log onto the basic authenticated website.
- Password - The password to log onto the basic authenticated website.
- Use for Downloads - If checked, any download that occurs from the “Host” (see above; “Realm” is ignored) will require use of the “Username” and “Password” entered above. If a single host has this checkbox checked for more than one basic authentication rule, then the first match in the basic authentication list will be used.
-
Wi-Fi Access Point List
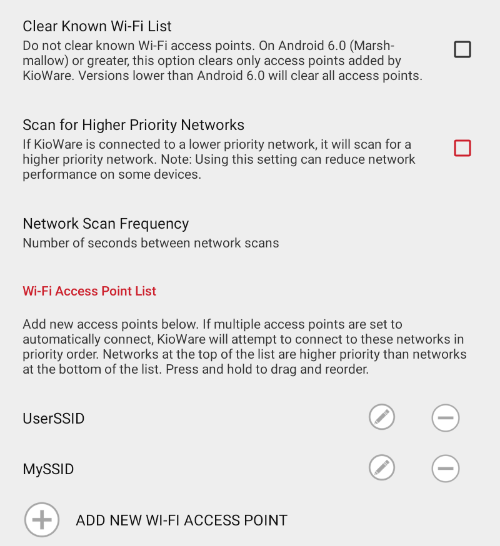
- Clear Known Wi-Fi List - This setting functions differently based on the version of Android you are using.
- Android 6.0 and Higher - Clears only the known access points added by KioWare for Android.
- Lower than Android 6.0 - Clears all access points.
- Scan for Higher Priority Networks - If checked and KioWare for Android is already connected to a network in the Wi-Fi Access Point List (see below), it will automatically scan for a higher priority network (default is unchecked).
- Network Scan Frequency - Set the amount of time (in seconds) between each scan for a higher priority network (applies both to networks that are set to automatically connect and networks that are not; default is 2, max. is 3600).
- Add New Wi-Fi Access Point - Select this option to add a new Wi-Fi access point. A popup window displays the related settings (see “Edit Access Point” below for descriptions of these settings).
- Remove Access Point - Select the minus (-) icon (see image above) to remove an access point.
- Reorder Access Point - Press and hold an access point entry to select it, and then drag up or down to reorder.
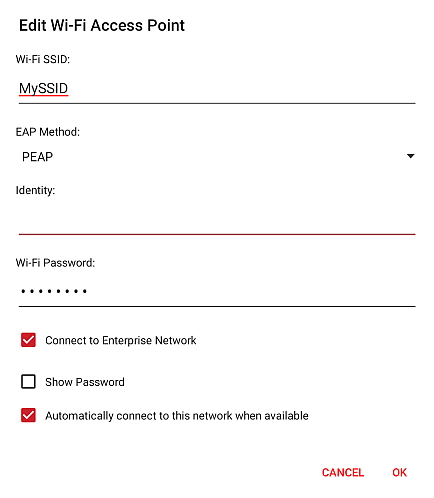
- Edit Access Point - Select the pencil icon (see image above) to edit an access point. The settings below will display (see image below).
- Wi-Fi SSID - Enter the Service Set Identifier (SSID), a unique alphanumeric ID that identifies a specific wireless local area network (WLAN). When you enter the first few characters of a known network, a dropdown will show for selecting that network.
- EAP Method - (Only available when “Connect to Enterprise Network” below is checked) Select the Extensible Authentication Protocol (authentication framework known as EAP) method to use for authenticating data sent over the wireless enterprise network.
- PEAP (Protected EAP) - Corrects any flaws in EAP by wrapping it in a layer of encryption.
- TLS (Transport Layer Security) - Requires dual authentication. Both the server computer and a computer on the network (client computer) must have a special digital certificate inspected and authenticated by each other before data can be transmitted.
- TTLS (Tunneled Transport Layer Security) - Extends TLS (see above) by not requiring each client computer to have its own certificate authenticated. Instead, the server computer has its certificate authenticated by the client, and then the server is able to create a “tunnel” (secure connection that data passes through) and use that tunnel to complete authentication of the client.
- PWD (Password) - Uses a shared password for authentication. Simpler passwords can be used without the need for server-side certificates, and these simple passwords may be input into a special function that uses them to create encryption keys for encrypting and authenticating the data that is transmitted.
- Identity - (Only available when “Connect to Enterprise Network” below is checked) Enter the user's network ID. This will be recognized throughout the network, and once authenticated, it “tells” the network which items the user is/is not allowed to access (e.g., applications, equipment/devices, servers, portals, and information such as web content, preferences, user credentials, and information on other users connected to the network).
- Wi-Fi Password - Enter the password for logging into the WLAN.
- Connect to Enterprise Network - If checked, KioWare for Android will attempt a Wi-Fi Protected Access 2 (WPA2) connection (security method for wireless networks that provides a high level of data protection and network access control) to an enterprise network using the “EAP Method” and “Identity” settings that show (see above).
- Show Password - If unchecked, the “Wi-Fi Password” (see above) will be hidden from other users of the WLAN.
- Automatically connect to this network when available - If checked, KioWare for Android will remember the WLAN and automatically try to connect to it. (To see the full list of “remembered” WLANs, go to your Android “Settings” and select “Wi-Fi”. Next, select the menu button at the top right (may show as a gear icon or three dots, depending on the tablet being used) and then select “Saved Networks”.)
