Configuration Tool
See Related Terms and Questions at the end of this section for more details on advanced and debug settings.
Advanced Tab
The tab looks like this when you first show it, letting you know that these settings can be harmful to KioWare if not used correctly, and that only advanced users should continue.
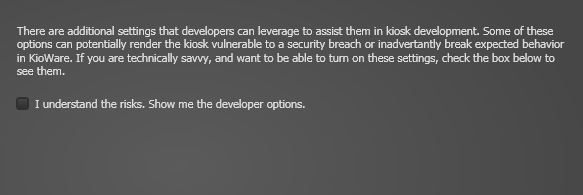
Checking this checkbox will show the advanced section tabs (see image below): Debugging Settings, Customization and Developer Extensibility, Advanced Settings, and Experimental.
Debug Settings Tab
When the Debug Settings tab is selected, the screen looks like this.
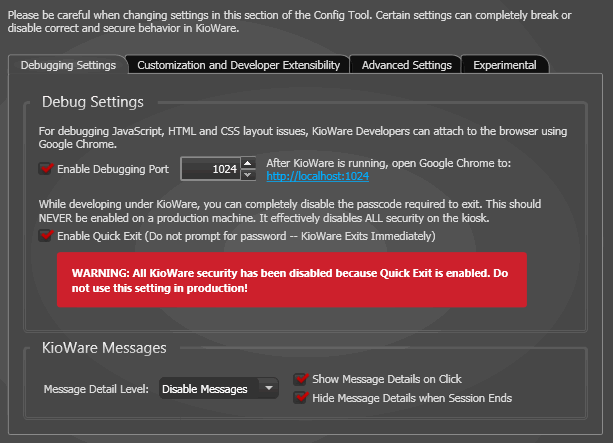
Debug Settings
- Enable Debugging Port - If checked, you can enter the port number in the box, for use in debugging.
- Enable Quick Exit - WARNING: Turn on this setting ONLY while you are testing because it lets users exit KioWare without a passcode.
Note: When turned on (checked), the setting prompts a Security Warning banner to show at the top of the Config Tool until it is turned off (unchecked). (See Configuration Tool, Config Tool Banners, Security Warning for more details on this banner.)
KioWare Messages
- Message Detail Level - Tells KioWare the types of messages to show or hide.
- Disable Messages - No messages show.
- Normal Messages - Shows only the messages that KioWare thinks are safe to show you.
- Extra Messages - Shows only the messages that KioWare is unsure about whether they are safe to show you.
- All Messages - Shows all messages (those KioWare thinks are safe, those KioWare thinks are unsafe, and those KioWare is unsure about whether they are safe).
- Show Message Details on Click - If checked, clicking (or selecting, if using a touch screen) a message during a user session shows the message details at the bottom of your screen.
- Hide Message Details when Session Ends - If checked, message details will be hidden each time a user session ends (Attract Screen mode starts; see Attract/Inactivity Tab, Related Terms and Questions for more details on Attract Screen mode).
Customization and Developer Extensibility Tab
When the Customization and Developer Extensibility tab is selected, the screen looks like this.
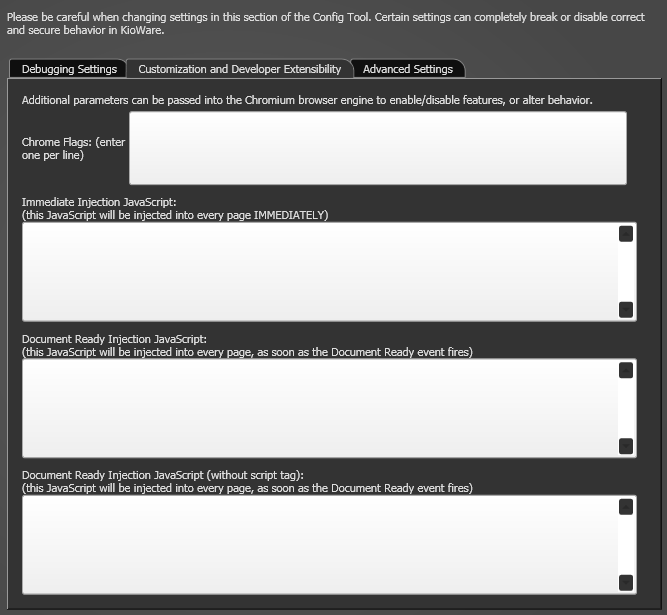
WARNING: Using these settings may keep your web page or KioWare from working correctly. Please visit www.kioware.com/contact.asp to contact KioWare Support for assistance before attempting to use these settings, which should only be used if there is no other alternative.
- Chrome Flags - If absolutely necessary to use Chrome flags (advanced, experimental settings that Google is still working on for its Chrome browser and does not yet support), enter one command line flag per line in this box. Note: Use Chrome flags at your own risk. At any time, they may break or disappear, crash your browser, compromise your security and privacy, or delete all of your data.
- Immediate Injection JavaScript - If absolutely necessary to use immediate JavaScript injection (using your own JavaScript code to alter a web site or web page as soon as it starts loading), enter your JavaScript code in this box. Note: Immediate injection of JavaScript is not permanent, and the changes to a website or web page can only be seen by you or other end users on the kiosk or computer.
- Document Ready Injection JavaScript - If absolutely necessary to use document ready JavaScript injection (using your own JavaScript code to alter a web site or web page once it has fully loaded and is ready for use), enter your JavaScript code in this box. Note: Document ready injection of JavaScript is not permanent, and the changes to a website or web page can only be seen by you or other end users on the kiosk or computer.
- Document Ready Injection JavaScript (without script tag) - If absolutely necessary to use document ready JavaScript injection without the <script> tag (using your own JavaScript code, without using the <script> tag, to alter a web site or web page once it has fully loaded and is ready for use), enter your JavaScript code in this box. Note: Document ready injection of JavaScript is not permanent, and the changes to a website or web page can only be seen by you or other end users on the kiosk or computer.
Advanced Settings Tab
When the Advanced Settings tab is selected, the screen looks like this.
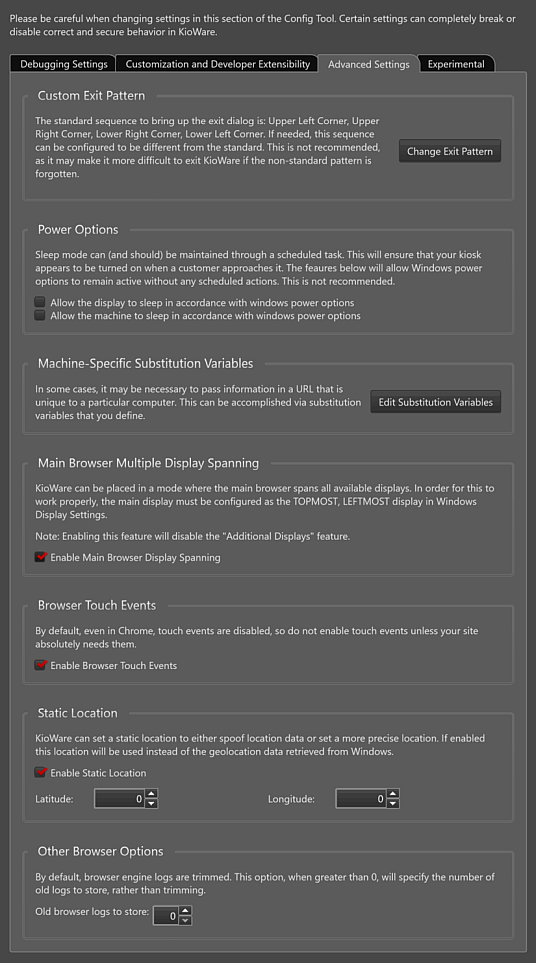
Custom Exit Pattern
Note: When using the correct custom exit pattern to exit KioWare, a pinpad shows for you to enter your exit passcode (see General Tab, Exit Passcodes). You will be given three tries to enter the passcode correctly. If all three tries are incorrect, you will be returned to the KioWare session.
- Change Exit Pattern - Select this button (see image above) to change the default pattern (four corners selection) for exiting the KioWare browser (see also Quick Start Guide, KioWare Browser, Exit the Browser). A popup window shows for setting the custom pattern (see image below).
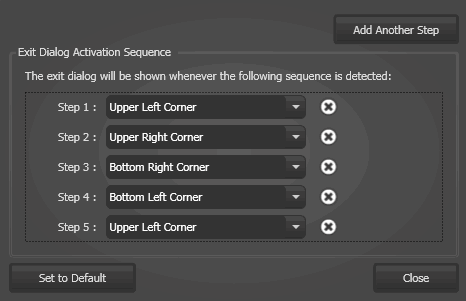
- Add Another Step - Select this button to add another step to the exit pattern. The step will show as the next sequential step in the list below. Note: A custom exit pattern MUST include at least one step.
- Remove Step - Select the “X” button to remove a step. Note: When removing steps, you can remove all but one. A custom exit pattern MUST include at least one step.
- Edit Step - Select the down arrow to the right of a step to change it. (Available options are “Upper Left Corner”, “Upper Right Corner”, “Bottom Right Corner”, and “Bottom Left Corner”.)
- Set to Default - Select this button to clear your custom exit pattern and reset the default pattern (“Upper Left Corner”, “Upper Right Corner”, “Bottom Right Corner”, “Bottom Left Corner”).
Power Options
- Allow the display to sleep in accordance with Windows power options - If checked, your display screen will go to sleep as set up in the power options of MS Windows, without having to schedule any sleep actions in the KioWare Config Tool (see Scheduled Actions Tab, Adding a New Action Item).
- Allow the machine to sleep in accordance with Windows power options - If checked, your kiosk or computer will go to sleep as set up in the power options of MS Windows, without having to schedule any sleep actions in the KioWare Config Tool (see Scheduled Actions Tab, Adding a New Action Item).
Machine-Specific Substitution Variables
- Edit Substitution Variables - Select this button to define machine-specific substitution variables (see Edit Substitution Variables below).
Edit Substitution Variables
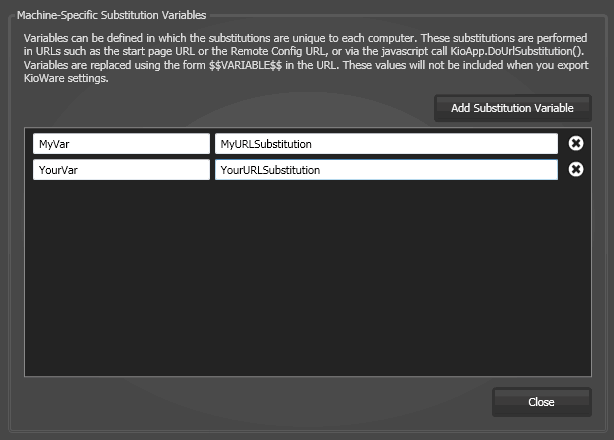
- Add Substitution Variable - Select this button to add a new substitution variable. A blank row shows in the pane below for entering the variable and its value.
- Edit (unlabeled) - Select a row in the pane and edit the substitution variable entry.
- Delete (“X” icon) - Select this icon to remove a substitution variable.
Main Browser Multiple Display Spanning
Note: These settings are only available with the Full and Basic models of KioWare (see above image of Advanced Settings tab).
- Enable Main Browser Display Spanning - If checked, KioWare will span the main browser window across all displays that are connected to your kiosk or computer. The main display MUST be set up as the topmost, leftmost display in your MS Windows display settings. To do this, follow the steps in the table below. Note: When this setting is enabled, the additional displays feature is automatically disabled (see Attract/Inactivity Tab, Additional Displays).
| Setting Main Display in MS Windows |
| Windows 7 and 8.x |
- Right click (or press and hold, if using a touch screen) on any empty space on your desktop. In the menu that shows, select “Screen Resolution” to open the Screen Resolution window in the MS Windows Control Panel.
- In the top box, you will see an image for each display device you have set up (e.g., monitor, touch screen, or projector). The image for your current main display will show the “Start” menu in the lower left corner (for Windows 7) or the notification area icons in the lower right corner (for Windows 8.x). Each image (display device) is assigned a number (selecting an image and then selecting the “Identity” button also shows the corresponding number).
- In the “Display” dropdown, select the display device that is to be your main display (the image for this device will be highlighted in the box above and should be the topmost, leftmost image).
- Check the “Make this my main display” box, and select “OK”. Note: When you check this box, the “Start” menu will show in the above image for that display.
|
| Windows 10.x |
- Right click (or press and hold, if using a touch screen) on any empty space on your desktop. In the menu that shows, select “Display Settings” to open the settings window.
- In the top box at the right, you will see an image for each display device you have set up (e.g., monitor, touch screen, or projector). Each image (display device) is assigned a number (selecting an image and then selecting the “Identity” button also shows the corresponding number).
- Select the image for the display device that is to be your main display (this should be the topmost, leftmost image).
- Under the Multiple Displays heading, check the “Make this my main display” box, and select “Apply”.
|
Browser Touch Events
- Enable Browser Touch Events - Check this box to allow touch events (e.g., swipe and pinch zoom) to be used when running KioWare.
Static Location
See also
Browser Tab, Geolocation Mode, Using Windows Geolocation and
Devices Tab, Monitored Devices, Geolocation for details on enabling Windows Geolocation Services and setting up a geolocation monitored device.
- Enable Static Location - If checked, KioWare will use the location data entered below instead of geolocation data retrieved from MS Windows.
- Latitude (Only available if the “Enable Static Location” checkbox is checked) - Enter the latitude coordinate.
- Longitude (Only available if the “Enable Static Location” checkbox is checked) - Enter the longitude coordinate.
Note: Use of static location input in KioWare is based on the use of Windows Geolocation Services (see Browser Tab, Geolocation Mode, Using Windows Geolocation), and a geolocation monitored device must first be set up (see Devices Tab, Monitored Devices, Geolocation):
- When Windows Geolocation Services are enabled and a geolocation monitored device is turned on, a device status of Normal is returned and the coordinates are set to those entered in the “Latitude” and “Longitude” settings above.
- When Windows Geolocation Services are disabled and a geolocation monitored device is turned on, a device status of Offline is returned and the coordinates are set to 0, 0.
Other Browser Options
- Old browser logs to store - Chrome creates a log file that normally is trimmed to 1 MB each time that KioWare starts up, but this setting can be used to prevent trimming. Set the number of old logs to be kept instead of trimmed (default is 0).
Experimental Tab
When the Experimental tab is selected, the screen looks like this.
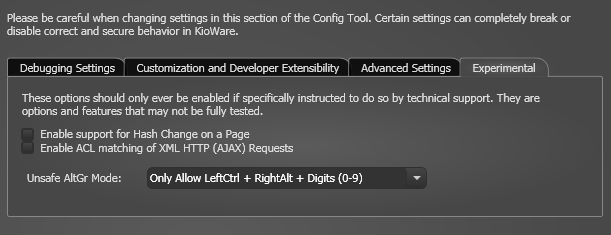
- Enable support for Hash Change on a Page - If checked, the hash (or fragment) part of a URL change will be evaluated by the KioWare browsing access list that is set up (for more details on the browsing access list, see Security Tab, Browsing Access List Configuration Screen).
- Enable ACL matching of XML HTTP (AJAX) Requests - If checked, XML HTTP (or AJAX) URLs will be checked against the KioWare browsing access list that is set up (for more details on the browsing access list, see Security Tab, Browsing Access List Configuration Screen).
- Unsafe AltGr Mode - Select an option from this dropdown if you have blocked the Ctrl and/or Alt keys (see Keyboard Filtering Tab, Keyboard Filtering) but still want to create special symbols that are usually only created with the AltGr key. Note: This applies only when using the built-in virtual keyboard of KioWare, which does not include an AltGr key.
- Disabled - Does not override the keyboard blocking you have already set up for the Ctrl and Alt keys.
- Only Allow LeftCtrl + RightAlt + Digits (0-9) - Allows use of the following Ctrl and Alt key combinations (all other Ctrl/Alt key combinations that were blocked on the Keyboard Filtering tab will remain blocked):
- Left Ctrl key, right Alt key, and any digit (0-9)
- Left Ctrl key and any key
- Right Ctrl key and any other key
- Allow LeftCtrl + RightAlt + Any Key - Allows use of the following Ctrl and Alt key combination (all other Ctrl/Alt key combinations that were blocked on the Keyboard Filtering tab will remain blocked):
- Left Ctrl key, right Alt key, and any other key
Related Terms and Questions
If the answers to your questions are not in this table, visit the KioWare website for frequently asked questions (FAQs).
| How do I get the initial warning screen to show again? | Once you check the checkbox to show the developer settings, you will not see this initial screen again unless you change the KioWare Config Tool Settings file (ConfigToolSettings.json). This file is stored under C:\ProgramData\KioWare Client. Open the file in a text editor (e.g., MS Notepad) and set the ShowDeveloperSettings setting to false. Close and reopen your Config Tool, and the initial warning screen will show. |
| What is a debugging port? | It is a port on your kiosk or computer that you can connect to from a different machine. Then, you can run Google Chrome outside of KioWare and view your JavaScript as it is running with KioWare. Once you check the “Enable Debugging Port” checkbox and enter a port number, a link shows to the right based on the port number entered. Open this link in Chrome to monitor your JavaScript. |
| What are KioWare Messages? | They are small windows that show at the bottom righthand corner of your screen when running the KioWare browser. These windows tell you things that are happening while the KioWare browser is running, such as when a website that you try to visit is blocked by KioWare (see the “Show Block Message” settings for protocol, browser, and scripting under Security Tab, Access Lists). You can tell KioWare which messages to show, or no messages, by selecting an option in the “Message Detail Level” dropdown. |
| What are message details? | Message details tell you more information about a message, why it was shown, and what was happening on your kiosk or computer to make the message show. When the “Show Message Details on Click” checkbox is checked, you can click (or select, if using a touch screen) a message to show a log of message details at the bottom of your screen. You can scroll through the log to find details of all messages that have been shown on your kiosk or computer. The “Message Detail Level” dropdown tells KioWare what type of messages, or no messages, to show detail about, and the “Hide Message Detail when Session Ends” checkbox will show or hide the log when the user session ends (Attract Screen mode starts; see Attract/Inactivity Tab, Related Terms and Questions for more details on Attract Screen mode). |
| What are machine-specific substitution variables? | They are variables that you can define in which the values substituted for them are unique to each kiosk or computer running KioWare. These substitutions can be used in URLs (e.g., the Start Page URL; see General Tab, Start Page URL) or by using JavaScript (see Scripting, KioApp.DoUrlSubstitution). In a URL, a variable will look like $$VARIABLE$$. Note: Substitution values cannot be exported to a KioWare settings file (see Configuration Tool, Related Terms and Questions for more details on a settings file). For more details on substitution variables in the Configuration Tool, see Substitution Variables. |
| What is a hash change? | A hash is a part of a URL that usually points to a specific part of a web page. It is indicated by a number sign (#) toward the end of a web address. HTML 5.0 introduced a new feature known as PushState. This feature allows a URL or the hash part of a URL to be automatically changed without refreshing the web page. By checking the “Enable support for Hash Change on a Page” checkbox, you can tell KioWare to check URLs with hash changes against the browsing access list that you set up. The access list tells KioWare which URLs to allow or block (for more details on the access list, see Security Tab, Browsing Access List Configuration Screen). |
| What is AJAX? | Asynchronous JavaScript and XML (AJAX) is a set of technologies that operate on the client side of a web page, allowing web applications to “talk” asynchronously with a web server. This allows the web page to send and receive data in the background, without disturbing how a web page behaves and displays information. That means parts of the web page can be constantly changing (e.g., showing real-time data) without having to reload the entire web page. By checking the “Enable ACL matching of XML HTTP (AJAX) Requests” checkbox, you can tell KioWare to check website URLs that use AJAX against the browsing access list that you set up. The access list tells KioWare which URLs to allow or block (for more details on the browsing access list, see Security Tab, Browsing Access List Configuration Screen). |
| What is AltGr mode? | On many international keyboards, the AltGr key appears where the right Alt key would normally be (right of the space bar). Using this key in combination with other keys can produce special symbols (e.g., AltGr + E creates a Euro symbol, €). When using the built-in virtual keyboard of KioWare, no AltGr key appears (only a right Alt key). You can use the keyboard filtering settings (see Keyboard Filtering Tab, Keyboard Filtering) to tell KioWare to block use of the Ctrl and Alt keys. After blocking these two keys, if you still want to allow use of the left Ctrl key and/or right Alt key for creating special symbols, then you can select one of two options from the “Unsafe AltGr Mode” setting.
- Only Allow LeftCtrl + RightAlt + Digits (0-9) - Lets you use the combination of left Ctrl key, right Alt key, and any digit from 0 to 9 (e.g., left Ctrl + right Alt + 5 is allowed, but left Ctrl + right Alt + E is blocked). This option also lets you use any key with only the left Ctrl or with only the right Alt (e.g., right Alt + E).
- Allow LeftCtrl + RightAlt + Any Key - Lets you use the combination of left Ctrl key, right Alt key, and any other key (e.g., left Ctrl + right Alt + 5 and left Ctrl + right Alt + E are both allowed).
Note: Even though all other Ctrl/Alt key combinations that were blocked on the Keyboard Filtering tab will remain blocked, use of these two settings is not the safest way to set up KioWare and is not recommended (see below). |
| Why is AltGr mode unsafe? | This mode overrides any keyboard blocking you have set up (see Keyboard Filtering Tab, Keyboard Filtering). That means if you set KioWare to block all use of all Ctrl and Alt keys, AltGr mode still allows certain key combinations that include Ctrl and Alt, which makes your kiosk or computer less safe. Before turning on AltGr mode, it is recommended that you contact KioWare Support to see if there is a safer way to set up KioWare to meet your needs [(Toll Free USA: 877-843-4790; International: 1-717-843-4790) or our website (www.kioware.com)]. |