Configuration Tool
See Related Terms and Questions at the end of this section for more details on KioWare security.
Security Tab
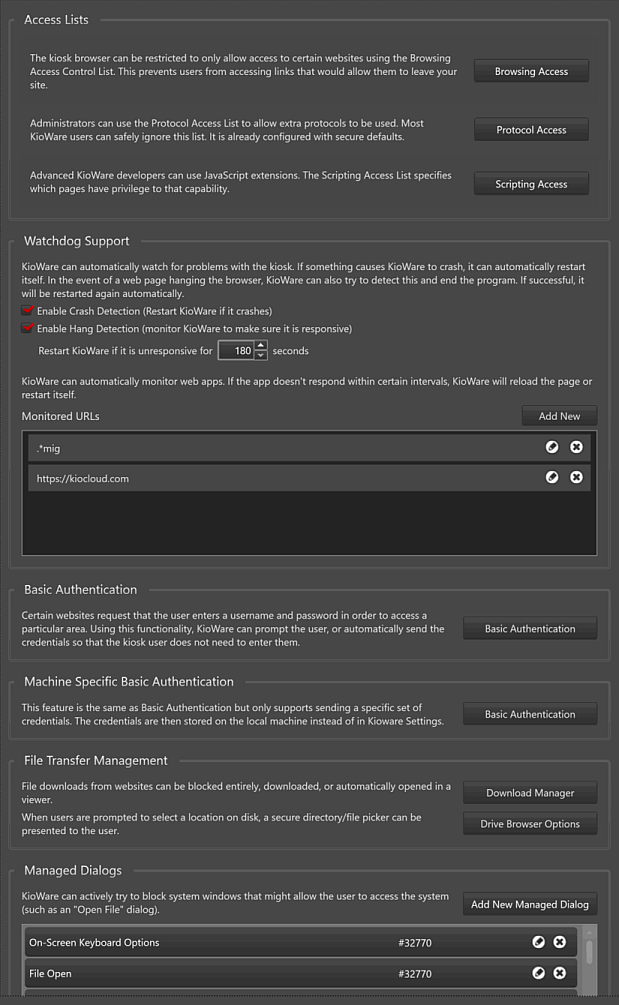
The settings below appear on the main Security tab. This tab contains “Protocol Access”, “Browsing Access”, and “Scripting Access” buttons that show additional screens for setting up access lists for protocols, browsing, and scripting, as well as the “Add New” button for adding managed dialogs. For details on these windows, see the sections for Protocol Access List Configuration Screen, Browsing Access List Configuration Screen, Scripting Access List Configuration Screen, and Managed Dialog Configuration Screen that come after these Security tab settings.
Access Lists
Watchdog Support
- Enable Crash Detection - If checked, the built-in watchdog will “watch” KioWare as it continues running and will restart if KioWare crashes.
- Enable Hang Detection - If checked, the built-in watchdog will “watch” KioWare as it continues running and will restart if KioWare “hangs up” and stops working.
- Hang Detection Timeout - The length of time (in seconds) that the built-in watchdog can remain “hung up” and unable to “talk” with KioWare before it restarts itself (default is 180).
- Web App Monitoring List - Use these settings to configure which browsed URLs are to be monitored by KioWare.
- Add New URL - Select the “Add New” button (see image above) to add a new URL to be monitored. A popup window displays the related settings (see “Edit URL” below for descriptions of these settings). Added URLs show in the “Monitor URLs” pane below.
- Edit URL - Select the pencil icon (see image above) to edit a URL. A popup window displays the following settings:
- URL - Enter a URL (or file path). KioWare will compare this URL to URLs that are browsed during a user session, and if there is a match, the URL will be monitored. Select the “EXACT”/“REGEX” icon to switch between exact matching or matching for a regular expression (see Browser Tab, Related Terms and Questions for details on regular expressions).
- Reload Webpage Timeout - Set the maximum amount of time (in seconds) that a page hang-up can last before the URL is automatically reloaded.
- Restart KioWare Timeout - Set the maximum amount of time (in seconds) that a page hang-up can last before KioWare is restarted
- Remove URL - Select the “X” icon (see image above) to remove a URL.
Basic Authentication
Machine Specific Basic Authentication
File Transfer Management
Managed Dialogs
- Add New - Select this button to add a new managed dialog (see Managed Dialog Configuration Screen below). The “Rule Description” and “Protocol Access” will show in this pane.
- Edit (pencil icon) - Select this icon to change the settings of a managed dialog.
- Delete (“X” icon) - Select this button to remove a managed dialog.
Browsing Access List Configuration Screen
This screen is shown when you select the “Browsing Access” button on the main Security tab (see Security Tab, Access Lists above).
- Watch Now!
- Our “how-to” video KioWare for Windows: ACL Troubleshooting shows how to find out what sites are being blocked, make changes to blocking rules, log blocking data to event logs, and do other ACL troubleshooting.
Setting Up Your Access List
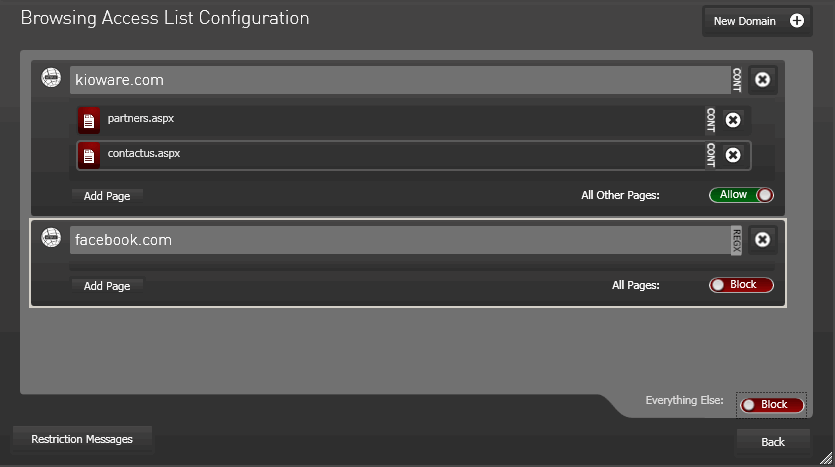
Select the “New Domain” button to add a new domain and any related pages to the browsing access list. These settings will show (see image above).
- Domain Name (unlabeled) - Enter the new domain. Do NOT include beginning protocols (e.g., “http://” or “https://”).
- CONT - Select this icon to set matching for regular expressions (“REGX” label) or for CONTAINS matching (“CONT” label). (For more details on regular expressions and CONTAINS matching, see Browser Tab, Related Terms and Questions.)
- Add Page - Select this button to add a new web page to the domain.
- Page Name (unlabeled) - Enter the new web page for the domain.
- CONT - Select this icon to set matching for regular expressions (“REGX” label) or for CONTAINS matching (“CONT” label). (For more details on regular expressions and CONTAINS matching, see Browser Tab, Related Terms and Questions.)
- All Pages and All Other Pages - Select the arrow to the right of these buttons and choose how if entire domains or individual web pages that are not added under a domain should be allowed or blocked. The button will be labeled “All Pages” if no pages are added to a domain, and will appear as “All Other Pages” when web pages are added.
- Everything Else - Select the arrow to the right of this button and choose if all other domains and web pages that are not in your browser access list should be allowed or blocked.
Changing Your List
On the Browser Access List Configuration screen (see image above), select any textbox or dropdown menu and make changes. KioWare will automatically save your changes.
Removing Domains/Pages In Your List
“X” icons appear to the right of domain and page entries (see image above). Select any “X” icon to remove a domain or web page. Icons to the far right are for domains, and indented icons are for pages. Note: Removing an entire domain will also remove settings for all pages within that domain.
Messages and Logs for Blocked Domains/Pages
Select the “Restriction Messages” button (see image above) to set options for blocking and creating Event Logs. These settings will show.
- Log Blocked Matches - If checked, any attempts to visit domains or web pages that you told KioWare to block (see above) will create Windows Application Event Logs (for more details on Event Logs, see Browser Tab, Related Terms and Questions).
- Do NOT Block - If checked, KioWare will not block any domains or web pages, regardless if you told KioWare to block them (see above). Note: This setting gives you the lowest amount of security for browsing and should only be used for testing purposes.
- Disable “Navigation Blocked” Page - Sets if KioWare will or will not show a “Navigation Blocked” page when you try to access a blocked domain or web page (see Setting Up Your Access List above for details on allowing/blocking domains and pages).
- If Checked - The “Navigation Blocked” page will not show.
- If Unchecked - The “Navigation Blocked” page will show. If the “Show URL in Block Message” checkbox (see below) is also checked, the blocked URL will be included on the page. The page can also be customized (see Configuration Tool, Customizing Warning and Other Pages for details on locating and customizing this file).
- Show Block Message - If checked, enter a block message in the box below. Any attempts to visit domains or web pages that you told KioWare to block (see above) will show this message, to alert users that blocking has occurred.
- Show URL in Block Message - If checked, the web address of the blocked domain or web page that you tried to visit will appear below the block message.
Protocol Access List Configuration Screen
This screen is shown when you select the “Protocol Access” button on the main Security tab (see Security Tab, Access Lists above).
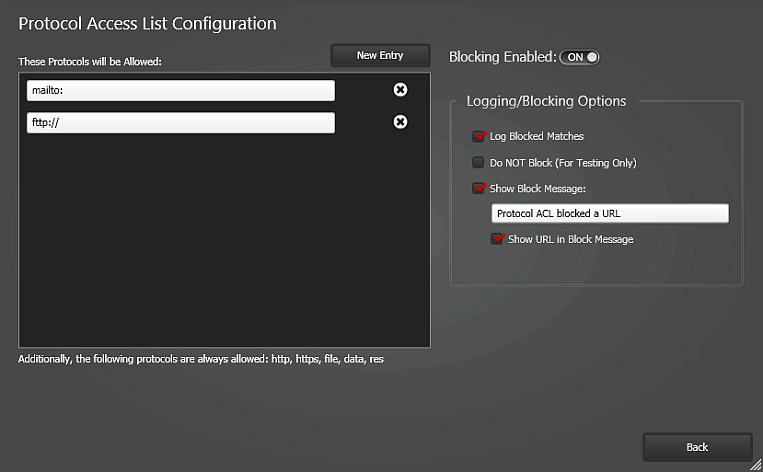
- Blocking Enabled - When set to “ON”, you can use all settings on this screen.
- New Entry - Select this button to enter a new protocol in the pane below.
- Delete (“X” icon) - Select this button to remove a protocol.
Logging/Blocking Options
When the “Blocking Enabled” setting is set to “ON”, you can use these settings for blocking and creating Event Logs.
- Log Blocked Matches - If checked, any attempts to use protocols that you told KioWare to block (see above) will create Windows Application Event Logs (for more details on Event Logs, see Browser Tab, Related Terms and Questions).
- Do NOT Block - If checked, KioWare will not block the use of any protocols, regardless if you told KioWare to block them (see above). Note: This setting gives you the lowest amount of security for protocols and should only be used for testing purposes.
- Show Block Message - If checked, enter a block message in the box below. Any attempts to use protocols that you told KioWare to block (see above) will show this message, to alert users that protocol blocking has occurred.
- Show URL in Block Message - If checked, the web address of the web page containing the blocked protocols that you tried to use will appear below the block message.
Scripting Access List Configuration Screen
This screen is shown when you select the “Scripting Access” button on the main Security tab (see Security Tab, Access Lists above).
Setting Up Your Access List
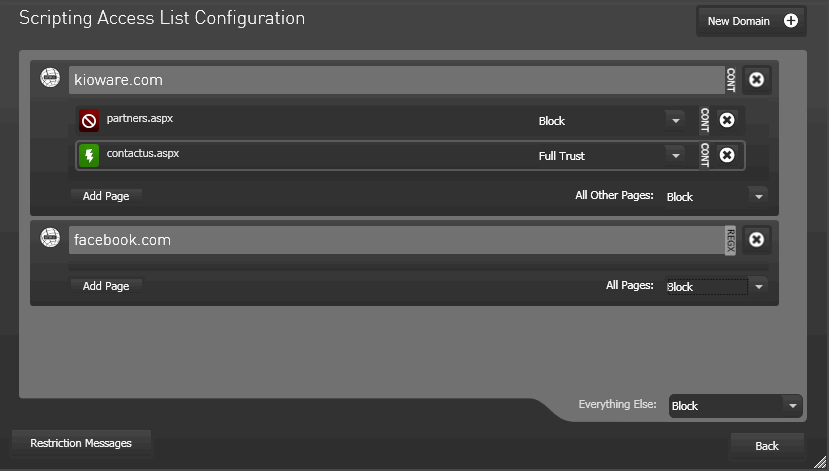
Select the “New Domain” button to add a new domain and any related pages to the browsing access list. These settings will show (see image above).
- Domain Name (unlabeled) - Enter the new domain. Do NOT include beginning protocols (e.g., “http://” or “https://”).
- CONT - Select this icon to set matching for regular expressions (“REGX” label) or for CONTAINS matching (“CONT” label). (For more details on regular expressions and CONTAINS matching, see Browser Tab, Related Terms and Questions.)
- Add Page - Select this button to add a new web page to the domain.
- Page Name (unlabeled) - Enter the new web page for the domain.
- Block - Select the arrow to the right of this button and choose how scripts from this web page should be handled: blocked or allowed with full, medium, or low trust. Pages with blocked scripts show a red icon to the left, and pages with trust of scripts show different colors: green (full trust), yellow (medium trust), and brown (low trust).
- CONT - Select this icon to set matching for regular expressions (“REGX” label) or for CONTAINS matching (“CONT” label). (For more details on regular expressions and CONTAINS matching, see Browser Tab, Related Terms and Questions.)
- All Pages and All Other Pages - Select the arrow to the right of these buttons and choose how entire domains or individual web pages that are not added under a domain should be allowed or blocked. The button will be labeled “All Pages” if no pages are added to a domain, and will appear as “All Other Pages Block” when web pages are added.
- Everything Else - Select the arrow to the right of this button and choose if all other domains and web pages that are not in your browser access list should be allowed or blocked.
Changing Your List
On the Scripting Access List Configuration screen (see image above), select any textbox or dropdown menu and make changes. KioWare will automatically save your changes.
Removing Domains/Pages In Your List
“X” icons appear to the right of domain and page entries (see image above). Select any “X” icon to remove a domain or web page. Icons to the far right are for domains, and indented icons are for pages. Note: Removing an entire domain will also remove settings for all pages within that domain.
Messages and Logs for Blocked Scripts
Select the “Restriction Messages” button (see image above) to set options for script blocking and creating Event Logs. These settings will show.
- Log Blocked Matches - If checked, any attempts to visit domains or web pages that you told KioWare to block scripts on (see above) will create Windows Application Event Logs (for more details on Event Logs, see Browser Tab, Related Terms and Questions).
- Do NOT Block - If checked, KioWare will not block scripts on any domains or web pages, regardless if you told KioWare to block them (see above). Note: This setting gives you the lowest amount of security for scripts and should only be used for testing purposes.
- Show Block Message - If checked, enter a block message in the box below. Any attempts to visit domains or web pages that you told KioWare to block scripts on (see above) will show this message, to alert users that script blocking has occurred.
- Show URL in Block Message - If checked, the web address of the blocked domain or web page that you tried to visit will appear below the block message.
Basic Authentication Entries Window
This window is shown when you select the “Basic Authentication” button on the main Security tab (see Security Tab, Basic Authentication above).
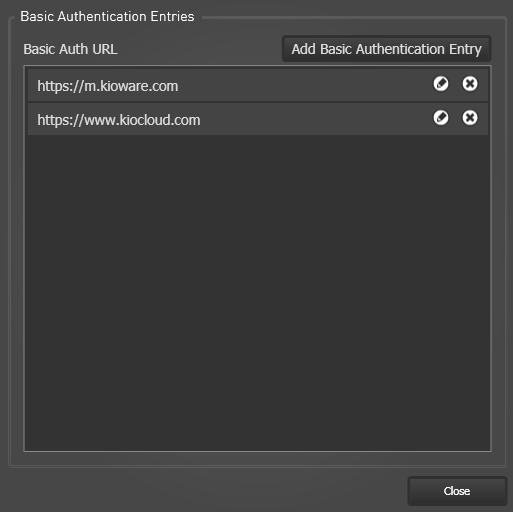
- Add Basic Authentication Entry - Select this button to add a new entry for basic authentication (see below for descriptions of settings). The URL of the web host, followed by a port number (if applicable), will show under the “Basic Auth URL” heading in the pane below.
- Edit (pencil icon) - Select this icon to edit an entry for basic authentication. These settings are shown.
- Mode - Select the mode for basic authenticated websites.
- No Basic Authentication Credentials Sent - No user credentials (generally, username and password) are sent to the basic authenticated website when the user attempts to log onto it.
- Send a Specific Set of Credentials - Specific user credentials will be automatically sent to the basic authenticated website when the user attempts to log onto it. Enter the “Username” and “Password” settings that show when this mode is selected.
- Prompt User for Credentials - The user will be asked to manually enter credentials that will be sent to the basic authenticated website when the user attempts to log onto it.
- Host - The URL of the web host.
- Match Port - If checked, enter a port number that must be matched before a user can log onto a basic authenticated website.
- Realm - The realm set up on the server (collection of web pages/resources and users, all controlled by the same authentication policy).
- Username - (Only available when the “Send a Specific Set of Credentials” mode is selected above) The username to log onto the basic authenticated website.
- Password - (Only available when the “Send a Specific Set of Credentials” mode is selected above) The password to log onto the basic authenticated website.
- Delete (“X” icon) - Select this icon to remove an entry for basic authentication.
Machine Specific Basic Authentication Entries Window
This window is shown when you select the “Basic Authentication” button in the Machine Specific Basic Authentication section of the main Security tab (see Machine Specific Basic Authentication above). Note: Machine specific basic authentication is the same as basic authentication (see Basic Authentication Entries Window above), but only supports sending a specific set of credentials that are then stored on the local machine instead of in your KioWare settings.
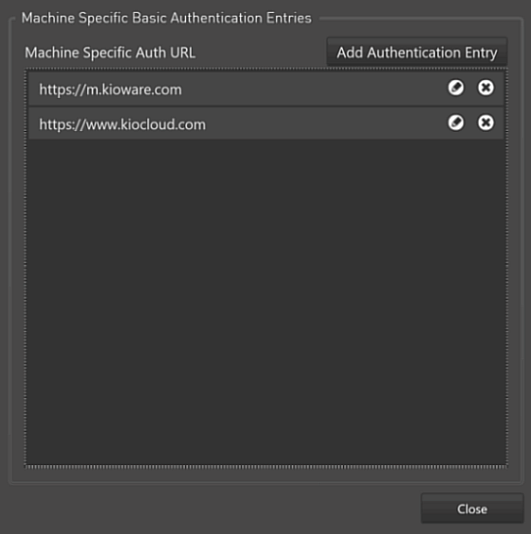
- Add Authentication Entry - Select this button to add a new entry for machine specific basic authentication (see below for descriptions of settings). The URL of the web host, followed by a port number (if applicable), will show under the “Machine Specific Auth URL” heading in the pane below.
- Edit (pencil icon) - Select this icon to edit an entry for machine specific basic authentication. These settings are shown.
- Mode - Select the mode for basic authenticated websites.
- No Basic Authentication Credentials Sent - No user credentials (generally, username and password) are sent to the basic authenticated website when the user attempts to log onto it.
- Send a Specific Set of Credentials - Specific user credentials will be automatically sent to the basic authenticated website when the user attempts to log onto it. Enter the “Username” and “Password” settings that show when this mode is selected.
- Prompt User for Credentials - The user will be asked to manually enter credentials that will be sent to the basic authenticated website when the user attempts to log onto it.
- Host - The URL of the web host.
- Match Port - If checked, enter a port number that must be matched before a user can log onto a basic authenticated website.
- Realm - The realm set up on the server (collection of web pages/resources and users, all controlled by the same authentication policy).
- Username - (Only available when the “Send a Specific Set of Credentials” mode is selected above) The username to log onto the basic authenticated website.
- Password - (Only available when the “Send a Specific Set of Credentials” mode is selected above) The password to log onto the basic authenticated website.
- Delete (“X” icon) - Select this icon to remove an entry for machine specific basic authentication.
Creating Download Rules
This window is shown when selecting the “Download Manager” button on the main Security tab.
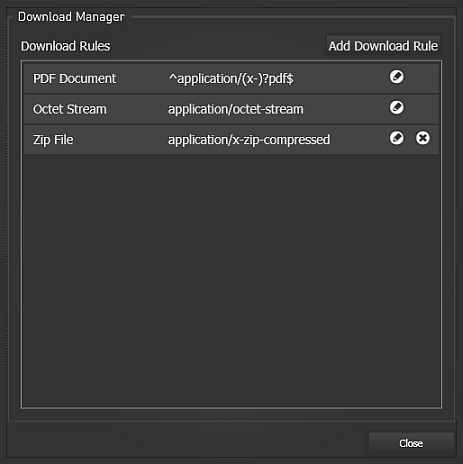
- Add Download Rule - Select this button to add a download rule. (See Download Rule Editor below for details on the related settings.)
- Edit (pencil icon) - Select this icon to edit a download rule. (See Download Rule Editor below for details on the related settings.)
- Delete (“X” icon) - Select this icon to remove a download rule. Note: Rules for PDF and octet stream are system rules and cannot be removed.
Download Rule Editor
This window is shown when selecting the “Add Download Rule” button (if adding) or the pencil icon (if editing) on the Download Manager window (see image above).
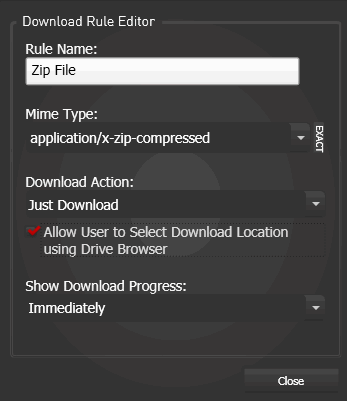
- Rule Name - Enter a name for the rule.
- Mime Type - Select a mime type from the dropdown. Select the “EXACT”/“REGEX” icon to switch between exact matching or matching for a regular expression.
- Download Action - Select the action KioWare will complete when trying to download a file of the selected mime type.
- Block the Download - Prevents KioWare from downloading the file.
- Just Download - Prompts KioWare to download the file for saving to a specified location (see “Allow User to Select Drive Location using Drive Browser” below).
- Open in Current Browser - Prompts KioWare to download the file and open it in the currently displayed browser.
- Open in New Tab - Prompts KioWare to download the file and open it in a new tab of the KioWare browser.
- Open with Default System Program - Prompts KioWare to download the file and open it in the default application for opening this type of file, as set on your kiosk or computer.
- Re-evaluate Mime Type from Filename - Prompts KioWare to use the filename of the download to determine the mime type. This mime type value will override the “Mime Type” setting above.
- Allow User to Select Drive Location using Drive Browser - (Only available when “Download Action” is set to “Just Download”) If checked, the KioWare drive browser is enabled (see Customizing Your Drive Browsing Window below for more details on the browsing window).
- Show Download Progress - Tell KioWare when to show the download progress meter (options are “Delayed”, “Immediately”, and “Never”).
Customizing Your Drive Browsing Window
Selecting the “Drive Browser Options” button shows a slider. If set to the “On” position, four tabs show: Access List, Windows Text, Appearance and Colors, and Options (see specific sections below for details on each tab).
Access List Tab
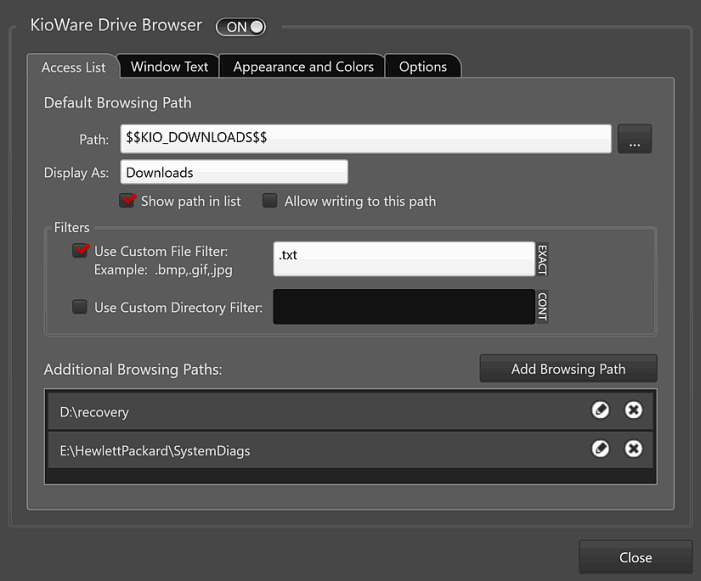
Default Browsing Path
- Path - Enter the browsing path that shows when the drive browsing window is first opened, or use the “Select” button to select a specific path.
- Display As - Enter a custom label for the path entered above.
- Show path in list - If checked, the path entered above will show in the dropdown list of available paths, located at the top of your drive browsing window.
- Allow writing to this path - If checked, users will be able to save or copy files to the above path.
Filters
- Use Custom File Filter - If using exact matching (see below), check this box and enter the file extension to match on. Only files with this extension will show when the path is used in the browsing window. (Advanced users may also enter a regular expression; see Browser Tab, Related Terms and Questions for more details on regular expressions).
- EXACT - Select this icon to set exact matching (“EXACT” label) or matching for a regular expression (“REGX” label). For more details on regular expressions, see Browser Tab, Related Terms and Questions.
- Use Custom Directory Filter - If using CONTAINS matching (see below), check this box and enter text to match on. Only files containing this text in their filenames will show when the path is used in the browsing window (e.g., if you enter a path of c:\KioWare and text of “sys”, only files under this path that contain “sys” in their filename will show in the browsing window).
- CONT - Select this icon to set matching for regular expressions (“REGX” label) or for CONTAINS matching (“CONT” label). For more details on regular expressions and CONTAINS matching, see Browser Tab, Related Terms and Questions.
Additional Browsing Paths
- Add Browsing Path - Select this button to allow another browsing path (other than the default path entered above) to be used in the browsing window. A popup window shows additional settings (see below for descriptions of them).
- Edit (pencil icon) - Select this button to edit an additional browsing path. A popup window shows these settings.
- Path - Enter a browsing path (other than the default path) that can be opened in the browsing window, or use the “Select” button to select a specific path.
- Display As - Enter a custom label for the path entered above.
- Show path in list - If checked, the path entered above will show in the dropdown list of available paths, located at the top of your drive browsing window.
- Allow writing to this path - If checked, users will be able to save or copy files to the above path.
- Filters - Use the settings below to create any custom filters for the path.
- Use Custom File Filter - If using exact matching (see below), check this box and enter the file extension to match on. Only files with this extension will show when the path is used in the browsing window (Advanced users may also enter a regular expression; see Browser Tab, Related Terms and Questions for more details on regular expressions).
- EXACT - Select this icon to set exact matching (“EXACT” label) or matching for a regular expression (“REGX” label). For more details on regular expressions, see Browser Tab, Related Terms and Questions.
- Use Custom Directory Filter - If using CONTAINS matching (see below), check this box and enter text to match on. Only files containing this text in their filenames will show when the path is used in the browsing window (e.g., if you enter a path of c:\KioWare and text of “sys”, only files under this path that contain “sys” in their filename will show in the browsing window).
- CONT - Select this icon to set matching for regular expressions (“REGX” label) or for CONTAINS matching (“CONT” label). For more details on regular expressions and CONTAINS matching, see Browser Tab, Related Terms and Questions.
- Delete (“X” icon) - Select this icon to remove an additional browsing path (prevent it from being used in the browsing window).
Windows Text Tab
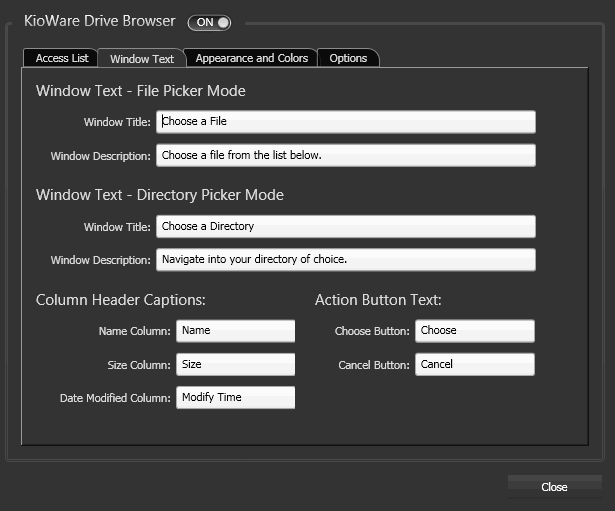
Window Text - File Picker Mode
- Window Title - Enter a title to show in the top blue band when a directory has been selected and files in that directory show for selection.
- Window Description - Enter a description to show below the blue band when a directory has been selected and files in that directory show for selection.
Window Text - Directory Picker Mode
- Window Title - Enter a title to show in the top blue band when no directory has been selected.
- Window Description - Enter a description to show below the blue band when no directory has been selected.
Column Header Captions
- Name Column - Enter a column label to show for the Name column.
- Size Column - Enter a column label to show for the Size column.
- Date Modified Column - Enter a column label to show for the Date and Time Modified column.
Action Button Text
- Choose Button - Enter a text label for the “Choose” button.
- Cancel Button - Enter a text label for the “Cancel” button.
Appearance and Colors Tab
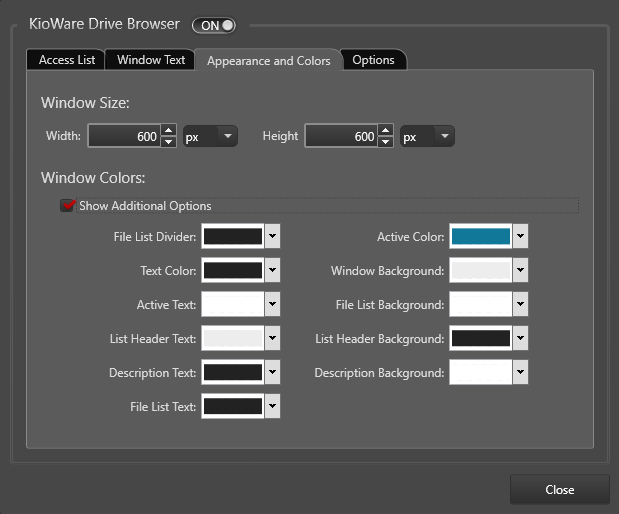
Window Size
Set a custom size for the browsing window. Use the dropdowns to the right of the “Width” and “Height” settings to select the unit of measurement (pixels or percentage of your screen).
- Width - Set the width and unit of the browsing window.
- Height - Set the height and unit of the browsing window.
Window Colors
Set custom colors for the browsing window and any text shown on it. More color settings are shown by checking the “Show Additional Options” checkbox. In all color dropdowns, either Hex or RGB colors can be set, and the bottom slider (labeled “A”) sets the opacity/transparency of the color.
- File List Divider - Set the color of the border around the description pane.
- Text Color - Set the color of text on button labels.
- Active Text - Set the text color of an entry selected in the description pane (before selecting the “Choose” button).
- List Header Text Color - Set the text color of column labels in the description pane.
- Description Text - (Only available if the “Show Additional Options” checkbox is checked) Set the color of any description text that appears at the top of the browsing window.
- File List Text - (Only available if the “Show Additional Options” checkbox is checked) Set the color of filenames, file sizes, and date/time in the description pane.
- Active Color - Set the background color of an entry selected in the description pane (before selecting the “Choose” button).
- Window Background - Set the background color for the browsing window (but not for buttons, file path box, and directory dropdown).
- File List Background - Set the background color of entries that are not selected in the description pane.
- List Header Background - Set the background color of column labels in the description pane.
- Description Background - (Only available if the “Show Additional Options” checkbox is checked) Set the background color of any description text that appears at the top of the browsing window.
Options Tab
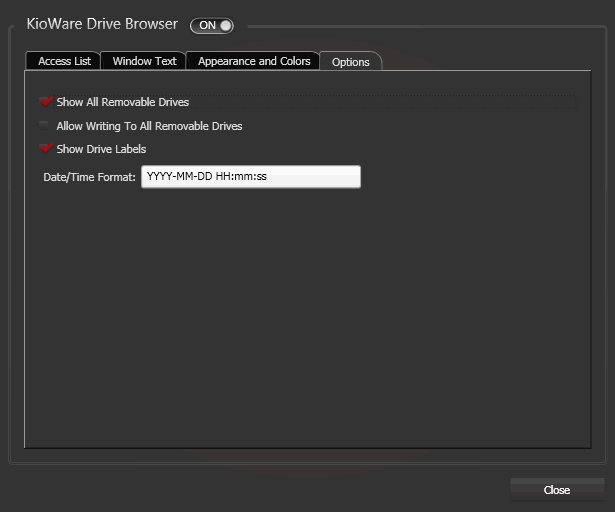
- Show All Removable Drives - If checked, any removable drives (e.g., a USB drive) that are connected to your kiosk or computer will show in the directory dropdown of the browsing window.
- Allow Writing To All Removable Drives - If checked, users will be able to save or copy files to all removable drives.
- Show Drive Labels - If checked, the drive label entered in the “Display As” box (see above) will show in the directory dropdown, instead of the path. This is true for both the default path and any additional paths you add.
- Date/Time Format - Set the format for how date and time show in the browsing window (e.g., YYYY-MM-DD HH:mm:ss).
Managed Dialog Configuration Screen
Note: The sections that follow are for advanced users only.
This screen is shown when you select the “Add New” button on the main Security tab (see Security Tab, Managed Dialogs above).
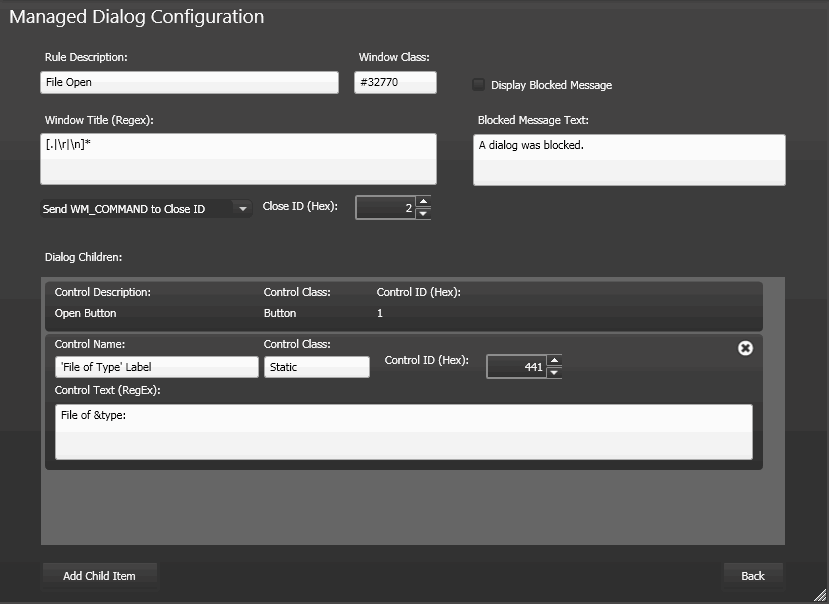
Adding Managed Dialogs
- Rule Description - A descriptive title of the dialog/window to be blocked (for information only).
- Window Class - The window class ID of the dialog/window to block. The class ID must be an exact match (is usually #32770 for dialogs). If using the third-party software Spy, it is the value specified by “Class Name” on the Class tab of the Windows Properties dialog.
- Window Title - The window title of the dialog/window to be blocked. For maximum pattern matching utility, the window title is treated as a regular expression. Visit http://en.wikipedia.org/wiki/Regular_expressions for more information on regular expressions.
- Display Blocked Messages - If checked, the message defined in “Blocked Message Text” will be displayed (see below).
- Blocked Message Text - Enter the message to display when the dialog/window has been blocked.
- Action (unlabeled) - Sets the action to be performed (Hide Window, Ignore, Minimize Window, Send WM_CLOSE Message, or Send WM_COMMAND to Close ID).
- Close ID (Hex) - Determines how the dialog/window will be closed. Common values are below (these are typical but are not always used):
-
| Values | Action |
| 0 | Select the “X” button. |
| 1 | Select the “OK” button. |
| 2 | Select the “Cancel” button. |
Adding Dialog Children
- Add Child Item - Select this button to add a new child item to your managed dialog. The settings will appear in the pane above (see image above, second entry in the Dialog Children pane).
- Control Name - A descriptive title of the child item to be blocked (for information only).
- Control Class - The class name of the child item (MUST be an exact match). Common values are below:
-
| Child Object | Control Class |
| Button | Button |
| Dropdown List | ComboBox |
| Static Text Field | Static |
| Tab | #32770 |
- Control ID (Hex) - The control ID of the child item. Common values are below:
-
| Control ID | Child Object(s) |
| 0 | General tab |
| 1 | “OK”, “Open”, “Save”, and “Print” buttons |
| 2 | “Cancel” and “Remind Me Later” buttons |
| 6 | “Install”, “Close Tabs”, and “Yes” buttons |
| 7 | “Don't Install” and “No” buttons |
| 430 | “Print Range” button |
| 433 | “Printer” button |
| 441 | “File of Type” and “Save as Type” labels |
| 442 | “File Name” label |
| 443 | “Look In” and “Save In” labels |
| 470 | Dropdown list |
| 3000 | “Browse” button |
| 7904 | “Close All Tabs” button |
- Control Text - The value of the control. For static text fields, this will be the actual text. For maximum pattern matching utility, the control text is treated as a regular expression. Visit http://en.wikipedia.org/wiki/Regular_expressions for more information on regular expressions.
- Edit - Select any child item in the Dialog Children pane (see image above, first entry in pane), and it will open in the pane for you to make changes (see image above, second entry in pane).
- Delete (“X” icon) - Select this icon to remove a child item.
Related Terms and Questions
If the answers to your questions are not in this table, visit the KioWare website for frequently asked questions (FAQs).
| My domains and pages are not being blocked/allowed as I set them up on my browsing access list. | When you add a domain and block or allow it, any pages you add under that domain automatically have a block/allow state that is the opposite of what your domain has. Pages that are allowed cannot be added under a domain that is allowed, and pages that are blocked cannot be added under a domain that is blocked. Below are some hints for setting up your browsing access lists. |
How do I allow a domain and all pages in it? | On the Browsing Access List Configuration screen, select the “New Domain” button to add a new domain entry in the pane below. Set the “All Pages” slider to “Allow”. |
How do I block a domain and all pages in it? | On the Browsing Access List Configuration screen, select the “New Domain” button to add a new domain entry in the pane below. Set the “All Pages” slider to “Block”. |
How do I allow an entire domain except for a few pages that should be blocked? | On the Browsing Access List Configuration screen, select the “New Domain” button to add a new domain entry in the pane below. Set the “All Pages” slider to “Allow”. For each individual page to be blocked, select the “Add Page” button and enter the page name. |
How do I block an entire domain except for a few pages that should be allowed? | On the Browsing Access List Configuration screen, select the “New Domain” button to add a new domain entry in the pane below. Set the “All Pages” slider to “Block”. For each individual page to be allowed, select the “Add Page” button and enter the page name. |
| KioWare shows a page that says “Page Blocked”. | This is the Navigation Blocked page that shows when you are trying to access a blocked domain or web page (see above for details on allowing/blocking pages). Select the “Go Back” button to show the prior page, or choose the “Go to Start Page” button to return to your start page (see General Tab, Start Page URL for details on the start page). The Navigation Blocked page can also be customized (see below). |
| Can I customize the Navigation Blocked page? | Yes, it is an HTML file that can be customized. See Configuration Tool, Customizing Warning and Other Pages for details on locating and customizing this file. |
| What is Basic Authentication? | A basic authenticated website will ask for a user's credentials (generally, username and password) when the user tries to log onto it. This information lets the website verify who the user really is. In KioWare, you can automatically send a basic authenticated website your username and password when you log on (select the “Send a Specific Set of Credentials” mode on the Edit Basic Authentication Entry window and enter the “Username” and “Password”). Or, you can tell KioWare that you want to manually enter them each time you try to log onto the website (select the “Prompt User for Credentials” mode on the Edit Basic Authentication Entry window). You can also tell KioWare to automatically use basic authentication when importing remote settings files (see General Tab, Remote Settings Configuration, Authentication Settings). |
| What is mime type? | Multipurpose Internet Mail Extensions (MIME or mime) types give special labels to file types, often based on file extensions, so that web browsers, web browsers, and other Internet programs manage the files in the same way. A mime type generally has two parts: a type (e.g., text or application) and a subtype (e.g., html or pdf), separated by a diagonal slash (/). A server may issue a mime type for a file (e.g., text/html or application/pdf), and then a client (computer or machine trying to talk to the server) will then know how to handle that file (e.g., treat it as a standard HTML document and show it in the default browser, or use the default PDF viewer to show it). In KioWare, the “Mime Type” and “Download Action” are paired using the Download Rule Editor window (to show this window, use the “Download Manager” button on this tab and then select the “Add Download Rule” or the pencil icon). |
| What is mime type matching? | Matching of mime type tells a client (see above) what patterns to look for in a mime type and what to do if these patterns are found. The “EXACT”/“REGEX” icon on the Download Rule Editor window (see above) tells the client how to match mime type. If set to “EXACT”, the client looks for only an exact match, with no other characters before or after. If set to “REGEX”, the client matches on a regular expression (see Browser Tab, Related Terms and Questions for details on regular expressions). Once a match is found, the client will complete the “Download Action” you assigned to the mime type (see above). |
| What do I enter into the text and background color settings for the browsing window? | Enter a specific hex color value (e.g., #8B0000) or color name (e.g., red). |