Configuration Tool
Command Line Arguments
See Related Terms and Questions at the end of this section for more details on command line arguments. See also Browser Application, Command Line Arguments.
You can pass commands into the Configuration Tool (Config Tool) by using the command line arguments below.
| Argument | Description |
| ConfigName | Tells the Config Tool to override both the default file path to your settings file and the default user data directory. |
Example: | "KioWare Client Config.exe" ConfigName=MultiTest
This means that the settings file is
C:\ProgramData\KioWare Client\KioWareClientSettings-MultiTest.kwconfig
and the user data directory is
C:\ProgramData\KioWare Client\UserData-MultiTest
|
Substitution Variables
Some parameters allow certain variable names to be passed into the Config Tool to set specific values on your kiosk or computer, such as your user data directory or kiosk name. The substitution variables below only apply to any parameters related to URLs, such as settings file path and custom user agent strings (see Browser Tab, Related Terms and Questions for more details on user agents).
| Variable | Description |
| $$KIO_PROGDATA$$ | Our data directory |
| $$KIO_USERDATA$$ | User data directory |
| $$KIO_UPDATEROOT$$ | Content update root |
| $$KIO_SITENAME$$ | Site name |
| $$KIO_KIOSKNAME$$ | Kiosk name |
| $$KIO_UNITNAME$$ | Unit name |
| $$KIO_DOMAINNAME$$ | Domain or workgroup name of the computer being used |
| $$KIO_COMPUTERNAME$$ | Machine name of the computer being used |
| $$KIO_REG[CompArch]:[RegHive]:PATH$$ | Windows registry of the computer being used (see example below).
[CompArch] = Computer architecture (optional; use default of x86 to access the 32-bit registry or specify x64 to access the 64-bit registry).
[RegHive] = Registry hive [required; specify LM (HKEY_LOCAL_MACHINE) or CU (HKEY_CURRENT_USER)]. |
| $$KIO_ENV:VarName$$ | Environment of the computer being used (see example below) |
| $$KIO_USERKEYBOARDS$$ | Path to user-defined Keyboards directory |
| $$KIO_USERTOOLBARS$$ | Path to user-defined Toolbars directory |
| $$KIO_DOWNLOADS$$ | Path to download directory |
| $$KIO_ATTRACTLOOPER$$ | Full URL or path to attract looper page |
| Examples |
StartPageURL $$KIO_KIOSKNAME$$ $$KIO_UNITNAME$$
This adds your kiosk name and unit name to your start page URL.
|
$$KIO_REGx64:LM:SOFTWARE\Microsoft\Windows NT\CurrentVersion\ProductName$$
The above syntax indicates a 64-bit computer architecture, the HKEY_LOCAL_MACHINE registry hive, and a path of SOFTWARE\Microsoft\Windows NT\CurrentVersion\ProductName for the Windows registry. It can be used in commands that call the registry variable such as this one below, which also calls the environment variable:
alert(KioApp.DoUrlSubstitution("Env: $$KIO_ENV:VarName$$\\nReg: $$KIO_REGx64:LM:SOFTWARE\Microsoft\Windows NT\CurrentVersion\ProductName$$"))
|
Config Tool Menu
See Related Terms and Questions at the end of this section for more details on the Config Tool menu.
At the top left of the Configuration Tool (Config Tool) is a button with three horizontal lines stacked on top of each other. This is the “Menu” button. (Note: Some users may call it the “Hamburger” button because, with a little imagination, you may see that this looks like a hamburger inside two halves of a bun). Selecting this button shows a left pane containing additional buttons (see image below). To hide this pane, select the “Menu” button again, or click (or touch, if using a touchscreen) anywhere on a Config Tool tab.
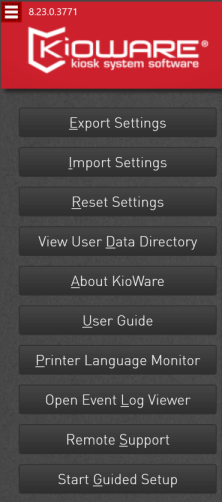
Shortcut keys are available for each option in the Config Tool menu and are based on the letter that is underlined (see image above). Simply depress both the “Ctrl” and “Shift” keys and then press the key for the underlined letter. Note: A shortcut key is also available for starting the KioWare browser (see table below for all Config Tool shortcuts).
| Config Tool Shortcuts |
| Ctrl + Shift + | Menu Option | Other Function |
| K | | Start KioWare Browser (see Browser Application) |
| E | Export Settings | |
| I | Import Settings | |
| R | Reset Settings | |
| D | View User Data Directory | |
| A | About KioWare | |
| U | User Guide | |
| P | Printer Language Monitor | |
| L | Open Event Log Viewer | |
| S | Remote Support | |
| G | Start Guided Setup | |
- Export Settings - Use this button to save your current Config Tool settings to a settings file (.kwconfig or .kwpkg file). If images on custom toolbars and other resources are set up in your Config Tool (in the user data or other directory), you will see a special window, asking if you also want to save them to your settings file. Check the box if you do. In the dropdown, select if this file should overwrite all data in the Config Tool or merge with current data when imported.
- Import Settings - Use this button to load a settings file (.kwconfig or .kwpkg file) into the Config Tool.
Note: You will not be able to load a settings file if it was created from a version of KioWare that is newer than the version (revision) you are running. If you try to do this, an error message shows and an error is logged in the Event Log (see Browser Tab, Related Terms and Questions for more details on Event Logs). To find the KioWare revision that you are currently running, select the “About KioWare” option (see below). Revision numbers for the browser application and Config Tool are in parentheses and begin with an “r”. To check the revision number of a settings file, open the file in a text editor (e.g., MS Notepad) and find the _appRev setting (near the top).
- Reset Settings - Use this button to clear all of your settings in the Config Tool and load the default settings.
- View User Data Directory - This button takes you to your user data directory.
- Watch Now!
- Our “how-to” video KioWare for Windows: User Data Directory shows how to open the user data directory, include all files stored there when exporting or importing your Config Tool settings file, use substitution variables when setting a start page that is placed in it, and avoid issues with browsing access list and scripting permissions by moving files there.
- About KioWare - This button shows the About KioWare screen. The screen contains information that is useful to our customer support staff (e.g., KioWare version number and revision number) if you ever have technical problems.
- User Guide - This button opens the online KioWare user guide (on the KioWare website), which explains what is included in KioWare and how to use it.
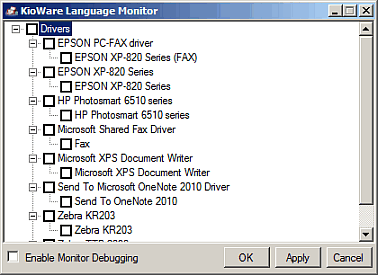
- Printer Language Monitor - (Only available with the Basic and Full models of KioWare) Use this button to set up printer language monitoring of one or more printers connected to your kiosk or computer. This window then shows for selecting the specific printers whose language you want to monitor (see image below). Checking the “Enable Monitor Debugging” checkbox allows you to debug the language monitor. (For more details on printer language and printer language monitoring, see Monitored Devices, Print Job Language Printers and Related Terms and Questions in the Devices Tab section of this user guide.)
- Open Event Viewer - This button opens the MS Windows Event Viewer (see image below), which shows all the Event Logs for KioWare. Select an entry to show its details below. Double click an entry (or press and hold it, if using a touch screen) to open the details window. You can then use the “Copy” button (bottom left) to copy the details or use the arrow buttons (at right) to scroll through the details of multiple logs.

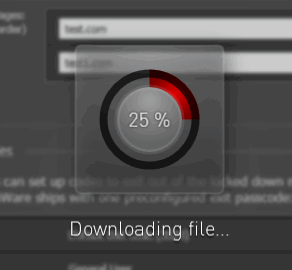
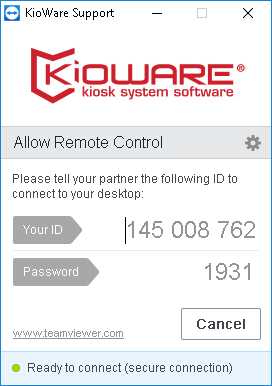
- Remote Support - Use this button to open the TeamViewer QuickSupport application (see www.teamviewer.com for more details). This application allows KioWare Support to have remote access to your computer or device for ease in troubleshooting any issues with running KioWare. When selecting this button for the first time, a progress meter shows while the TeamViewer QuickSupport executable file is being downloaded (see image below).
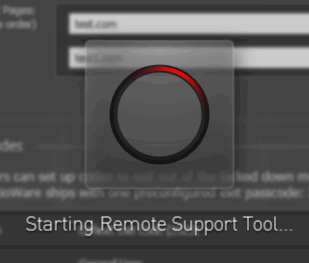
Next, a second progress meter shows as the remote support tool is being started (see image below).
The TeamViewer Login window then shows. Enter your user ID and password to allow a KioWare Support rep to connect to your desktop (see image below).
-
Start Guided Setup - Select this option to access the Guided Setup. This popup window appears first, telling you to be sure to back up your settings before continuing.

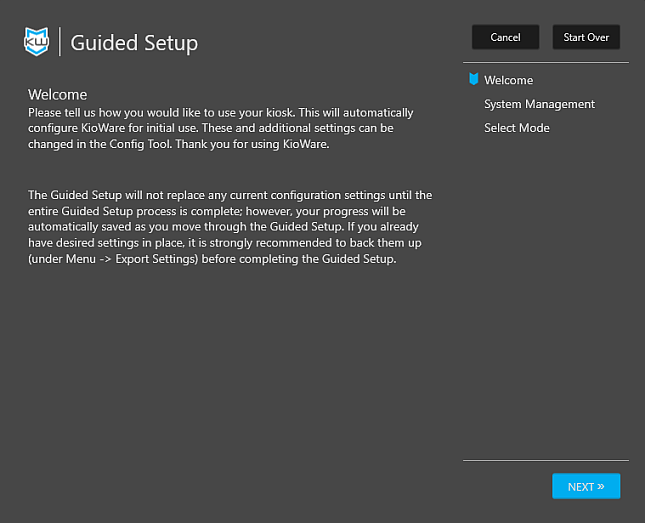
Select “Yes” to open the Guided Setup (see image below), which can help you easily set up the Config Tool in the way that is best for how you want to use your kiosk or computer (to create any type of interactive web setup or set up a non-interactive digital sign).
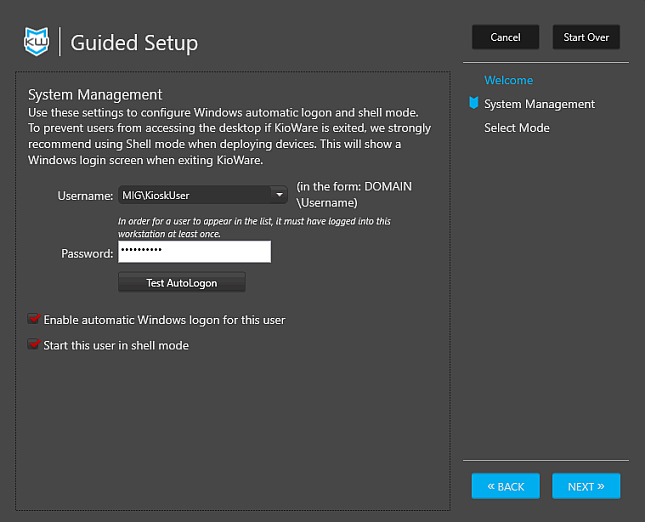
Select the “Next” button and the Guided Setup allows you to turn on MS Windows autologon and set KioWare as the browser shell for each user (except the one you used to currently log on). Select a user (other than the one currently logged on) from the “Username” dropdown and enter the password. If the “Enable automatic Windows logon for this user” checkbox is checked, selecting the “Test AutoLogon” button will check if the logon is successful using these credentials.
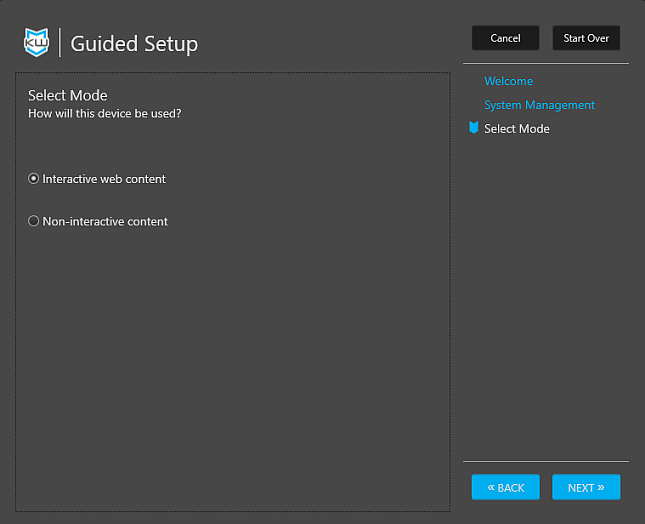
When continuing after a successful or unsuccessful autologon test, you can then set which mode you want KioWare to run (“Interactive web content” or “Non-interactive digital signage”).
The table below describes how you can use the Guided Setup to achieve your purpose (based on the mode you select) and also provides helpful hints for using it. Note: The Guided Setup only contains commonly used settings, and these and any other settings can be changed at any time in the Config Tool, except for portal settings (which can only be changed in the Guided Setup).
| USING THE GUIDED SETUP |
| I Want KioWare to... | Which Option (Mode) to Select | Things You Can Set Up in This Mode |
| Display web-based content that users will be interacting with | Interactive web content | Set if the interactive web content is a portal landing page, video player, KioCall video chat software, or your own custom web content/application (app). All of them allow you to do these things:
- Set amount of time a user session can be active (or inactive) before it ends and a new user session starts
- When there is no user activity, set if custom images/videos should loop or if a custom list of web pages should show sequentially
- Set amount of time that each image/video/web page will show before the next one is shown
- Set up a toolbar containing your choice of buttons and address bar (or choose to keep existing toolbars)
See below for other things that each type of interactive web content allows you to do.
|
| | My Own Content |
- Set the start page URL
- Set up block/allow lists for website domains and pages (or choose to keep existing lists)
- Set how popups are to be handled
- (See above for more)
|
| | Portal Page |
- Set up a simple start page (with your desired title/subtitle, text size/colors, background image, and logo) for accessing a portal
- Set up custom buttons for opening web URLs
- Set the button layout (number of rows and columns buttons are to show in)
- Set up custom categories that can be assigned to custom buttons
- (See above for more)
|
| | Video Player |
- Set up a simple start page (with your desired title/subtitle, text size/colors, background image, and logo) for accessing videos
- Set up custom buttons for opening videos
- Set the button layout (number of rows and columns buttons are to show in)
- Set up custom categories that can be assigned to custom buttons
- (See above for more)
|
| | KioCall |
- Set up credentials for verifying that you have purchased and are running a license of KioCall
- Set how to handle incoming calls
- Set up a simple start page (with your desired title/subtitle, text size/colors, background image, and logo) for accessing KioCall
- Set up custom buttons for opening web URLs or for quick calling of specific users/kiosks/groups
- Set the button layout (number of rows and columns buttons are to show in)
- Set up custom categories that can be assigned to custom buttons
- (See above for more)
|
| Display one or more digital signs | As non-interactive digital signage |
- Set if custom images/videos should loop or if a custom list of web pages should show sequentially
- Set the amount of time for each image/video or web page to display
|
| GUIDED SETUP HELPFUL HINTS |
| Item | Mode/Interactive App | Important Things to Know About This Item |
| Categories | | |
Add Options to “Category” Dropdown | Interactive web content/portals, videos, and KioCall |
This dropdown is initially blank. You can add options to it using these steps:
- On the Select Portal Buttons screen (or the Select Video screen if adding videos), select Add Button (or Add Video), choose Category from the Button Type dropdown, enter identifying label text in the Label Text setting.
- Repeat the above step for as many categories that you want to add. Then, when adding any type of button or editing any existing button, these options will be available in the Category dropdown for assigning to the button.
|
| file:/// Protocol | Interactive web content/videos |
You can use this protocol in file paths of local video files, as in this example:
- file:///C:/ProgramData/KioWare Client/UserData/filename.mp4
|
| Substitution Variables | Interactive web content/videos |
You can use substitution variables (see Substitution Variables above) in file paths of local video files, as in this example:
- $$KIO_USERDATA$$/MyKWVideos/filename.mp4
|
Config Tool Banners
When first installing KioWare, the Config Tool will show two top banners: The first one contains a “Contact Us” button, and the second one shows important messages for users. A third banner will show if all KioWare security has been disabled. The sections below provide more details about these banners, and the table below describes the order for showing them.
| Order That Banners Show |
| Contact Us | Messages | Security Warning | Banner Order |
| Always Showing | Showing | Showing | Contact Us followed by Security Warning followed by Messages |
| Always Showing | Not Showing | Showing | Contact Us followed by Security Warning |
| Always Showing | Showing | Not Showing | Contact Us followed by Messages |
Contact Us
The banner containing the “Contact Us” button (see image below) will always show at the top of the Config Tool, regardless of which tab is selected. (See the table above, which describes the order for showing banners.)

When you select this button, KioWare first checks if the kiosk or computer has an Internet connection. A progress meter shows during this check (see image below).
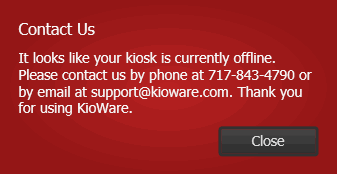
If there is no Internet connection, a popup window shows to provide information for contacting KioWare Support by phone or email (see image below).
If an Internet connection is found, the Contact Us page of the KioWare website will show (see image below).

Messages
The Messages banner (see image below) will show below the Contact Us banner when first installing KioWare. These two banners will continue to appear in this order if the Security Warning banner is not showing (see Config Tool Banner, Order That Banners Show above).

Select the “MORE” link (see image above) to show any messages about the model and version of KioWare that you are running, status of your licensing and support, easiest way to contact KioWare Technical Support, and other important things you may need to know about KioWare. The “LESS” link will then show (see image below) and can be used to hide the messages. Use the “X” button to close the entire message banner. Once closed, the banner will not show again until KioWare is uninstalled and re-installed.
Note: If the kiosk or computer is offline, messages will be logged to the Event Log (see Config Tool Menu, Open Event Viewer above).

Security Warning
When showing, the Security Warning banner (see image below) will always appear below the Contact Us banner (see Config Tool Banner, Order That Banners Show above). This banner alerts you that the “Enable Quick Exit” setting (see Advanced Tab, Debug Settings Tab, Debug Settings, Enable Quick Exit) is enabled, which in turn disables all KioWare security. It is strongly recommended that this setting be disabled before KioWare is used in a production (non-testing) environment.

Import Settings from KioWare Classic
If you want to run KioWare with the same settings you used in KioWare Classic, use the KioWare Classic Settings Import Tool to transfer your KioWare Classic settings to KioWare. In Windows 8.x, this tool can be found by selecting the “Search” option (hover mouse at bottom left corner to show this option at the top of the Charms bar). Enter “KioWare” and select “KioWare Classic Settings Importer” from the search results. In Windows 7, 10, and most other versions, select the “Start” button, type “KioWare”, and select “KioWare Classic Settings Importer” from the list that shows above.
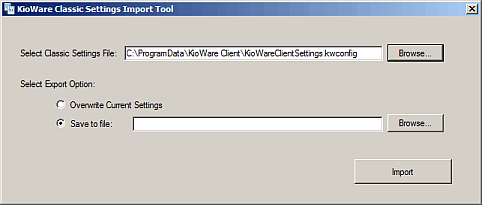
Use these settings to “tell” the KioWare Classic Settings Import Tool how to transfer your KioWare Classic settings, and then select the “Import” button.
- Select Classic Settings File - Enter the URL or file path of your KioWare Classic Settings file, or use the “Browse” button to select a file.
- Select Export Option - Choose how your settings will be exported from KioWare Classic and imported to KioWare.
- Overwrite Current Settings - KioWare Classic settings will overwrite current KioWare settings.
- Save to file - KioWare Classic settings will be saved to a file that can be imported into KioWare at any time, using the “Import Settings” option of the Config Tool menu (see Config Tool Menu above). Enter a URL or file path (including a filename), or use the “Browse” button to select a file.
Assistive Technology
KioWare strives to accommodate as many types of users as possible, and that is why it can be used with devices and software that assist those with special mobility and accessibility needs (e.g., these products can make it easier to see items on a screen, press buttons, and move through web pages). See Assistive Technologies Tab for specific ways that KioWare can help to accommodate users who may need certain types of assistive technology.
Printing
Setting Up the Default Windows Printer
It is important to set the default Windows printer for users of your kiosk, so that they do not send print jobs to a printer that is unavailable. Follow these steps to set the default printer:
- Create Multiple Windows Accounts - At the very least, set up two user accounts: one for an administrator to use when doing maintenance on the kiosk and one for users of your kiosk. This is recommended so that you can run the KioWare shell. (Additional accounts can also be created as needed.)
- Turn Off KioWare Shell - It is highly recommended that the KioWare shell be used when running KioWare, but it must be turned off in order to set the Windows default printer. Log onto your system administrator account and then follow these steps.
- In the KioWare Configuration Tool, select the “System Settings” tab.
- In the Utility to Change User Settings area, select an account from the “Username” dropdown. Note: You will NOT be able to change the account that you used to currently log in.
- Enter the password and select the “Change User Settings” button.
- Select the option to use Windows Explorer as the user shell, and then select the “Close” button.
- Log On as Kiosk User - The way you do this is based on the version of Windows you are running.
- In Windows 7, select the “Start” button and then select “Switch User”. Next, select the icon for your kiosk user account and log on.
- On the Windows 8.1 Start screen, select your username or picture in the upper right corner to show icons for all user accounts. Select the icon for your kiosk user account and log on.
- On the Windows 10 (and higher) Start screen, select the Windows icon in the bottom left corner. A popup shows, and all existing user accounts are at the bottom of it. Select the account for your kiosk users and log on.
- Set Default Printer - The way you do this is based on the version of Windows you are running.
- In Windows 7, select the “Start” button and then select “Control Panel”. In the top right corner of the Control Panel, set “View by” to “Category”. Under “Hardware and Sound”, select “View Devices and Printers”. Icons appear for all available printers. Right click (or touch and hold, if using a touch screen) on the printer for kiosk users, and then select “Set as default printer”.
- On the Windows 8.1 Start screen, right click (or press and hold, if using a touch screen) the Windows icon in the bottom left corner. Then select “Control Panel”. Once the Control Panel is open, the steps are the same as for Windows 7 (see above).
- On the Windows 10 Start screen, the steps are the same as for Windows 8.1 (see above).
- Turn On KioWare Shell - It is highly recommended that the KioWare shell be used when running KioWare.
- In the KioWare Configuration Tool, select the “System Settings” tab.
- In the Utility to Change User Settings area, select an account from the “Username” dropdown. Note: You will NOT be able to change the account that you used to currently log in.
- Enter the password and select the “Change User Settings” button.
- Select the option to use KioWare as the user shell, and then select the “Close” button.
Setting Up Receipt Printers and Other Printers
Besides the Windows default printer, certain other printers can also be used with KioWare:
- Receipt printers, unmonitored (Epson, Hengstler, Zebra, and more)
- Ticketing and other printers, unmonitored (Boca, Custom Engineering, Stimare, and more)
- Print Job Language (PJL) printers, monitored (for more details on PJL printers, see Devices Tab, Related Terms and Questions)
- Other monitored printers (Citizen, Custom Engineering, and more)
To set up these printers in KioWare, use the Devices Tab in the Configuration Tool. The steps are listed below for each type of printer. For specific devices that fall under these printer types, visit the Devices page of the KioWare website.
| Printer Type | Setup |
| Receipt Printers (unmonitored) | On the Devices Tab, select the “Add Output Device” button (see Devices Tab, Output Devices), and then select the printer type from the “Device Type” dropdown. As needed, enter all other settings (based on the device, different settings may show such as “Friendly Name”, “Device Name”, “Description”, or “COM Port”), and then select the “Close” button. |
| Ticketing and Other Printers (unmonitored) | On the Devices Tab, select the “Add Output Device” button (see Devices Tab, Output Devices), and then select the printer type from the “Device Type” dropdown. As needed, enter all other settings (based on the device, different settings may show such as “Friendly Name”, “Device Name”, “Description”, or “COM Port”), and then select the “Close” button. |
| PJL Printers (monitored) | On the Devices Tab, select the “Add Monitored Device” button, and then select “PJL Printer” from the “Device Type” dropdown (see Devices Tab, Monitored Devices, Print Job Language Printers). Enter the settings at the top of the window (“Friendly Name”, “Device Name”, and “Description”), select all printers to be monitored, turn on/off the “Enable Debugging” and “Restart Spooler” settings as needed, and then select the “Save Changes” and “Close” buttons. |
| Other Monitored Printers | On the Devices Tab, select the “Add Monitored Device” button, and then select the printer type from the “Device Type” dropdown (see Devices Tab, Monitored Devices). As needed, enter all other settings (based on the device, different settings may show such as “Friendly Name”, “Device Name”, “Description”, or “COM Port”), and then select the “Close” button. |
| New Printers | The list of printers that KioWare supports continues to grow, so be sure to check the Devices page of the KioWare website for updates. |
Customizing Message Popup Windows
In KioWare, you can override the MS Windows system icons in message popup windows. Some examples of these are below.
| Icon | Shows on These KioWare Windows |
| Exclamation | Session End Warning and Inactivity Warning |
| Information | JavaScript Alert |
| Question | JavaScript Confirm |
To use custom icons, first open your user data directory (under C:\ProgramData\KioWare Client\UserData) and create a subfolder called DialogIcons. Place your custom icons in this subfolder, and they will automatically show on the message windows. Icons MUST be .png files that are 32x32 in size. Refer to the table below for image naming. Note: You do not need to create all of these custom images; the default image will appear for any that do not exist.
| Image Type | Custom Image Filename |
| Application | Application.png |
| Exclamation | Exclamation.png |
| Error | Error.png |
| Information Only | Information.png |
| Question/Prompt for Answer | Question.png |
| Shield | Shield.png |
| Warning | Warning.png |
Customizing Warning and Other Pages
KioWare includes a few built-in pages that can be customized (e.g., the default start page and pages that show warnings to users). Follow the steps below to access and customize these files.
- Open the KioWare Config Tool, select the top left “Menu” button (shown as three horizontal lines), and then select “View User Data Directory” (see Configuration Tool, Config Tool Menu for details on the “Menu” button). This opens the UserData directory (folder), which is located within the KioWare Client directory.
- The KioWare Client directory also contains the Assets directory. Copy the Assets directory and paste it into the UserData directory (do not drag and drop).
- From this pasted Assets directory, open a file (using MS Windows Notepad or other text-editing software) and make the desired changes. Filenames and descriptions of the pages they generate are listed in the table below.
| Filename | Page Description |
| BrowserClosed.html | Indicates that the currently displayed website is attempting to close the KioWare browser |
| ContentUpdateMode.html | Indicates that KioWare is currently performing a content update (see Kiosk Management Tab, Related Terms and Questions for details on content updating) |
| DefaultStart.html | Default home page (see General Tab, Start Page URL for details on the start page) |
| NavBlocked.html | Indicates an attempt to access a blocked domain or web page (see Security Tab, Browsing Access List Configuration Screen for details on allowing/blocking domains and pages) |
| NavError.html | Indicates an attempt to access a web page that is not currently accessible |
| RendererCrash.html | Indicates that KioWare's renderer (feature that reads HTML and other code and translates it into what you see visually in the KioWare browser) has stopped working |
Related Terms and Questions
If the answers to your questions are not in this table, visit the KioWare website for frequently asked questions (FAQs).
| What are command line arguments and how are they used? | They are small lines of code that issue “commands” to KioWare to complete certain actions. Generally, you place command line arguments in a batch file, and run this batch file to prompt KioWare to carry out the commands. (See Installation, Automatic Installation, Command Line Arguments for commands related to automatic installation of KioWare, and see Browser Application, Command Line Arguments for commands related to the KioWare browser application.) |
| What is a settings file? | It is a JSON file (see below) that contains all your custom settings for KioWare. The settings file will always be found under C:\ProgramData\KioWare Client. Use “Export Settings” button to save your settings to a settings file, or load a settings file into KioWare using the “Import Settings” button. |
| What is JSON? | JavaScript Object Notation (JSON) is a type of code that is generally used in text files for handling many types of data. The text in a JSON file can be read and used as a data format by any programming language, and is easy for machines to create or read. JSON files can be used to save and store data (e.g., an event or activity, or music or movie playlists) or to transfer data (e.g., from a server to web-based software or in RSS feeds from social media sites). In KioWare, JSON files can be used to store custom settings, addins, or files in your user data directory (see below), and can also be used to reload these items into KioWare (see above). Note: JSON both stems from and looks a bit like some of the code in the JavaScript programming language, but it is a separate type of code that is not based on any programming language and should not be confused with JavaScript (see Browser Tab, Related Terms and Questions for more details on JavaScript). |
| What is the difference between saving my settings to a .kwpkg file vs. a .kwconfig file? | When using both the “Export Settings” and “Import Settings” buttons, you can choose between these two different file types. A configuration (.kwconfig) file contains only your custom settings for KioWare. The package (.kwpkg) file can include your custom settings as well as addins that are loaded and any files stored in your user data directory (see below). The configuration file (KioWareClientSettings.kwconfig) and the package file (KWSettingsFiles.kwpkg) will always be found under C:\ProgramData\KioWare Client. |
| Can I manually update a settings file? | Settings in a config file and all items in a package file appear in JSON code (see above) and can be opened in any text editor such as Notepad or the KioWare Client Jump List Helper that installs with KioWare (used by default). You might be able to find and edit your custom settings within this JSON code, but code for the other items in a package can be tricky to read and is not recommended to be changed manually. |
| What is the SaveID in the settings file? | Each settings file contains a SaveID value, which is simply a unique identifier found at the top (generally shown as "SaveId": "UniqueSaveID"). This value automatically changes when you use the “Export Settings” button to overwrite a settings file with an updated one. KioWare looks for the SaveID and checks if it has been used before. So, if you manually make changes to the settings file, you will need to change the SaveID (it can be set to any value, as long as it is changed). Otherwise, KioWare will link the SaveID to the previous version of the settings file and ignore your recent changes. |
| Can KioWare automatically load updates to my settings file? | Yes, using the General tab, you can tell KioWare to automatically load or update a settings file (see General Tab, Remote Settings Configuration). |
| What is my user data directory and where can I find it? | It is a directory (located at C:\ProgramData\KioWare Client\UserData) that KioWare automatically creates when installed. Anything you place in this directory will not be deleted when you upgrade or uninstall KioWare. Use this directory to store attract screens, custom images, custom virtual keyboards (see User Interface Tab, Related Terms and Questions for details on custom virtual keyboards), or any other files that you want to use with KioWare. When you use the Config Tool to set up custom images (e.g., for toolbar buttons), those images are automatically copied to this folder. Within the user data directory is the attract looper directory, which is used when you want Attract Screen mode to continuously loop through multiple images, videos, web pages, etc. (see Attract/Inactivity Tab, Attract Screen Mode, Using Local Folder Contents). As a shortcut, you can use the “View User Data Directory” button to quickly open your user data directory. |
| What is the Assets directory and where can I find it? | Just like the UserData directory (see above), the Assets directory (located at C:\ProgramData\KioWare Client\Assets) is also automatically created when KioWare is installed. This directory stores HTML files that generate the default start page (see General Tab, Start Page URL) and other warning pages. When a copy of the Assets folder is pasted into the UserData directory, its HTML files can be opened (using MS Windows Notepad or other text editor) and customized. |
| What are Event Logs? | Event Logs are created to store details on the conditions of software/systems when an issue or the potential for an issue arises, such as the source (software/system component) associated with the troublesome conditions, user, and computer name. Event Logs can be generated at three levels: Error (critical issue), Warning (non-critical issue), or Information (information only). To help troubleshoot problems with KioWare, it is often useful to view the Windows Application Event Log for related log entries. When you select the “Open Event Viewer” button in the Config Tool menu, you will show the Event Logs for KioWare. For details on the different types of Event Logs and how they relate to KioWare Server, see Kiosk Management Tab, Remote Monitoring. For details on Event Logs relating to script errors, see Browser Tab, Related Terms and Questions.
|